It’s time to plan a new, fun and exciting wine club party. Marking our 9th year as a wine club calls for an exciting and celebratory theme. Our group loves dressing up, so we needed a theme that would elevate this special anniversary. Our wine selection for this tasting party, Bordeaux Blancs was recommended by one of my friends and since this meeting is being held in the early summer, I thought a light, crisp, elegant, chilled white wine would be refreshing and encourage a light menu as well.
It’s essential to conduct a bit of research on the chosen wine to ensure that our food choices complement the wine and enhance our tasting experience with each bottle.
Per Google Search: Bordeaux blanc—also referred to as white Bordeaux—is a tasty white wine. In general, a white Bordeaux is made with a blend of two or more grapes. These grapes, however, must come from the Bordeaux region of France. This region is known for distinct wines produced from grapes such as Sauvignon Blanc and Sémillon.
I also found the article “Breaking down Bordeaux Blanc” on HartandCru.com. The passage presents an intriguing insight into the transformation of Bordeaux from a deep red wine to a white version and the history associated with that transformation.
When traditionally thinking of France, I tend to lean towards the City of Light – Paris – for my design. However, I’ve already applied that theme for several other wine and book clubs gatherings, and I wanted to find a new approach. I’ve been playing with the idea of a casino themed party for some time, but wanted to elevate it.
Who doesn’t love a good James Bond action movie? I read that the fictional location of “Casino Royale” was in Northern France and then the idea of Monte Carlo was sparked. Monte Carlo is Monaco’s most well known quarter, perched along the French Riviera’s southernmost shore and home of the Monte Carlo Casino. It is also associated with wealth and luxury as the home of the Royal Family.
With this information at hand, I decided to take inspiration from the glamorous images of Monte Carlo, its illustrious Casino and the popular “007 Casino Royale” James Bond movie to create an elegant, and festive environment for my party. Of course there would have to be some time set aside for a little “casino” activity and that would require props starting with casino chips.
Photo by Helena Jankoviu010dovu00e1 Kovu00e1u010dovu00e1 on Pexels.com
Since this “casino theme” has been in the back of my mind for some time, a couple of years ago I found some colorful chocolate candy casino chips that I bought and set aside (at this point I of course would not recommend eating the chocolate). They are as I stated colorful and could easily play the part of a little “wine inspired” betting, but when searching for other casino props, I found a set of 50 $1.00 Monte Carlo chips – which for my purpose works perfectly. We will not be actually betting for money, but I was excited to find the chips with Monte Carlo printed on them.
Colorful chocolate candy chips and Monte Carlo Clay Composite Chips
Note: The chocolate candy chips, covered with an aluminum foil are slippery and hard to stack, but would work in a pinch. The cost for the chocolate and the clay were very similar.
Unsure as to what kind of gambling games we would actually play, I also found a set of black and gold dice, a velvet lined cup and some black, gold and silver plastic playing cards to add to the decor. Next I would have to brainstorm to create wine related games to apply to these props. But for now, on to the other table decor.
Place Cards:
While browsing through Pinterest, I found weddings and other large event posts that had created Secret Intelligence Service M16 007 ID badges. There also were large cut out silhouettes of James Bond and Bond Girls that provided inspiration for my place cards.
I searched Temu and found very inexpensive plastic I.D. pouches. I snipped photos of the guys attending and with a little cut and paste crafting created each a Secret Intelligence ID place card. I used two Bond Girl silhouettes to create place cards for the ladies.
Double sided tape was used to adhere the two cards to my metal stands.
The cards for each couple were attached (using double sided scotch tape) to black metal place card stands that I’ve had for other events to identify where guests should be seated.
The seating arrangement at my events is carefully planned to ensure the comfort of each guest. This involves taking into account specific needs, such as accommodating left-handed individuals to prevent any elbow bumping, providing space for guests with recent injuries, and offering comfortable seating for taller individuals. Additionally, seating rotation allows guests to engage with different groups at each gathering, fostering varied and lively conversations.
This wine tasting event will be sophisticated and elegant. The attire of James Bond and Bond Girl has everyone creating their own interpretation of the theme. One couple thinks they would feel more comfortable representing the “M” and “Q” Bond series characters. Of one thing I know for sure, there will be surprises and fits of laughter to be shared.
To welcome my guests as they arrive, an aperitif (wine based as to not disturb the palate) sets the tone, providing something to sip on as they mingle before the main event. As each bottle is opened and poured into its designated glass, anticipation builds for the tasting to come. Once everything is prepared, guests are invited to savor the various wines, encouraging them to jot down their impressions on a provided scorecard. By selecting a favorite before any food is consumed, everyone can appreciate the purest essence of each wine. As any wine enthusiast understands, the flavors and overall experience of a wine can be significantly influenced by food. It can either elevate its qualities or transform it into a more complementary accompaniment. It has been our practice to select our favorite prior to introducing food to the table. (More about the aperitif in my food edition on this wine party).
On to the napkins:
White napkin folded into a tuxedo jacket, with a white paper towel shirt tucked inside. Bowtie made with black wired edge ribbon. (The link with instructions can be found on my Pinterest page for this Wine Tasting Party Theme).
Bond girl gown folded with a black cloth napkin, tied with ribbon and a small artificial flower. (The link with instructions can be found on my Pinterest page for this Wine Tasting Party Theme).
The Table:
I’ve place a dinner plate on the table for each couple for the purpose of my staging photos. Guests are asked to each bring a small bite for the party. A single dinner plate for each couple to share is an option with space is limited. I have a set of black salad size plates purchased at The Dollar Tree that are placed in a stack on the food buffet table. Each guest has their own smaller individual plate that more easily fits into the space available at my table. With fewer guests, dinner plates can be offered to all guests. Mine is just a space limitation issue.
While this post provides a tantalizing glimpse into our upcoming event, in does not end here. Be sure to stay connected for the second edition that will publish the first week of June, and will include the food, the costumes, the games and the festivities of this evening by FOLLOWING or SUBSCRIBING.
RESOURCES:
Chocolate casino chips (Homegoods)
Monte Carlo Casino chips -set of 50 (Amazon)
Roulette wheel & felt board (Amazon)
Paris Playing cards (The Dollar Tree)
Black and gold Playing cards, dice and cup (Temu)
China dinner plate, (Mikasa, pattern Mount Holyoke)
Goldware – (Wm. Rogers & Son)
Wine glasses (Homegoods -vary)
Etching cream for numbers on glasses (Michaels); Number stencils 1 1/2″ (Etsy)
The day of my Mothers’ Tea Celebration finally arrived, but there was still more planning and preparation to do beforehand. A few additional touches were created to add the essence of our honored Mother, Mary.
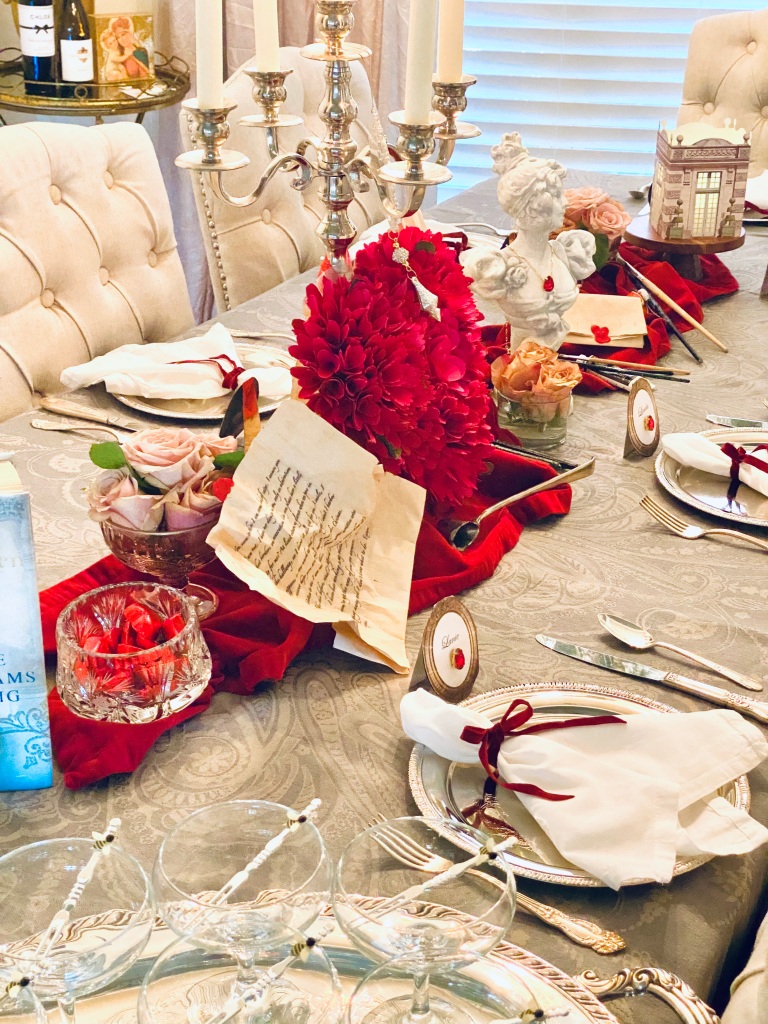
When my friend Jane (whose mother we are highlighting this year) met with me to talk about the things that brought her mother joy, she shared that her mother frequently took her as a young girl to the library, and in doing so Mary passed on her great love for reading to Jane. In an effort to encapsulate this passion, I adorned a stack of vintage books in shades of blue, similar to those used in the table decor, and secured them with lavender and blue ribbons, along with delicate silk flowers. Other book decor was created to further emphasis this important aspect of Mary’s life.
In my previous post, I shared the library card bookmarks that were printed on card stock and embellished with a gold tassel. Additionally, I utilized the first chapter-aged pages of an old paperback book to create napkin rings and the in-between pages to craft a table runner, both of which were inspired by a Pinterest post.
Most of the ladies attending the tea are also members of my book club, so we all share in the same affection for books that Mary did. These book page napkin rings and table runner may reappear in one of our book club luncheons in the future, I mean how can we resist?
Individual pages from the book were glued together to create a table runner, with the bottom edge of pages trimmed and scalloped. Two different shaped hole punches were used to create a eyelet edge along both sides of runner.
The complete place setting includes the small clay pot place cards, the lavender linen hemstitched napkin rolled into a chapter page napkin ring, library card bookmark, plates and teacups.
Jane fondly shared memories of her parents working together in their vegetable garden. To honor this garden theme, the centerpiece mainly comprises small, fresh vegetables such as carved rainbow carrots, little gem lettuce, multi-colored cauliflower florets, and small fresh radishes with greens. Additionally, a few flowers placed in floral water tubes adorn the arrangement, which is displayed in a galvanized container resembling a trough purchased at Hobby Lobby.
Ceramic produce cartons were used to make small arrangements for other areas of the room. The flowers are arranged in small glass jars filled with water and then small pieces of fresh vegetables were tucked around the sides.
The table also displays a small vase of beach sand with a Padre Island sign, symbolizing the memories of Jane’s parents riding on the sand dunes in her Dad’s jeep. Additionally, a vinyl 45 record with a silhouette of a dancing couple represents their love for dancing. This evocative collection of objects were selected to capture the essence of Mary’s story.
The Celebratory Cocktail – A Toast to Mom
As my guests arrive, I offer a light cocktail for sipping as they gather and visit for a while. Once everyone has arrived, I direct them to have a seat in the living room, where we listen to a song discovered several years ago that helps our hearts and minds focus on the purpose of our gathering. Trisha Yearwood’s “I Remember You” expresses all the sentiment intended for this special day. Afterwards, I share a prayer I’ve written for the day, reflecting on the gratitude we all feel for the love and devotion of our mothers and how it has shaped us into who we are today. Then, we move on to the dining room, where the tea sandwiches await, and I move to the kitchen to fill small bowls with warm soup, garnished with edible flowers that will be delivered to the table shortly.
Lavender syrup, simple syrup and champagne.
The Menu
This afternoon’s tea menu offers a delightful variety of spring-inspired dishes. From traditional tea sandwiches to flavorful scones and pastries. Each year a spring soup or salad, and sometimes a refreshing sorbet palate cleanser are added to the menu. The delightful touches of edible flowers from my garden add a colorful and fresh appeal to each dish. As soon as the warmer weather arrives I plant and nurture nasturtiums, violas or pansies and fresh herbs, giving all a weekly drink of fertilizer, to encourage their blooming period offering a variety of colors and flavors to be added to each course of my menu.
Roasted Yellow Pepper with Coconut Milk and ShrimpMango SorbetStrawberry SpinachSpring Corn Coulis with Spring VegetablesCantaloupe sorbet with prosciutto crispFresh carrot and pea soup
This year I used Erin French’s (The Lost Kitchen) Fresh Celery Soup. An interesting use of fresh celery (two full bunches) combined with onion, celery seed, one russet potato, stock and a little cream (or in my case coconut milk) resulting a new refreshing soup experience for me and all of my guests.
Once laddled into small portion tulip shaped bowls, the soup was garnished with a drizzled of browned butter, fresh celery leaves, chive blossoms, radish blossoms, thyme blossoms and a nasturtium.
The Tea Sandwich Course
The tea sandwiches were also created to reflect the garden theme. They included delightful combinations such as fresh heirloom cherry tomatoes with basil, egg salad with a hint of fresh dill and chives, cucumber paired rice wine vinegar and fresh dill, and cranberry chicken salad, each adorned with edible violas, chamomile, basil, radish, and chive blossoms. The attention to detail in both the flavors and the garnishes truly brought the garden theme to life and the tea sandwiches were light leaving room for the next course.
Egg salad stripe made with a stencil and smoked paprika.
The Scone Course
Scones are a delicious part of the tea menu, but if made too large can make getting to the pastry course difficult. In order to enjoy a small dose of this tradition, I made a bite sized (or two) 2 inch toasted pecan scone flavored with both vanilla paste and a small amount of rum exact. The top of each was then brushed with a little cream and sprinkled with some coarse turbinado sugar, to create a delicate crunch.
Toasted Pecan Scone
2 1/2 cups all-purpose flour
1/3 cup sugar
2 1/2 teaspoons baking powder
1/2 teaspoon kosher salt
6 tablespoons very cold unsalted butter, cubed *
1/2 cup chopped toasted pecans
3/4 cup plus 3 tablespoons cold heavy whipping cream divided
1/2 teaspoon vanilla paste (or extract)
1/2 teaspoon rum extract (optional)
1 large egg
turbinado sugar or sanding sugar (optional)
Preheat oven to 350 degrees. Line a rimmed baking sheet with parchment paper or silpat or silicone liner (for smaller scone size you will need two baking trays).
*Cut cold butter into small cubes and place in the freezer for 10 minutes
In a large bowl, whisk together flour, sugar, baking powder, and salt. Using a pastry cutter or two fork, cut the cold cubed butter until it resembles coarse crumbles. Add pecans stirring to evenly distribute into mixture.
In a small bowl or two cup measuring cup, whisk together 3/4 cup plus 2 tablespoons cream, vanilla, rum extract and egg. Add cream mixture to the flour mixture, stirring until moist. (If dough seems dry, add more cream 1 tablespoon at a time until all of the dry ingredients are incorporated without being sticky or wet. Work mixture gently with your hands. Try not to over handle to avoid a tough scone.
Turn out dough onto a lightly floured surface, gently knead dough 4 to 5 times. Use a light sprinkle of flour as needed on the surface to avoid sticking and rolling pin. Roll out dough to a 1 inch thickness. Using a 2 1/4 inch fluted round cutter, dip cutter into flour and tap off with each cut. This size makes close to 30 small scones. Place scones fairly close together on the baking sheet (this helps to keep them from spreading and falling over). Brush the top of each scone with cream and then sprinkle with turbinado sugar. Place tray of scones in the freezer for 5 to 10 minutes.
Remove from the freezer and bake until edges of scones are golden brown and a wooden pick inserted in centers comes out clean, approximately 20 minutes.
The Pastry Course
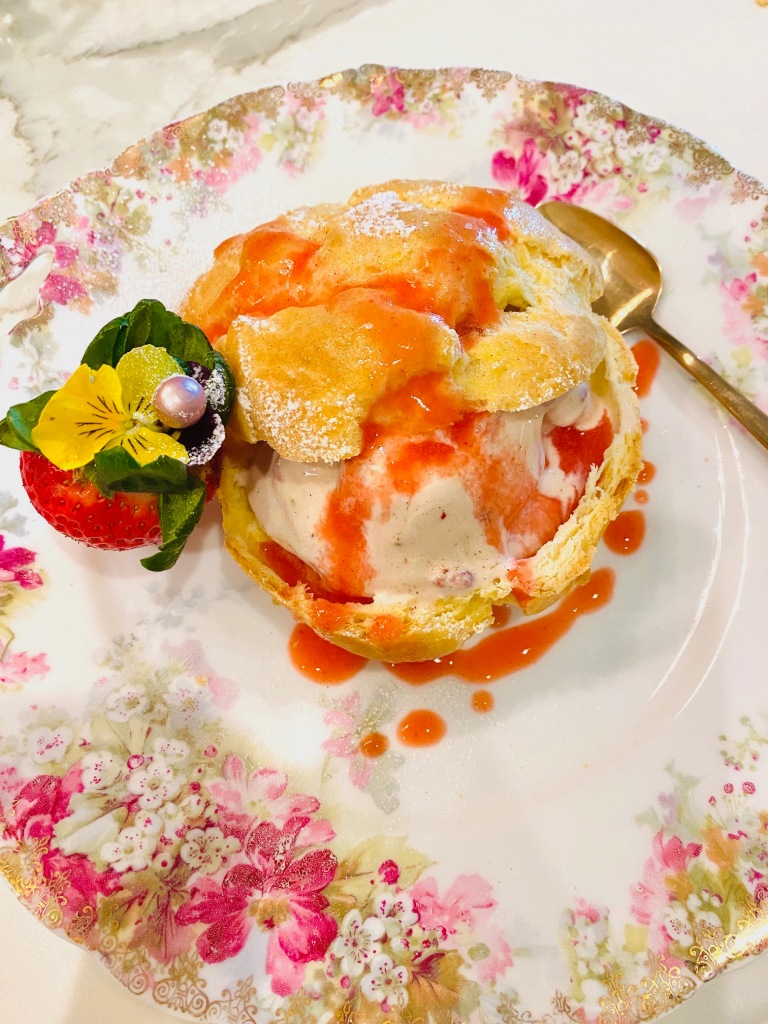
For the pastry or dessert course, I like to have a variety of flavors and textures – something fruity, something chocolatey, and something a little crunchy. While I usually prefer making most of the menu from scratch, there are moments when a shortcut comes in handy. To cover the chocolate and vanilla elements, I purchased oversized petit fours from a local bakery, leading me to halve them for just the right portion. To cover the fruity element, I whipped up a delightful no-bake mini cheesecake with a biscoff crust, topped with vibrant strawberry preserves. For the crunchy component, I introduced a peanut butter cookie packed with chopped mini peanut butter cups, a small gesture to honor Mary’s fondness for Reese’s peanut butter cup candies.
As our tea celebration came to an end, I distributed prepared boxes of cookies and bagged scones for everyone, along with a pair of garden gloves and a packet of seeds as favors.
Marking another great day of reflection and shared memories of our Moms, our time had come to an end. While watching a series about a bar that Garth Brooks has built in Nashville, I came across one of his interviews where he shared some wise words from his father. With tear-filled eyes, the ever emotional Garth shared a statement that stuck with me and hit the core of what this tea represents: “We don’t love our parents the way we should until they’re gone.“
If your Mom is still with you, cherish her, give her your patience, your compassion, and your time. Later in life, my mother didn’t want a physical gift; in fact, I found many of them never used after her passing. What Mom wanted was the gift of spending time together. So each Mother’s Day, I’d search for something special to do with her. An exhibit at the museum, a Broadway musical, or high tea at a downtown hotel. Afternoon tea was just one of those shared gestures that Mom enjoyed the most and became the signature celebration of her memory.
If your Mom has gone home to the Lord, take a moment to remember her. We celebrate our Moms with an afternoon tea. Celebrate yours by doing something in her honor that she loved doing, either alone, with your family or a group of friends. I promise she will be smiling down on you with a full heart.
Wishing everyone a blessed and Happy Mother’s Day! What a gift and honor it is to be a Mom.
Note: The fresh vegetables were later used to create a salad and a fresh garden soup.
RESOURCES:
Galvanized metal container centerpiece, blue and lavender ribbon, (Hobby Lobby)
3 1/2 inch clay pots and 3D butterflies (previously purchased at The Dollar Tree)
Garden gloves and seed packets (The Dollar Tree)
Bubble glass salad plate with gold trim (Homegoods)
The spring season arrives with a slow, easy pace, gently nudging nature’s dormant slumber to rise and shine. It beckons us toward our outdoor patios and decks, where we can comfortably enjoy the fresh, slightly breezy air and the sweet scent of blooming shrubs and trees. Now we can have an alfresco late morning breakfast or sip a late afternoon cocktail free of the bitter cold or soon to come blistering heat. One should cherish this beautiful time of year by celebrating outdoor gatherings and attend outdoor events to revel in the fresh air and sunshine.
I’m especially fortunate to live in an area that celebrates and supports local artists and musicians, with frequent fairs and free outdoor concerts during this time of year. There is also a nearby river for boating and watersports and Lake Pontchartrain for sailing. On a beautiful sunny day, you will find people walking, running or biking along the lakefront; some families may be gathered for a picnic or barbeque and the few restaurants overlooking the lake are busy with the laughter and chatter of patrons.
On one such Spring morning, I decided to attend the local Antiques and Uniques Festival where I enjoyed a casual stroll while sipping a cup of chai tea latte and browsing through tents filled with antiques, collectables, artisan crafts and unique plants.
At my favorite tent, I found a vintage original nude sketch in a gold frame that I purchased to add to the wall in my primary bathroom water closet. The addition draws the eye up and better emphasizes the high ceilings.
I also was drawn to the cutest pair of heart shaped succulents called Heart Hoya or Sweetheart plant, Native to Southeast Asia. I purchased the sweetheart pair in hope that I could successfully grow mine into a larger version.
While my purchases were not grand, they were joyful finds that I smile at whenever I look at them. Marie Kondo (The Tidying Up Specialist) says we should only keep things that give us joy. When browsing through antique and consignment shops I most definitely only purchase items that give me joy.
Some ladies love jewelry, I’ve always loved dishware, glassware and other entertaining ware. While I don’t like to go overboard, I try to get rid of something that I haven’t used in years when I buy something new in this department. Some of my most recent items over the past few years have been collected and some have been gifts all with memorable stories. Collectables are always better when there is a special story attached.
I’ve always been a fan of Victoria Magazine, a periodical that celebrates the formalities and traditions in history through furnishings, music, literature and travel while featuring rich, elegant table settings peppered with a variety of beautiful crystal, china, teapots and silver of the past. It is what inspires me to incorporate my silver finds when entertaining. While we as a society have moved more towards informality, I treasure the formalities of the past and try to incorporate those elegant touches when entertaining. The intention is to make my guest feel appreciated and special.
We have a fun consignment and estate sale shop with various locations around the Greater New Orleans area that is constantly being restocked with items. Sadly, younger generations don’t usually have an interest in the collected items of the generations before, but with me, their treasured items will live on to be part of celebrations, at least throughout my lifetime.
I often stop in and check out the latest inventory usually leaving with nothing, but in some cases there is either something to keep my eye on, or something that has been marked down that I would love to have.
On one such visit, a few months prior to the holidays I spotted a large beautiful silver tray with handles and little feet that I’ve never seen (or maybe just never noticed) before. It was so elegant and was just the size I could use to place prepared aperitifs for my dinner parties, but the price was over my budget. So I left with the plan that if it was meant for me to have it, it would still be there on one of the shop’s 50% off days. I would simply hold out and keep an eye on it.
The shop came up in conversation with a friend over lunch one day who often attends estate sales. I told her about the tray I was keeping an eye on, hoping for a sale. She inquired about where the shop was located explaining that she had been wanting to go to it, but kept forgetting and didn’t know where it was. After our lunch she went on to the shop and texted me to ask if I had a picture of the tray so she could check out if it was still there. I sent her the picture and a few minutes later she messaged back that it had been sold. I was a little disappointed, but responded -“oh well, it just wasn’t meant to be.”
A month later, just a couple of weeks prior to Christmas, my friend showed up at my house with a large Christmas bag. When she handed it over to me, I furrowed my brow as in “What on earth is in there?” I couldn’t imagine what she had brought in such a large bag. As I pulled away the tissue paper, I could not believe what I saw. There was the silver tray! She had managed to get it for 50% off on the day she went to the shop. It was such an amazing surprise and of course my favorite Christmas gift of the year. And yes, it gives me joy every time I use it and has this lovely story attached to it.
On another visit to the same shop I found these silver plated bowls (below) that have similar patterns, two with a pedestal and one without that I use for nuts and olives at parties. In the back of the shop on the clearance shelf I found these silver plated egg cups (above) for $1.00 each that I use for battery votive candles that I line along my fireplace mantel.
On my very first visit to the shop, I found this 8″ x 10″ black and white original painting of old Paris. It is so detailed and the painting has a beautiful layered texture. I originally left it behind, but it continued to hold in my memory and on my next visit I brought it home.
Another sweet antique gift from a different friend is this candle snuffer that comes in handy at the end of a party. The silver tray was found several years ago in an antique shop and is used frequently.
A few years back I traveled to Atlanta to visit my cousin and her husband. My cousin picked me up at the airport and we stopped in Marietta for lunch. Afterwards we walked around the square and stopped in an antique store a couple of blocks from the restaurant. A set of framed still life paintings with an old world look caught my eye. They weren’t very large, but I tried to imagine them somewhere in my house as I continued to browse around the store.
The horizontal painting is tucked inside a curiot cabinet in my kitchen,
The price was reasonable, so I decided to buy one of the set of three.
During my visit, we alternated between wineries and antique shops throughout the mountains north of Atlanta. As we browsed through the first shop, I mentioned to my cousin and her husband that I wanted to collect silver plated tablespoons to place next to my stove to use as “tasting” spoons when I’m cooking. I had gotten the idea from years of watching Ina Garten – The Barefoot Contessa. It seems no one noticed but me that she had a jar or cup filled with silver spoons that she pulled from to taste her food while cooking. She probably bought hers in the Paris Flea Markets, like I had planned to and haven’t yet made it to Paris. I decided it might be a good idea to buy a couple here and there instead, wherever I might travel or my collection might never happen. It was a usable souvenir again with a story of where each might come from.
Suddenly my cousin’s husband was spotting spoon candidates everywhere. I think I left with about 6. So my spoons are not from a Paris Market, but they are in a cup with “Paris” on it. Ha! Ha!
Once I returned home and looked around my room for a suitable place to hang the painting, I realized one painting wouldn’t be enough. I asked my cousin if she happened to be in Marietta if she would go back to the shop and purchase the other two paintings for me. Thankfully, the rest of the set was still there and they made their way home to me when my cousin and her husband came home for the holidays to visit family.
The two vertical paintings were placed on the wall on each side of my curio cabinet in the kitchen, and the horizontal version was placed inside the curio.
Back in 2022, I found a set of 6 dessert/salad forks with a feminine pattern I had not seen before. After the spoon hunt in Georgia I decided to start searching for dinner forks, knives, teaspoons, etc. with the goal of collecting a complete set of 12 to use at my brunches, lunches and dinner parties. I usually use my Mom’s bronzeware or goldware since most of my dinnerware is trimmed in gold. I’ve always wanted a set of silverware that is usually very expensive, but when I found the smaller forks at a reasonable price I decided it would be interesting to pull together a set with various patterns that would make my set unique, again, each having a story attached.
Gradually over the past few years I’ve managed to collect various pieces and I’m close to having my set of 12, missing a few dinner forks and another set of six of those dessert/salad forks. Just a great reason to keep up the hunt.
A recent visit back to the estate sale shop, I found a small footed tray that looks like the cousin of my gifted large silver tray. Sometimes these trays are very scratched up or the silver is starting to come away from the surface. But this one was beautiful and again, I was able to purchase it on sale.
The tray currently sits on my bar cart presenting a crystal decanter and two glasses.
Last year (2023) on my drive home from Baton Rouge, LA, I decided to stop through a small area referred to as Denham Springs, Antique Village. It had been many years since I visited the area and I was excited to have picked a day when it was quiet with very few patrons. I was able to enjoy my time, casually strolling through each shop and seeking out something special. Tucked away on a clearance shelf was what looked like a silver plated vase, but upon closer examination it was light weighted and seemed like it was actually aluminum made to look like silver. The pattern was really pretty, and I decided not having to clear it (like silver), but having the look of antique silver was a positive.
While preparing the table decor for my annual Mother’s Tea this year, I wanted some pretty vintage books in the blue and lavender color palette I had chosen. While I love old books, they are harder to find (at least for me). Years ago at an estate sale I found an old edition of Jane Eyre, one of my favorite books. Another time I found a set of three hardcover copies of books by the French author Colette, but my books were black and red.
While having lunch with a family friend I mentioned an upcoming book fair that would have some old books, but it wasn’t scheduled until after my tea and I needed to tried to find some books with the right colors. She suggested that she would look through her daughter’s collection when she got home and when she did she found these three books in a pretty shade of blue with lovely gold lettering and designs.
We are the decade of the term “recycle” or “upcycle”. When walking into an Antique store or festival, consignment or estate shop or simple vintage thrift store, there is no way of knowing what kind of treasures may be waiting to be discovered and loved into the future. Whatever your point of interest may be, there is always something to be found and cherished. I try to choose items that I will actually use and not just sit on a shelf somewhere most of the time, but there are also those moments when I find something that adds character to my home like a beautiful piece of art that captures my heart or a stack of old books that provides a layer of the “old, worn, and loved” to my newer decor and furnishing items. These small treasures were once loved by a prior owner and I enjoy welcoming each into my home and continuing to give each the love and care it deserves to live on into the future.
Sources:
The Occasional Wife (Mandeville, LA)
The Copper Rooster (Covington, LA)
Denham Springs Antique Village (Denham Springs, LA)
Spring has officially arrived…. well really it’s been more like “its Spring”, “its cold”, “its Spring”, “its cold”, “its Spring”, but nature has awakened from her winter slumber as evidenced by the blossoms forming in my herb garden, and the new growth and fullness of the shrubs and trees. The fig and lemon trees are both filled with lush green foliage swaying in the breeze. The lemon tree is filled with white blossoms gently touched by a blush of pink, visited daily by busily buzzing bumblebees gathering all of the pollen they can before the blossoms fall and eventually form into the tiny beginning of beautiful bright yellow lemons.
The arrival of Spring means its time to pull together the plan for this year’s Mothers’ Tea held the first Sunday afternoon in May. This will mark the 6th year of setting aside time to remember our mothers who have passed and leave us with the lessons and memories that formed who we are today.
I recently watched a documentary about a bar that Garth Brooks built in Nashville, and he was remembering things that both his mother and his father had said to him throughout his life. Three times he stopped and said with great emotion, “We don’t love our parents the way you should until they’re gone.” How true this hits home and is part of the “why” behind our gathering each year.
This tradition began several years ago after my mother passed away. It was in the month of April when the stores begin to fill with cards and gifts in preparation for Mother’s Day. The loss of my Mom hit me in a new way that inspired me to reach out to friends who also no longer had their mothers and may have experienced the same emotions of loss associated with the holiday.
My mother loved the ritual of afternoon tea that I had introduced her to several years ago, held at local hotels. Whenever she found a little tea cafe she wanted to experience it. I decided that organizing a tea each year in her memory would be something that would have thrilled her.
To help make each year a little something new to look forward to, I had everyone’s name written out on little pieces of paper and placed into a teapot. At the end of our tea, we pulled a name to determine whose Mom would be featured at the next tea. I provided a questionnaire designed to stimulate memories to inspire a theme for the tea with the intention of highlighting the life and interests of each honored Mom.
In the past ( search from the website rather than the app -MENUS: Traditions & Tea category to see the past tea themes) we have had a Stitching Together the Memories of Mom -Seamstress Theme, Mother’s Life of Service, a Nurse Theme, A Little Racey, Beachy and Peacock Theme, Travel Journey Steeped in Faith Theme and this year we will have a Garden Theme “Rooted in the Simple Joys”.
For some of our gatherings the table decor included both mine and some of my Mother’s tea cup collection curated over many years. Other times for simplicity reasons, I used the white with thin gold trimmed teacups from my china.
ROYAL ALBERT -25TH ANNIVERSARY OLD COUNTRY ROSES
I usually schedule a lunch meeting with my friend a couple of months before the date of the tea (this year my friend Jane’s Mom is being featured) to have a conversation about their Mom. I look over their responses on the questionnaire and I try to gather as much additional information as possible. Everyone’s relationship and memories of their mother differ and some have trouble recalling some of the questions I created to help stimulate their memories, so a conversation may reveal something helpful that did not appear on my questionnaire.
Jane described her mother Mary as a wonderful wife, mother and grandmother who lived a stress free life, not ever wanting more than what she had. She met her husband at a naval base where she worked as a secretary in Texas near Padre Island where they often drove the sand dunes in her father’s jeep. Jane described her as a stay at home Mom (once Jane was born), an excellent cook and listener who gave good advice that family and friends sought out. She enjoyed reading (although Jane could not recall her favorite types of books) and they frequented the library. She enjoyed crossword puzzles and visiting with her family on the telephone who lived in various parts of the country. When her husband retired, together they tended a vegetable garden which became part of this year’s theme.
Jane couldn’t recall a favored color or flower – but said her mother looked good in blue. So I chose to use a French blue and lavender color theme for my table. The garden theme has leaned more toward flower gardening only due my inability to find pretty items associated with vegetable gardening. I will be using some miniature veggies as part of my floral arrangements on the day of the tea.
As a wink to her love for crossword puzzles, I found a Mother’s Day version to use as an activity for everyone to fill in at the tea.
Jane remembered many trips to the library as a child, so in addition to vintage books that will be displayed as part of the table decor, I made vintage library card book marks for everyone.
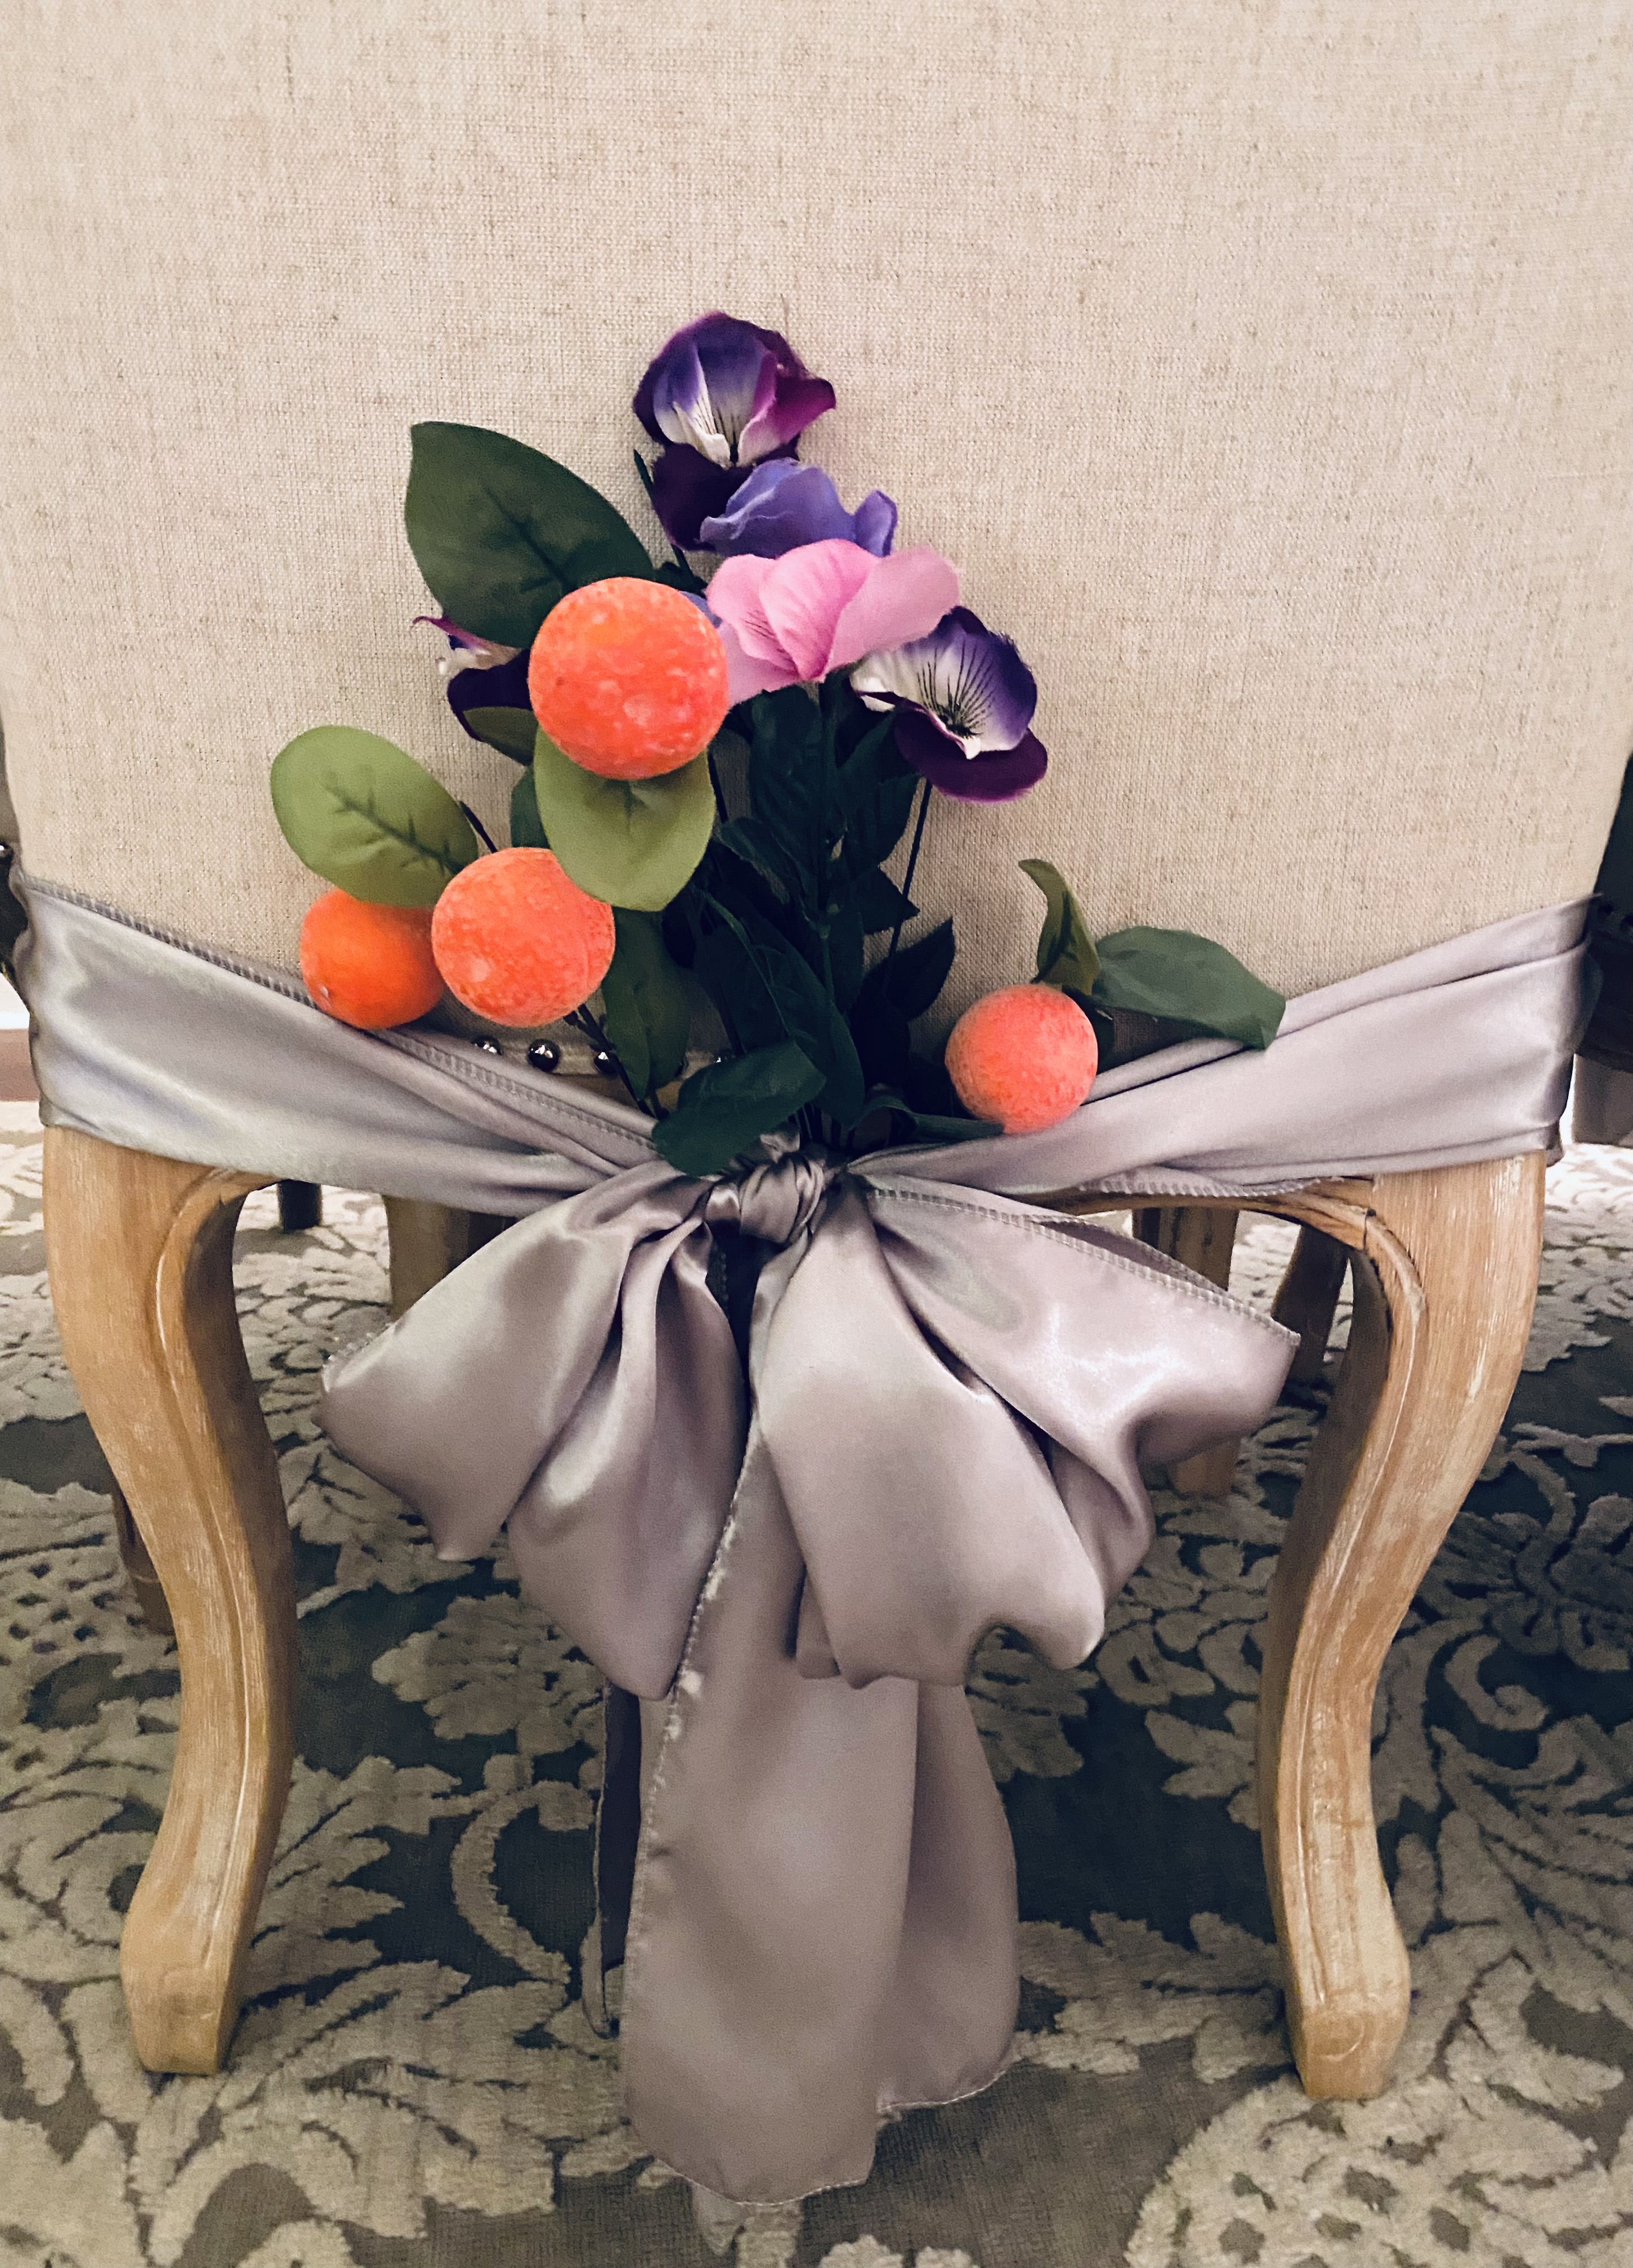
I try to make each year’s decorations unique and new. This year I used satin gray ribbons on the chairs and tucked silk flowers and peach branches in the center.
For place cards, I had 3″ terra cotta plant pots left over from a prior book club luncheon that I filled with faux plants and a garder marker with clip art. I also purchased mini garden shovels and hoes that I tied together with twine to place next to each place setting.
While this is not where the table plan ends, it suggests ideas for a garden themed tea or luncheon. In the next post, the floral and vegetable arrangements, and menu will be provided to complete this special day’s plan.
Make sure to FOLLOW so you don’t miss the final planning and menu. Thank you for stopping by!
Source:
Majestic Purple Campanula (plant) – Trader Joe’s
Garden gloves –The Dollar Tree
Blue and Lavender ribbon – Hobby Lobby
Mini garden shovels and hoes – Temu
Lavender Linen napkins – SFERRA.com
Silk flowers and peaches – The Dollar Tree
Seed Packets – The Dollar Tree
Gold tassels – Temu
Clipart for invitation and place cards – from online
Crossword puzzle – free download search
Library card bookmark – online search
Gray chair sashes –I had these given to me but they can be found online
Plastic garden markers used for place cards –The Dollar Tree
Butterfly stickers (white) – The Dollar Tree
3 D Butterfly stickers (various) – The Dollar Tree (in the past)
Lavender tea towel (table center) – Homegoods (in the past)
Ah, who doesn’t love the enthusiastic high energy of New York City? The first time my daughter and I visited NYC she was in her second or third year of college. The internet was fairly new and available in places like libraries and at least “I” was not yet comfortable with this new technology, so all of my research was acquired from travel books, magazines and a laminated map.
At that time I had to be more cost conscious while still attempting to enjoy as much of what the city had to offer as possible. We stayed in a cost efficient hotel near the Empire State Building that was far from glamorous, but clean and we didn’t spend much time there. While we enjoyed our time, it was more of a learning experience and an opportunity to understand the layout of NYC and how to better manage our day and the time there in the future.
Where to Stay:
The second time I took my daughter to NYC, it was the holiday season between Thanksgiving and Christmas. I quickly learned from our previous visit that staying in midtown Manhattan would provide a central location to most of the venues we wanted to visit and since I did not know if this would be our last trip to NYC I booked a beautiful spacious room at the Waldorf Astoria. (Interestingly enough the hotel has been temporarily closed undergoing renovations since 2017). For some time after the 9/11 attacks NYC tourism was suffering and the price of everything had reduced substantially allowing us to enjoy a more high end hotel than would have normally been unaffordable. For additional visits to NYC later, with friends, hotels on Lexington Avenue (Hilton and The Metropolitan) proved to both provide that desired central location we were looking for.
Our visit approximately 2003
It appears that many of the hotels have since changed ownership, are in the process of being renovated (taking years) and then renamed.. A central location makes walking to various areas easier when using a strategy of focusing on one specific section of the city per day. There is so much to do and see that if not mapped out and somewhat planned in advance, the loss of precious time will limit the experiences the city has to offer.
March 2024 with my daughter and granddaughter
Transportation:
Prior to my first visit to NYC I asked around among my friends that had been to there for advice about various the aspects of traveling there. Most recommended reserving a car service for airport pick up and return. The cost in comparison to a taxi or Uber is NOT significantly more and makes the arrival special and exciting. Having three of us this time in lieu of two and seeing the size of the suitcases my daughter and granddaughter packed, on this trip an SUV was necessary to transport us and all of our luggage. A simple cab or Uber vehicle would not have been able to manage us and all of our luggage, so it is definitely something to consider. Of course there is also the option of a limousine if you want to be fancy, but even celebrities tend to go the SUV route these days.
While the options for transportation include subways, buses and even pedicabs or rickshaws, I am personally more comfortable with a taxi or Uber. Subways and buses of course are more cost efficient, but you also have to endure several stops along the way until you reach your destination. Most recently there were some reported safety (crime related) issues in certain areas of the city’s subways, so I preferred not to risk it. For this trip I chose to use Ubers.
I have used both a bus and subway in the past. In regards to the subway, New Yorkers are extremely aggressive and in a real hurry. Don’t expect any nicities or polite, “after you” gestures. Everyone is in a rush to get to work or wherever they are going and if you don’t push yourself and your group through the crowd you will find yourself standing on the side as one subway car after the other passes you by again and again. You have to aggressively go for it while hanging on to whomever you are with.
Twenty or more years ago the avenues were filled with lines of yellow cabs aggressively pushing their way through the traffic and we had to master the skill of stepping off the curb, raising our hand and yelling “taxi!!!!” to summon a ride. While the taxis are still there and usually appear as options on the Uber app (mostly in the evening hours), on this trip we used an Uber for transportation. There are so many cars available throughout the city that you simply request an Uber “now” on the app and a car will arrive within 2 to 6 minutes. There was no exchange of funds or your card for payment as it was in the past. Payments were made directly on the Uber app. (Excuse my ignorance, but it’s been several years since I’ve traveled to a place where this form of transportation was used and it was actually my first experience with an Uber.)
2024 Spring Break Trip – Intinerary
New York is calling!
Day of Arrival: Dinner & Friends Experience
My granddaughter celebrated her “Sweet 16” in December and I wanted to take her (first trip) and my daughter to New York during their Spring Break. This trip would be different than the previous, because I wanted to plan an itinerary that would appeal to a 16 year old, while also throwing in a couple of different and fun things for my daughter and I that we haven’t done in the past.
Previously, I would usually buy theater tickets for the evening of our arrival. The majority of the day is consumed with flying and getting settled into the hotel leaving a fairly short evening. For this trip however, we left on a Sunday morning and the theater isn’t open on Sundays. So I made a reservation near our hotel for a quick dinner and afterwards we had tickets to The Friends Experience of which my daughter is a huge fan. She continues to watch reruns of episodes to this day. While my granddaughter had not watched a lot of the Friends series, she knew enough about it to enjoy the exhibit and played along with us. (I think she may go home and watch some of it now.)
Note: Another great option to consider for the evening of your arrival is a dinner cruise on the Hudson River. There is usually music entertainment, a nice dinner is served with large windows providing beautiful views of the illuminated Statue of Liberty, Brooklyn Bridge and of course the city’s skyline. It’s a great way to relax and unwind after a day of traveling, but also check off one of those must do things like seeing the city and some of its iconic symbols at night.
Day 1:
The American Natural History Museum
Carriage Ride through Central Park
Dinner at Lillie’s Victorian, Union Square
The Summit One Vanderbilt
For our first full day, I had reserved a carriage ride through Central Park in the morning with tickets to The American Natural History Museum after a quick lunch. As we exited our hotel, the temperature was icy cold with a sharp wind that cut the breath as we pushed against it to walk to a local Starbucks. I immediately knew I had to rearrange the day.
(Logistics note on the planning: The Natural History Museum runs along the west side of Central Park, while the The Metropolitan Museum of Art – (The MET) is on the east side of Central Park.)
I reached out to the carriage company and they moved our reservation to 3 p.m. in the afternoon with no fuss. So we spent the morning in this enormous museum that the girls chose over the MET. We had lunch in the cafeteria inside the museum and strolled through the prehistoric dinosaur and gems exhibits until about an hour before our carriage ride.
Both the American Natural History Museum and the Metropolitan Museum of Art are enormous and can consume an entire day without having nearly seen everything within. My daughter and I went to the MET in our prior visit to NYC and we focused on just a couple exhibits before we grew weary from all of the looking. From there we took a stroll through Central Park, finding ourselves eventually on the west side of the park where Strawberry Fields is located in memory of John Lennon and there is a clear view of The Dakota residence where he was shot and where he and Yoko Ono resided (she still resides there).
The Dakota is a historical landmark, the first of its kind built in 1884 before there was a surrounding city presence. Several blocks down we located the Natural History Museum. It was so late in the day that she only had an hour or two to look around, so on this trip both my daughter and granddaughter enjoyed more than half of the day inside.
We left the museum about an hour before our carriage ride reservation, and elected to walk through the park to the appointed area to meet our driver rather than down the west side street. The sun was shining brightly, and while the air was still crisp and chilly, it was comfortable for the ride. The ride included three stops at iconic locations often featured in movies and the driver assisted with taking photos of us. The green stems and leave of bulbs planted throughout the park had sprouted from the earth, with buds formed at the top and ready to burst within the next week or two. While I know it would have been gorgeous to see everything in bloom, I can’t imagine what it would have done to the girls’ allergies. I think all of that pollen would have made them miserable, but it would have been beautiful.
When the carriage ride ended, the driver pointed us in the direction of a little cafe where we could use the restroom and grab a cup of hot chocolate. Cafe Serafina turned out to be a very cute place where we enjoyed a nice cup of hot chocolate and ended up finding ourselves going back the following day for a late lunch.
As we walked down Broadway, we realized we were suddenly in Times Square and my granddaughter spotted several stores that she wanted to shop in. We browsed through stores until we had to redirect and call for an Uber to get us to our dinner reservation.
I saw a silly Arctic decorated restaurant in Union Square called Lillie’s Victorian on Instagram. It was full of faux white rabbits, polar bears, and white flowers something I thought would appeal to a 16 year old and of course provide the opportunity for pictures. The food was ok, not wonderful but as my granddaughter said they eat about the same thing every week and outside of that it’s hard to please them. We had a little time to burn after dinner before we had to be at The Summit.
The Summit One Vanderbilt- The Empire State Building in the distance.
The Summit at One Vanderbilt is a newer observation experience since our previous visits. In fact there are more than a few options now when back in the day the only option was the Empire State Building. Having been up in the Empire State Building at least four times, I opted for a new experience. The Summit‘s hours span from morning until late at night, but I wanted my granddaughter to see the city lights. Daylight savings time had just kicked in and so our tickets were for 8:30 p.m.
In the past my daughter and I, or a friend took one of the boat tours in the Hudson River to see the city from a distance in addition to a view of the Statue of Liberty and Brooklyn Bridge. On our first trip we took the cruise during the day. It was just a few months after the 9/11 attacks and one of the buildings was still smoldering with a black smoke. It was a very emotional sight. On another visit, a friend and I scheduled a dinner cruise on the night of arrival. Seeing the Statue of Liberty and Brooklyn Bridge lit up at night (in addition to the city’s skyline) is breathtaking. I highly recommend doing something in the evening that allows you to view the city’s beautiful lights either from below or from an eye level distance.
Day 2 :
Rockefeller Plaza
St. Patrick’s Cathedral
Lego Store
Tiffany’s
Bergdorf Goodman
The Plaza Hotel
Times Square
Bryant Park
Broadway Musical “The Lion King“
On our second day we started the morning a little later arriving at Rockefeller Plaza around 10:15 a.m. There we walked the interior of the building and then outside where we saw the ice skating rink and Radio City Music Hall’s iconic sign.
Then we crossed the street after browsing in a couple of shops to walk through St. Patrick’s Cathedral, only to cross the street again to visit the Lego Store. Reminiscent of the Toys R Us store that was once in Times Square with NYC landmarks and icons made of legos.
A taxi cab made of legos.
The ultimate stop for every young girl, we went into Tiffany’s where I bought a little “Sweet 16” something as a keepsake for my granddaughter.
We then walked through Bergdorf Goodman so my granddaughter could see what a very high end department store looked like. We stepped inside the Plaza Hotel to take in its historical architecture and elegance. (Years ago a friend and I had high tea there. It was very lovely.) And then we found ourselves back in the same spot where the carriage ride ended the day before and the cafe we had hot chocolate in.
We decided to stop into Cafe Serafina to have a late lunch before strolling back toward Times Square where we later had tickets for the Broadway Show, “The Lion King”. With a couple of hours to spare we found ourselves in Bryant Park, a lovely park in the center of the concrete jungle as they call it, where people sat sipping coffee or healthy drinks while reading, playing a guitar or conversing. We found a table and sat for a while for a rest and to take in all that was going on around us.
We walked an average of 7 to 8 miles a day with Ubers in between in order to capture so much in a day. As we left Bryant Park the evening was near and we were pretty tired, so we stopped in a little gelato store across the street from the theater and I think the sugar helped boost our energy. This would be my granddaughter’s first Broadway Musical, and she didn’t know what to expect. This would be my third time seeing “The Lion King” in NYC. My daughter and I saw it on our last trip to the city and then a year later when I went with a friend she wanted to see it. Twenty years later here I am again, and each time it never disappoints. It’s beautiful and the performers are so extremely talented. Before calling it a day, we stopped into a Taco Bell in Times Square and then were whisked off in an Uber back to our hotel where we slept like happy tired, well fed babies.
Day 3 – Finale
Greenwich Village
Bleecker Street
Noho
Soho
Tribeca
The Oculus
The 9/11 Memorial
Brookfield Mall with view of Statue of Liberty
Empire State Building
There were parts of NYC that I had not seen in past trips, and I did my best to get to those places this time. Greenwich Village has a handful of little shops that my granddaughter was excited about and spent time in shopping for some clothes. Along the way we found the sweetest floral shop with a cafe in the back where people sat sipping latte’s while nibbling on breakfast pastries among the intense aroma of very fresh, very beautiful flowers. We had lunch at a really pretty little Thai restaurant, walked through a small section of Soho, Noho and Bleecker Street while gazing up at the beautiful historical architecture.
As our last afternoon began to slip away, we called for an Uber to take us down to The Oculus and we paid our respects at the 9/11 Memorial. Just a couple of blocks away was Brookfield Mall where the girls looked through a couple of shops, then we sat in the courtyard where they ate a savory crepe and I had a pastry while watching a handful of folks ice skate just outside the door in front of the Hudson River.
We discovered that on the 2nd floor there was a clear sight of the Statue of Liberty through the large windows. As our energy began to falter, we found one of the largest fancy Starbucks we’ve ever seen. Again taking our rest while drinking some water, my granddaughter said there was one store she never saw that she wished she could have gone to. (Hollister) So I had her look it up on her phone and discovered it was just a couple of blocks from the Empire State Building.
So once again, we were off in an Uber for our final destination of this trip. After purchasing a few items at Hollister, we crossed the street to roam around Macy’s for a short while and then walked to the Empire State Building where I bought tickets for my daughter and granddaughter, while I to decided to retire in an even larger Starbucks on the corner of the building to wait for them. My daughter said that the Empire State Building experience had been updated from our previous experience. I’m sure with the new observatory buildings in the city, it needed to have a more modern twist.
Note:
The Summit Vanderbilt One Experience takes place on the 93rd floor.
The Empire State Building observatory is on the 86th and 102nd floor.
One World Observatory at the Trade Center is the 100-102nd floor.
The Rock Observatory or Top of the Rock (Rockefeller Plaza) is on the 67th, 69th and 70th floors.
We were back in our hotel room early enough to repack or suitcases and prepare for our return trip home the following morning. We had a lot of fun and pushed ourselves to get in everything we could. Sights that I missed again this time were the Grand Central Station (which is connected to The Summit, but it was too late to go see); the Public Library and Serendipity. I suppose we have to save some things in case there’s a next time. Our new experience was in exploring the five boroughs of the city for the first time, a new observatory, and the Friends Experience.
In my opinion the best time to visit New York City is during the holidays between Thanksgiving and Christmas. The holiday decorations are enormous, elaborate and over the top beautiful. There’s a festive buzz in the air and of course like everywhere the stores are filled with special items you don’t usually see the rest of the year. There are also holiday markets set up around the ice rink in Central Park and you just have to make time to ice skate at one of the three locations (Rockefeller Plaza, Central Park or Brookfield Mall). I believe I saw another rink in my research on the Brooklyn side of the Brooklyn Bridge. Everything as they say is “Merry and Bright” adding a little magic on top of everything else about the city.
While we didn’t get a glimpse of the Brooklyn Bridge on this trip, I hope someday to make my way to the other side of it and explore many of its charming restaurants and shops. So many place and things to do, with so little time. I’m grateful to have shared this three generations experience with my girls and hope to share another special trip with them in the near future.
In 2023 I was invited to work as a volunteer for the local annual charity event known as the Chef’s Soirée. Restaurateurs, spirit and wine vendors and a multitude of other food and beverage related businesses from the area volunteer and donate time and tastings for those attending the event in an effort to raise a sizable amount of funds to support the local Youth Service Bureau.
The Youth Service Bureau’s mission is to provide Advocacy, Counseling, Education and Intervention for at-risk youth and their families, helping them reach their full potential. Their programs have served St. Tammany and Washington Parishes since 1981. https://www.ysbworks.com/ The YSB is dependent on the donations and fundraising efforts throughout the year.
Since relocating to the Northshore area (north of Lake Ponchartrain and New Orleans) a little more than a decade ago, I’ve seen the annual posters for the event displayed in various restaurants, but I was unfamiliar with the event or it’s purpose when invited to participate. I accepted the invitation to work as a volunteer in order to become more familiar with the cause and those involved.
When the weekend of the event arrived it was extremely cold and wet from rain which could result in a disaster for an outdoor event. By the evening of the main event, while still very cold, the sun blazed brightly and helped to somewhat dry the park’s turf, but didn’t warm up enough to prevent us from having to forfeit elegant red dresses for warm layers of sweaters and coats. When all was said and done, the weather relented and the evening went on like clockwork making the event once again a success.
Meeting a new friend. I’m on the right.
This year I was approached and asked if I’d be interested in joining the actual planning committee for the 2024 Chef’s Soiree’ which will be the 40th anniversary. I originally agreed to assist a friend with her committee, but somehow ended up being assigned the task of decorations for the event. While quietly unconvinced an event of this size was something I could manage, and knowing it would greatly test my confidence, I reluctantly agreed to take the assignment.
I was assigned the task of designing centerpieces for 130 various sized tables for the event, with the note that everything for the event is donated and there was no funds in the budget for decorations, to which my eyebrows furrowed. Later I was informed there was no donor for decorations and I given a small budget of only $300 which comes to $2.31 per table. While I do like to challenge myself, I was seriously concerned, I have no magic wand.
The person in charge of organizing the event (for 28 years) advised she had chosen a “Glitzy Gold” theme and wanted an elevated elegant decor for this anniversary year incorporating lots of gold. The plan included additional lighting (more than prior years) that would be strung in the trees throughout the park in specific patterns and designs to update the ambiance. The high boy tables would be covered with black tablecloths and cinched with a gold sash (but in the end had white sashes). I suggested that the black and gold brought my thoughts to an Art Deco decor which was enthusiastically accepted as the direction for my decorations. Now I had to present a few samples of table decor designs that would cost pennies.
The Dollar Tree Materials. Poster board (gold and black), gold rings, a hanging utility light, skewers, wooden beads, styrofoam disks and self adhesive rhinestones.Ostrich feathers – 40 for $25 on Amazon.
For those that follow me, you know I rely heavily on The Dollar Tree to source materials for creating my home themed party decor. This event was no different, especially due to the very limited budget. I carefully collected some materials and began my quest to design tasteful styled art deco centerpieces that I could present to the committee.
Tumbler vase with a band and votive.
A VIP party is held the Friday evening prior to the main event for those that made the most generous donations and sponsorships with an attendance of approximately 300. While decorations are used for this evening, they are less elaborate offering just a hint of what is to come in the main event and include only 26 tables. Above and below are the centerpieces for that event. The tumbler vases were donated to us, so we did not have a cost for that item (but they are also sold at, you guessed it The Dollar Tree.) The vases will also be reused with a different wrap band design on the evening of the main event. The three sided poster board design was used on the high boy tables and the vases were placed on small bistro tables.
Simple three sided cover for battery votive candle for high tops.
The poster board is so lightweight that I glued glass floral pebbles inside of each corner to keep it in place on the table. Since the event is held outdoors, concerns about any wind had to be considered as part of my designs. The space in the middle is just the right size to hold the votive candle. (each square is 4″ x 4″)
A large art deco fashioned arch was constructed for the VIP’s to walk through as they arrive to the VIP event and another was placed in the “Chef’s Corner” tent, again for VIP’s.
My mind continued to spin with unique ways to use the poster board to create designs, knowing it would keep the cost down. Below is a medallion I created from the larger ring (left over from the set of 3), poster board and rhinestones that was placed behind the car raffle tent.
On to the bistro sized and 60″ round tables, I started with a set of 3 gold rings I found in the floral section (The Dollar Tree). Using two of the smaller rings wired together, I imagined a wood stand that would hold the rings in place wrapped in black and gold card stock in an art deco pattern. One of our construction fellows made 12 wooden stands for me and painted them black. I cut and paste together an art deco style center card with “40” on it, and purchased two packs of 40 feathers from Amazon for $25 each). This design was the majority favorite and guests left with two of them! The feathers were used in several of the other designs.
The final ring design – is two sided so that both sides of the table have the same image.
The final design included the wood block, painted black and then wrapped in black glitter cardstock. To avoid the expense of printing the anniversary cards inserted in many of the designs, I opted to use the poster board and rhinestones with numbers cut out on a cricut machine (with the help of a volunteer as I do not have a cricut machine). Five of this specific design were made.
My paper cutter got a very big workout making all of the poster board designs.
Inspiration for some of my designs.
My meeting with the event planner was at her house, and I was inspired by a sconce on her foyer wall that had a modern art deco design created with metal spikes. I decided to purchase wooden skewers and paint them gold to create an original design for some of the tables. This design will be used on four tables.
Using the round styrofoam base with skewers cut to form a crownlike shape (higher in the back and gradually lower in the front), then painted gold created the next design. I also incorporated some party skewers with gold wooden beads that I had in my own person stock to add some variation and interest. Later I found similar wood beads at The Dollar Tree that I was able to slip on to the wooden skewers to repeat the adornment to other spike designs created.
The final design also included the card made with poster board and it was set and glued to a wood block painted black. I used cocktail napkins from a recent party that had gold fringe on the bottom edge to wrap around the wood block. This gave weight to the styrofoam based design to help hold it in place on the table.
The larger 60″ tables needed something a little larger, without being too tall or obstructing the view from one side of the table to the other. These Dollar Tree very art deco mirrors were glued to the middle sized ring (same set as the ring design) with E6000 adhesive. One side until it was fully dried and then one placed against its back to form a two sided design.
The bottom kind of resembles a tuxedo.Small designs for high tops in a special tent, made with scraps of styrofoam, skewers, a shower curtain ring for support and pearl push pins. (All from The Dollar Tree. )
To stretch the dollar even further, I used gold pearl push pins, black and gold glitter vinyl paper (for a cricut machine) and adhesive rhinestones all found in the office and craft sections of The Dollar Tree. Mirror squares found in the candle section, were framed with strips of the pearl-rhinestones and then the entire design was attached with E6000 to give it stability and reflection. A battery votive candle will go in the center (a gold painted shower curtain ring).
I call the design below my “Empire State Building”. Simple poster board, skewers inserted into styrofoam and a clear plastic bowl sprayed gold.
Since all of the components are very lightweight, there is a concealed small plastic bowl turned upside down with glass floral pebbles (6) inside to add weight to the very light centerpiece. (Skewers from Walmart – 100 count for 97 cents, gold spray paint $7, plastic bowl 2 for $1.25 and Pearl and rhinestone $1.25 a sheet –The Dollar Tree). A light sprinkling of gold glitter was added to the skewers while the paint was still wet.
The ostrich feathers were the most expensive item of all of the materials used. The adornment added just the right amount of and much needed flair and elegance to some of the designs.
Heavy plastic champagne flute glasses were donated to create the 44 high top table design. Glittered white tissue paper, a battery operated votive and an ostrich feather completed the design. I also added some of the self adhesive rhinestones and pearls to the feathers. The feminine touch needed a little jewelry. (Every single one of these were taken by the guests!)
Tumbler vases with poster board bands, then filled with gold and black painted skewers are for the small bistro tables. The battery votive candles were later wiped down with a gold wax to blend in better with the design.
When I thought all of my designs were complete, the event organizer advised that she had a new sponsor that would need a tent with four more tables. I remembered I had a small number of gold foil mini cupcake or candy holders in my baking stash. So using the same glass tumbler, I created a different band for the four tables using the same poster board and a rhinestone design that was in the center of the full sheet.
Each year a local Ford dealership, donates a new vehicle to be raffled off at the Soiree. It is a major source of the fundraising for the night. A special tent is set up where raffle tickets are sold. We placed the large vases on each side of the tent on column pillars filled with pampas grass plumes and gold palm leaves. For this vase I created a 4 inch band out of corrugated paper (used to pack and separate dinner plates) painted gold to create “fringe”, topped with black poster board. I then traced the outline of the art deco mirror on the back side of the metallic gold poster board, black starbursts and YSB initials cut on a cricut were placed in the center.
As I continued to look at the pile of scraps that remained from the materials I used, I had a final burst of inspiration. I used the two larger rings (15″) the remaining gold poster board and scraps of black poster board, rhinestones and feathers to create two faux sconces. I hot glued a section of poster board inside the cup shape to place a battery votive candle. These were placed in front of some shiny gold fringe in the pavillion.
Every year an artist creates the image for the event poster. This year’s poster was inspired by the event planner’s imagination of what this year’s soiree would look like and depicts the artist in the crowd (the red haired woman in the front in a gold dress). The event planner and artist are one in the same.
Based on the photo I took below, the image matches the poster almost perfectly.
I was a little wet and weathered, once again it rained causing what usually is many hours of work to be condensed to only a couple of hours and everyone was worn out and exhausted, but I made it to the end. Never take for granted how hard volunteers work in the background to create a memorable evening for events you attend.
VIP night 2024
I watched families with young kids set up cardboard trash receptors with bags for nearly an hour, men and women push water from the rain with brooms to clear paths, carry tables to various locations manually because the rain had delayed the set up until just two hours before the event was to begin and more. The work was exhausting and at all times I tried to stay focused not only on my commitment to see my assignment through (and I could never have done it without the help of some of my closest friends), but also the purpose for this event which was to raise funds to help make many little young lives better for themselves and our community. I now have a new appreciation for all that goes into raising funds to help such meaningful organizations and we are grateful for every single hand involved in addition to the generous donors and those who purchased tickets to attend. À votre santé and Bon Appetit!
Tips:
Use double sided scotch tape to layer the poster board rather than hot glue or any liquid glue. Hot glue cracks when bent and does not provide a smooth surface. Wet glues make the color of the poster board bleed and bubbles. The double sided table avoids all of these issues.
When spray painting the skewers, use a block of styrofoam to stick as many of the skewers into as possible leaving some space in between. Lightly spray from one angle and allow to dry. Turn the square and spray from another angle. Repeat until all skews are completely covered. To add the glitter, sprinkle lightly after final spray while still wet. An alternative, once the paint is completely dry use an adhesive spray to gently mist the skewer and then sprinkle with the glitter.
It doesn’t have to be pretty, (no one will be looking that closely and it will be dark – an evening event) but we rubbed a gold metallic wax on all 100 battery votive candles. The white stood out too much and did not blend in with all of the sparkly gold. Even when slightly covered with glitter tissue paper, if any portion peeked out, it looked better gold.
Reflecting on the Journey of Lifeand It’s Many Winding Roads
Life at times can feel like a huge mountain standing before us, calling on one’s daily energy to climb each of it’s rugged crevices, with fearful unknown cliffs to be peered over now and then, riddled with unexpected twists and turns, and fogged with the uncertainty of a clear path. When we finally form a routine that offers the rhythm we feel we can dance to, and hold the summit nearly in view, the terrain shifts it’s paths and we have to find our way all over again.
What am I talking about? I’m talking about the young child’s first day of school, who in a blink of an eye is celebrating their Sweet 16 and learning to drive an automobile. Now a teenager trying to prepare for academic exams while contemplating the unknown of college, trying to decide what kind of career and future they want to approach, while possibly moving away from their childhood home. From the growing and maturing years of college, to possibly starting a career and life with a partner. On to the birth of their first child and then suddenly on to managing three kids’ busy schedules, a stressful job with daily challenges, and a home. The added pressure of financial challenges, unexpected or planned changes in employment and possibly having to care for an ailing parent all at the same time.
The mountains in the horizon, are constantly evolving. They are never the same and are different for each individual. Throughout life we become better equipped with skills and wisdom that helps us to better manage, but never completely conquer their unique peaks and valleys. If we are truly wise, we would stop more often and simply enjoy the view instead of constantly focusing on ways to race to the top.
The past year handed me two large unexpected changes that thankfully my faith prepared me for and carried me through. For one, I am blessed to say that while I lost my job early last year, I was able to retire a little earlier than I originally planned. As they say, plans are made, but we have to be prepared and flexible when they change. While grateful for my 40 year career in mortgage banking, and all the ways my life has been blessed because of it, I am relieved to put it to rest. Each day I pray with gratitude for the past employers that formed my career.
What has helped me continue to climb those different mountains has been faith in knowing that each and every time the path shifted, the Lord was already many steps ahead of me lining up the right people and circumstances that would get me to where He wanted to me. When it is all said and done, things always work out, usually for the better.
Unemployment (early retirement) freed up my time. To begin I just gave myself the time to rest and just “be” with no specific demands or requirements. It also gave me the freedom to say “yes” to things I often had to say no to. I was able to visit my daughter, her husband and my grandchildren who live about 5 hours away from me more frequently and attend special events I had been missing while working. It also allowed me to spend a little more time with my ailing Dad whose memory and health were failing. By the year’s end, my beloved father that my brother and I have cared for over the past nearly 10 years went home to the Lord. The second major unexpected change in my routine, followed by the process of grieving his absence.
As a young teenager, my passions were writing , reading, teaching; the creative artistic processes, decorating; and cooking. Throughout my years, although my career would not seem to reflect any of my interests, I did my best to incorporate my amateur skills whenever I could in either my professional or personal life and by doing so I had a satisfying life.
As the years progress and the nest empties, space opens up in our lives and we have to embrace and decide how to fill it. In my case, I finally had the space to bloom those passions formed in my teens in unique ways, with the help, participation and encouragement of friends and family. I started my Social Writes Book Club (blessed with so many friends who share in my love of reading). I also formed my Decades Wine Club, sharing my love of food and wine with like minds. I host an Annual Mother’s Tea in memory of my mother with those in my life who also lost their mothers. I stared down the fearful intimidating mountain of technology and pushed myself to start this Social Interactions and Parties blog.
For the first time in many years, the mountain in front of me feels different. It feels inviting, asking me “where do you want to go from here?” The decades long bucket list I compiled has many things checked off, leaving mostly travel and some learning experiences always with the focus on personal growth, emotionally, physically and spiritually. All of it requires time – as in “life” not hours, something we are not in control of.
While all of these traditions formed over the past decade with friends will go on, how will I fill the space left open with retirement? Being a person who has an insatiable need to keep learning, the mountain before me is free of stress and worry and has formed into one of unknown adventure and surprises to come.
Recently I hosted my book club group with a spa themed luncheon and I encouraged everyone to pick a word from a list provided that popped out at them to use as inspiration for this year. I also suggested they consider making an intention for the year and maybe learn something new. The word from the list that jumped out to me was “OPEN”. Unsure of the direction my newfound freedom will take me, I will be “OPEN” to whatever or wherever the good Lord takes me. I’m making time to listen and trying to stop myself from letting lack of confidence or fear discourage me.
My daughter, her husband and my three grandchildren are all healthy and comfortable, but when I visit them I stand back and see how they are climbing their mountains every day much like I did at their age; not taking time to take in the simple beauty of life around them. Time and experiences we can never go back and savor the way we could have when it was actually happening. However, I can step back with great pride reflecting on my many years of climbing, trying to be the best Mom I could be and say “Job well done!” I know they also are trying to do the best they can and I’m extremely proud of them.
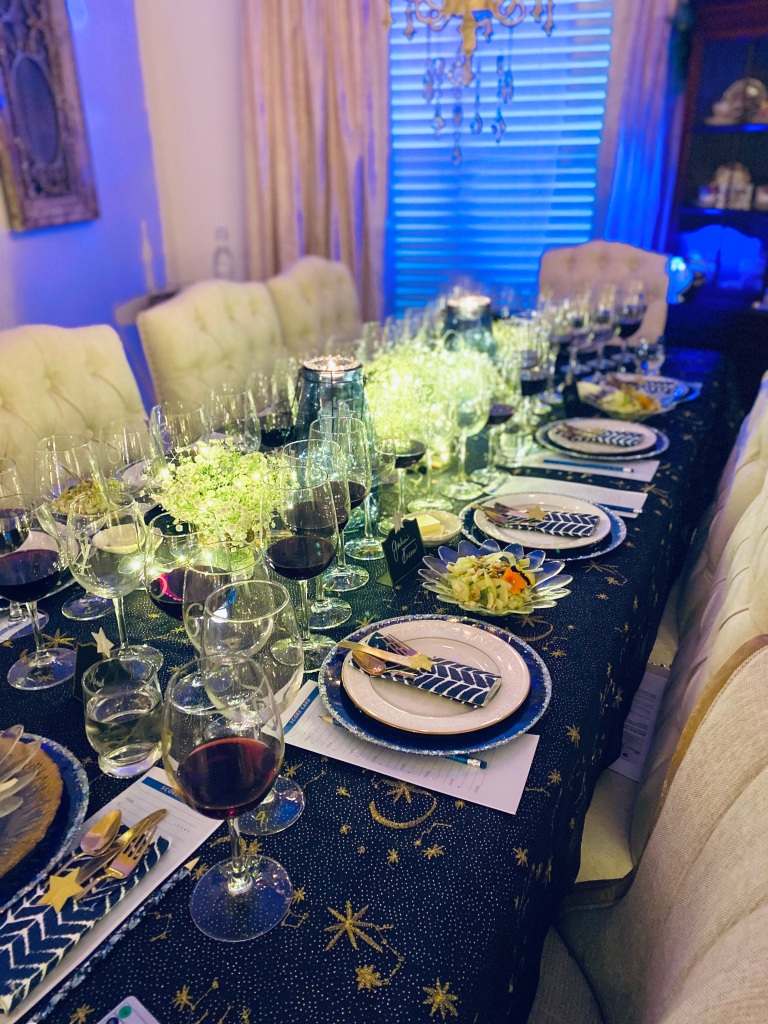
With all of the parties I’ve hosted over the past 9 or so years, I decided I to host a party to celebrate my retirement and birthday, but also as a thank you to my group of friends who have been so supportive and encouraging in my quest to reimage “Social Interactions and Parties”. My “Bubbles & Bites” affair will be exactly what it implies, and I’ll be using rose gold and silver party decor.
To start, I used my bar cart to set up a Champagne Bar so my guests could easily serve themselves. The sign found on sale at Michaels inspired the idea. I attached a string of battery operated mini lights with a dot here and there of hot glue to illuminate and have it stand out.
In December, I watched a Martha Stewart holiday series on the Roku channel where her friend and colleague Kevin Sharkey created a rhinestone snowflake wreath for his New Year’s Eve party. The snowflakes were very heavy and very expensive, but I loved the idea and it inspired to create my own version.
I purchased a set of 3 different sized gold rings in the floral section at The Dollar Tree $1.25. On my way out of Hobby Lobby, I happened upon the holiday clearance isle and found a single box of 18 lightweight rose gold glittered snowflakes for $1.05 (90% off)! One could say I manifested this wreath.
Using the silver twist ties usually disposed of from the clear treat bags I also purchased at The Dollar Tree for cookies, I tied the snowflakes to the ring and each other. I also purchased a roll of rose gold glitter ribbon at Hobby Lobby that was 40% off. I wasn’t sure how I’d use it because it’s made of a very thick canvas material not flexible for bow making, but its sturdiness worked perfectly to hang and support the weight of the wreath.
Spray roses are being used to create rose filled ice cubes to place on the top of the large ice bucket holding the various bottles of bubbly.
There will be champagne, a rose’ prosecco, one bottle each of peach, mango and strawberry/raspberry bellinis (from Trader Joe’s).
On the side there is also the option to add a little Elderflower liqueur or Lavender syrup to create champagne cocktail. I also left a small stack of plastic shot glasses for measuring the additions if desired.
Small charms have been added to the champagne flute stems to help everyone relocate their glass if accidently set down and briefly left, which often happens at parties where the guests are returning to the buffet table.
If planning a party requiring champagne glasses, the best time to shop for them and catch a great sales price at places like Homegoods is just after the new year (early January). I believe they stock up in anticipation of New Year’s Eve celebrations and then whatever is leftover is marked down. While I already had a set of glasses, I did find these fun cocktail napkins that were marked down to $1 per pack. I didn’t realize until I opened them that the bottom has a cute fringe that I’ve never seen on a paper cocktail napkin before. I love the Art Deco style of it!
Creating the Ambiance
I wanted balloons. Lots of balloons! Temu had the best price with an assortment of sizes and colors. I accidentally ordered two sets, so I had all the balloons I could ask for under $20. I was also smart enough to include an electric balloon pump in my order. There’s no way to manage all of these balloons without one. I do wish someone would invent a tool for tying them. My fingers were practically raw from days of typing balloons.
This was my first experience with making balloon garlands. To prepare, I watched a lot of Youtube videos and read that once the balloons were inflated, could last up to two weeks. So I started with the balloons above the champagne bar 7 days prior to the party. I only had a problem with a few of the smaller balloons deflating by the next day. So I held some smaller balloons on the side to inflate the day of the party to ensure they would be in good shape that evening.
Throughout the following week, I made one more garland each day. I placed one above the doorway with fringe for taking pictures, then added another behind my dining room table.
Two days prior to the party I added balloons on the side of the fireplace, beneath my sofa table and some to just scatter on the floor. I chose some art on Youtube for my TV screen so that it wouldn’t be a black blob on the wall. My friends wanted to know when I put a frame on my tv and I had to show them how to search on Youtube for tv screen art. The reel plays for 2 to 3 hours depending on which one you select. They all thought is was really pretty.
One of the balloon sets came with tissue paper flowers that I placed on the mantel. I used battery votives everywhere to avoid any accidental fires. Sometimes it isn’t cold enough to light the fireplace, and when lit it puts out a lot of heat. So with a room filled with a lot of body heat, I opted to have battery candles inside of the fireplace to simulate the warm glow of a fire.
Highlighting the Years Gone By
Now it was time to add some images of the past of my younger years and those with some of the same friends coming to the party. Years ago, Mom gave me a box of black and white pictures from my youth and my birth announcement was tucked in between the photos. I decided to put it in a little frame on the table along with a photo of me where she wrote “Lorilyn 2 weeks old” on the back side.
Having recently lost Dad, I had to go through boxes of pictures to add to a memorial video for his service. While doing so I set aside photos of myself over the years that I placed in an album for the party. I also displayed a second album that contains pictures of my daughter and I over the years. I figured it would give everyone something to laugh at.
The Welcome
With all of the balloons ready inside, I placed a couple of milar ball balloons at each side of my front door, offering an introduction to the theme inside and to welcome my guests. I also made a champagne bottle with gold metallic poster board, some of the glittered ribbon and adhesive rhinestones to display on the front door.
The Buffet Bites
On to preparing the buffet table. A buffet set up enables guests to serve themselves, so that I can enjoy the evening visiting with everyone, instead of preparing and serving food like I usually do.
To help my guests easily identify what each tray or dish is, I used mini gold frames from The Dollar Tree. I printed rose gold free clip art to create a background behind the glass and then my sister-in-law used her cricut to print out the names of each dish to adhere to top of the glass. This method also allows me to reuse the frames for another party since none of it is permanent.
Another alternative is to use an erasable pen to simply write on the glass.
An erasable marker is also an option if a cricket printer is not available.
Or print out the entire menu and display it in one or more frames around the table. (Frame The Dollar Tree)
The Buffet Spread
The menu was a combination of freshly made items and items purchased ready made in the freezer section that I just had to put in the oven for 20 minutes.
The shrimp salad was made with shrimp boiled in those cajun seasonings we use in Louisiana, combined with small diced English cucumber and a dressing made with mayonnaise, finely minced ginger and garlic, thinly sliced green onions, and then served on endive and little gem leaves.
I was going to order finger sandwiches until I learned that the cost was $72 for only 95. The cost of things have just gotten out of hand. So I bought a loaf of both white and wheat bread, made a sandwich spread of mayo, honey mustard, a little Cattlemen’s Golden BBQ sauce (has a little chipotle kick) and some lime. Finger sandwiches can be pretty bland without a nice spread. The grocer had cold cuts on sale for $4.50 a pack which clearly made more sense than the $16.99 per pound versions at the deli counter.
A nearby restaurant make this beautiful Seafood Monica pasta that was worth the splurge.
Having chosen to explore a vegan diet for a while, I made two vegan small bites; a moroccan stuffed mushroom and mini peppers that have a lentil stuffing with mexican flavors. My only additions to these recipes in the link below are noted.
Moroccan Mushrooms: I added chopped pistachios to the filling.
Tip – I made the stuffing a couple of days before the party and placed in a air tight container in the refrigerator. Since the stems of the mushrooms are used in the filling, I also cleaned out the center (prepping for the filling) and placed the mushrooms in brown paper bag in the refrigerator to allow them to breathe until ready to stuff). This saved an enormous amount of time in getting them ready on the day of the party. The recipe is below.
As with the mushrooms, I also prepared the filling for the peppers a could of days ahead, but I did not prep the peppers. A friend came early to help me get all of the food on the table, and it took a lot of time to cut the mini peppers and clear out the seeds and membranes. In the future I would prep the peppers and put them in an airtight container or zip bag ready to be filled and baked off on the day of the party.
This carrot tart is easy and always a hit. The recipe can be found in my previous post below. For these smaller bites I used frozen sliced multi-color carrots purchased at Whole Foods. Tip: make sure to line any baking sheet or muffin tin with parchment paper first to ensure ease in removing the fully baked tart.
Another easy time saving party favorite, I used meatballs from the freezer section (family size) and warmed them in a bottle of spicy honey BBQ sauce.
Spinach Artichoke Balls (frozen) from Sam’s Club and Pastry Pups from Trader Joe’s.
The Cake
Tip: There’s no need to pay a fortune for a cake. I ordered this lovely 16″chocolate cake with vanilla buttercream from Sam’s Club for $16.99. I provided the sprinkles that matched my favor cookies and requested the naked cake style. I then topped it off with three fresh country roses (from Trader Joe’s). Candles ordered from Amazon.
Thank You Favors
Finally, I always like to send my guests home with a little favor. I baked champagne flute glass shaped strawberry lime cookies and wrapped them in cellophane bags that were handed out to each guest at the end of the party with a thank you note.
I used some free rose gold abstract clip art to create a note on each bag and cinched with a (mauve) ribbon.
The evening was cold and windy, but my family and friends arrived at the appointed time, with warm smiles and big hearts. We had a lovely evening that I am so grateful for. Everyone left with “to go” containers filled with leftovers and a piece of cake, leaving me with a joyful memory to carry forward into the future.
RESOURCES FOR THIS PARTY:
All balloons, rose gold fringe door curtain, tissue flowers, electic balloon pump (Temu)
Rosers, flowers (Trader Joe’s)
Champagne Bar sign (Michaels)
Battery lights around champagne bar sign (Homegoods)
Large champagne bucket on cart (Sams)
Champagne (Sams); Bellini’s and Rose’ Prosecco (Trader Joe’s)
Lavender Cocktail syrup (Homegoods)
Plastic gold dotted shot glasses (The Dollar Tree)
All gold frames menu and annoucement (The Dollar Tree)
Pop, Click, Fizz paper cocktail napkins (Homegoods)
The end of 2023, more specifically the month of December, was filled with loss and stress for me, my family and some of my friends. The wonderful thing about a new year is that it lends the opportunity to turn the page, begin a new chapter, and breathe in a fresh starting point.
I wanted to hold our first club meeting relatively early this year, in hope that we may be able to get in six meetings rather than our usual five. I also wanted to select a book that was light, but interesting.
“Fifth Avenue Glamour Girl” by Renee Rosen is a historical fiction novel that shares the story of Estee’ Lauder as a business woman and one of the original pioneers in the skincare products industry. The two main characters, Gloria and Estee’ become acquainted at a beauty salon, both financially struggling and running from the truth about their families and backgrounds. Gloria is from a wealthy family having suffered financial scandal that she is trying to separate herself from, while Estee’ portrays herself and family history as one of european royalty and wealth which is far from the truth.
While the book is told from the perspective of Estee’s fictional friend Gloria and discusses much of her life, it also informs of how driven Estee’ was and how there seemed to be no limit to the personal sacrifices she would make, even at the expense of those who loved her, to succeed. The story, in my opinion was interesting enough and worth the read. I’m curious how my friends will feel about the name Estee’ Lauder after reading it. Regardless, Estee’ Lauder has stood the test of time as one of the most successful skin care lines.
When it came to finding a theme for this meeting, the image of Estee’ pampering women with facials in the beauty salon and her drive and determination to sell her face cream along with unasked for skincare advice, made me think of a Spa environment. A Spa theme was also a great way to help everyone decompress from the holiday hussle, set some new intentions for 2024, reset an affirmation of gratitude and enjoy each other’s company. I sent a message to everyone to dress comfortably and to wear or bring a robe – the rest would be a surprise!
Having visited Manhattan a few times, and recalling my walks down Fifth Avenue, I thought of Tiffany’s. To continue the pampering theme I set the table with Tiffany blue and silver and created a somewhat spa menu. It also opened the opportunity to pull out my silver plated flatware collection I’ve been accumulating over the past few years as well as my crystal! My intention is to make these ladies feel special!
As luck would have it, I found eight (the exact number needed) mini Tiffany blue boxes in my stash, left over from a brunch I hosted about ten years ago. I didn’t have the white ribbon (like the box on the centerpiece) to tie around all of the boxes, but I did have scalloped cupcake picks with a little pearl in the center also from the same event. So I removed the toothpick and just taped the piece to the top of the box and made gift tags to use as place cards.
I recently learned about an estate sale and consignment service that has stores set up around the Greater New Orleans area. While visiting the store nearest to me, I found a beautiful silver plated tray that I couldn’t take my eyes off of. The price was a little steep, so I decided I would wait and hopefully catch one of their frequent half price sale dates. I happened to mention the tray to one of my friends over lunch one day. She asked me where the shop was located stating she’s been wanting to go to it. After our lunch I received a text from her asking what the tray looked like, she was going to check if it was still there. I had taken a picture of it, so I sent it to her. A few minutes later she sent me a message stating “Sorry, it was sold.” ”Oh well, ” I responded, “it just wasn’t meant for me to have it.” I resigned to the fact that I wouldn’t get it, but felt a little disappointed. It is really a special piece.
A couple of weeks before Christmas, she arrived at my house with a very large bag. We have a standing weekly meet up for dinner at my house. When I peered into the bag that she held out to me, I could see the handle of the tray and I just couldn’t believe it! My friend had bought it for me on the day she said it had been sold and she also got it on sale! Obviously this was my favorite Christmas gift in 2023, and it’s even more special because of its story and the friend that gave it to me AND if fit perfectly into my Tiffany-Spa Theme.
As the ladies arrived I directed them to signs I placed outside of my bedroom door and in the bathroom (above), where spa music was playing (on my Alexa Echo), candles were flickering , and my silver tray displayed spa bundles which included guest slippers, a facial headband and a box of eye masks ordered from Amazon for everyone. The sign instructed to put on the headbands, eye patches and slippers and then return to the living room.
When they returned to the living area they were given a warm lavender scented towel to wipe their hands with and lavender essential oil to dab on their wrists before having a seat in the living room for a pre-poured peach bellini and appetizer.
I made labels for the water bottles with our book club initials (Social Writes Bookclub) SWB that some joked they thought is stood for sewage and water board!!!
Once everyone was settled, I lead them in a blessing and a short breathing meditation. Everyone then received a copy of Heather Stillufsen’s “Word of the Year” list. I encouraged everyone to pick their own personal word for 2024. Then each wrote the word on a piece of paper and I placed it in a bowl and read the words to everyone without knowing which word belonged to which guest.
I encouraged everyone take time to think about something they may want to manifest in 2024 and read them an example of some things I had heard on morning talk shows as inspiration.
The coffee table was set with the appetizer, hummus with accoutrements and bowls of berries.
Appetizer
Store bought hummus (roasted garlic)
carmelized onions
toasted pinolis (pine nuts)
spice pepper jelly
chopped sundried tomatoes
warmed naan bread triangles
thick sliced cucumbers
endive leaves
carrot & celery sticks
red bell pepper
I saw a post on Pinterest where a mound of some kind of dip was formed into a head shape, on top of the head two cabbage leaves were placed to resemble a wrapped towel, cucumber slices for eyes and lips formed from red bell pepper. It was so cute that I decided to form my container of hummus into the head shape. I had mini butter lettuce in my refrigerator to form the towel, but mine was not as good as the example I saw (mine looks more like a shower cap). Still she got laughs!
I decided to use naan instead pita bread and a variety of garnish toppings for added flavor that each guest could select from.
Lunch
One of my personal goals this year is to follow a vegan diet as often as possible. The health benefits are what inspired me and as someone who enjoys cooking, it also challenges me as a cook. While I have no intention of imposing this personal choice on any of those in my life, I was able to create a not so obvious vegan menu for this gathering.
I served a roasted tomato soup with freshly ciabatta croutons, fresh basil and a viola (edible flower), with a pepper jelly vinaigrette spinach salad (recipe from Zea’s Restaurant). Crumbled goat cheese being the only non-vegan ingredient.
A different recipe (that included dairy so I couldn’t use it) had thinly sliced disks of orange baked into the bottom of the cake pan under the batter and then flipped to create a pretty top.
To achieve the same design, I sprayed a 9″ springform pan with olive oil. I lined the bottom with a circle of parchment paper and sprayed again. I arranged the thinly sliced orange disks over the parchment and then added the cake batter.After baking, the orange rind was very bitter and I had to instruct guests to not eat it the rind. Candied oranges or I’ve seen where the slices were simmered in boiling water may be the method for reducing or eliminating the unwanted bitterness.
Orange Sauce:
I decided to make an orange sauce to place beneath the slice of cake when served, to add some moisture. Below is the recipe that tart and tangy and elevated the cake.
To make the sauce:
Place 1 1/2 cups of orange juice into a sauce pan and simmer until reduced by half. (About 20 to 30 minutes)
Add 3 tablespoons of granulated sugar and whisk in well
In a separate cup or small bowl:
Mix 1 1/2 tablespoons of corn starch with 1 tablespoon of water to make a loose paste. Add more water if needed. Add to the pot of reduced juice. Whisk together until smooth. Completely cool. Spoon a couple of tablespoons into the bottom of the dessert plate and spread forming into a circle. Place the slice of cake on top.
My guests said it was delicious and a couple asked for the recipe, so I count that as a win.
While digging around in The Dollar Tree of all places, I found exactly eight boxes of different serums and moisturizers in the Tiffany Blue color. I also found a pedicure brush with built in pumice stone and file and a set of three per package heart shaped makeup sponges. Using cellophane bags and ribbon (also from The Dollar Tree) I made each guest a little skin care gift bag to take home.
My friend below, Carolyn, said she’s never been to a Spa and this was her first Spa experience! While not the full treatment of a luxury spa, we had a fun time together as always and played like the young girls we once were!
Remember to FOLLOW and or SUBSCRIBE to keep in touch we our future shenanigans and inspiration to entertain your friends and family at home! I greatly appreciate your LIKES and Shares!
As we approach the New Year, there may be some fatigue from all of the decorating, shopping, gift wrapping, cooking and gatherings. So here’s a couple of ideas to inspire a no stress easy way to update your table and front door wreath for New Year’s Eve or New Year’s Day repurposing items you may already have or picked up at after Christmas discount sales like I did.
For starters I made this champagne (or Crémant in my case) bottle. I originally used a different bottle, but when I found this one I thought the label was perfect for a centerpiece. When opening the bottle take are to keep the gold foil around the top affixed to the bottle rather than tearing it away. Pull it up around the top of the bottle’s opening to hide the bare bottle top.
Fold pulled around the top of the bottle.
To create the bubbles, I used three different sized clear plastic ball ornaments from The Dollar Tree. Then I used a wire coat hanger that I cut open with wire cutters creating a hook at one end with a straight stem. Slide the ornaments on to the stem stacking in size variation. I’ve used this centerpiece for about five years now, just tucking it away in a closet covered with a plastic bag to protect it from getting dusty.
NOTE OF CAUTION: Hot glue will melt the plastic balls other glues are impossible to hide and look bad. This wire hanger was the only method I could find to ensure the ornaments were not disturbed and strong enough to hold the stack.
While browsing through some of the half off sales after Christmas I found these beautiful snowflake ornaments. My inspiration was sparked by an episode I recently watched on Martha Stewart Holiday Roku where Kevin Sharkey stacked rhinestone and glittered snowflakes to create a wreath for a New Year’s Eve Party.
To set the table I used my Dollar Tree gold chargers, my china that is cream with a gold rim, and cream cloth napkins topped with the silver bead and glittered snowflake ornaments. While this is a great idea for a New Year’s table, it’s also a great way to dress up the table for a simple but elegant winter’s evening, special birthday or anniversary dinner party.
New Year’s Wreath
Now that the table is set, here’s a little inspiration for a last minute update to your front door holiday wreath for New Year’s. Use what you have from previous years like I did. Nothing new was purchased, I just repurposed items.
Start with a plain real or faux evergreen wreath.
Make a large bow
Hot glue together Happy New Year horns into the center of the bow
Hot glue a few champagne corks on the ribbon tails.
Using spray adhesive, spray the ribbon tail and sprinkle with chunky gitter.
Hang a little tree tinsel strans from the branches.
Tuck in a Happy New Year headband.
This year has been a special one as all years are, but I’ve had two major life changes in 2023. I started the year with losing my job (as a resident mortgage underwriter) due to the rising interest rates, but I am blessed that I was just one year from retirement so I took the plunge. In the early part of December I also loss my beloved Dad that my brother and I have been taking care of for the past 10 years. I look back on 2023 with love, appreciation and gratitude and look forward to 2024 with those same emotions combined with an excitement as where my next chapter in life leads me. Blessings, love, joy and peace to all of you in the New Year and always! Thank you so much for your support!
We have reached the finale for 2023 of our 8th year as Social Writes Book club. This year’s book selections were a mix of historical fiction and murder mysteries, so we decided to end with something light including a special celebration.
We’ve all heard the term “Bucket List”, that for me became a point of interest after seeing the popular movie starting Jack Nicholson and Morgan Freeman. My bucket list has been pinned on a bulletin board for decades and I’ve gradually checked things off and added more resulting in an abundance of learning, fun, entertainment, and travel that continue to make life interesting. “The Bucket List” by Rachel Hanna, takes a different spin on the idea that is fun and thought provoking. Sometimes someone else has to push us out of our comfort zones in order to get us to truly experience the life we only dream about and to help us grow.
Below is a brief review of the books we read in 2023.
Since I am the founder of the Social Writes Book Club, it is tradition that I host the first meeting of the year. I most enjoy when a book presents a theme that I can translate to the table decor and menu. My book selection fit the bill for this year’s first luncheon meeting.
“The Forgotten Room” a collaboration novel by three well known authors Karen White, Beatrice Williams and Lauren Willig is a romantic love story that is woven into three generations. A romantic table, recreated love letters, and a special necklace passed from mother to daughter to granddaughter inspired my table just a couple of weeks ahead of Valentine’s Day.
While a themed luncheon is not required by the others that host, there are a few that like to get into the spirit of the book when they host as well. Unfortunately some books don’t really offer a theme that can inspire a setting, or a member prefers to do something simple which is always just as lovely and makes an enjoyable afternoon. I’ve advised everyone they are in charge of however they want to host a meeting, in anyway they choose. There is no required method and they do not have to do things the way I do. In every case we all enjoy discussing the good book we read, the good eats provided and the conversation and company of each other.
Our friend Linda, reached out to me in January with great excitement in her voice. She had chosen a book and like me, already had an entire plan for it in mind and asked if she could host the next book club meeting. It took a while to get everyone on board for an agreeable date, but finally the majority of the group met.
Linda pouring some bubbly.
“The Guest List” by Lucy Foley is a murder mystery that takes place at a wedding. Linda who loves to dress up, had no idea that I had asked all of the ladies attending to dress as different members of a wedding party. They are all so fun that some thought of things I didn’t even think of myself. We had bridesmaids, a bride, a groom, and a wedding party. Linda acted as the murderer as she posed holding the cake knife.
Linda had planned a mini wedding reception, complete with a wedding cake. It was a really fun afternoon for all of us!
The next book selection “A Dangerous Legacy” by Elizabeth Camden left us wanting more and most of us ended up reading the trilogy. (The story continues with “A Dangerous Venture” and “A Dangerous Hope”, but wait there was more! “Christmas at Whitefriars”.) If you’ve ever wished you could find out what happened after the story ended, this is a fun way to follow the lives of the various characters in the first book of the series.
The series will also educate on the original challenges and scientific minds that sought out solutions for purification of drinking water, the invention of pumping systems that allowed clean water to be pushed up into the various floor levels of multi-level apartment buildings and the loss of homes and towns in order to build reservoirs. Each story highlighting a special love story as well.
The next book brought us back into an abduction, murder mystery genre that the most used word to summarize it was “creepy”. “Then She Was Gone” by Lisa Jewell was an impossible story that only a sick mind could fathom, a quick read that leaves the heart a little broken. Our friend and host Jane, lives on a beautiful lake in the country. She served us a lovely gumbo and potato salad lunch at a long table in her dining room lined with floor to ceiling windows on a beautiful day with a view of the lake.
I offered an “in between meetings” book suggestion “The Fall of Marigolds” by Susan Meissner with an invited discussion at my annual Friendsgiving in early November. Two separate tragic historical events nine years apart in New York City with similar unfathomable loss of life.
The book moves from 1911 to 9/11/2001 and jumps to the future in 2011. One young women loses a man she loves in The Triangle Shirtwast Factory Fire (Greenwich Village NY) in 1911 and a different young woman loses her husband in the 9/11 attacks. The book is about the grief that follows and hows each woman emotionally barren in her grief process, while drawing strength needed to somehow move forward into the future and open up to love again. Overall the book is about hope, and a return to love after such awful loss. It ends with a happy hopeful future and new found love stories. Both are linked by an autumnal hue scarf filled with golden marigolds. I couldn’t put it down.
When it came time to select our next and last book of the year, “The Bucket List” by Rachel Hanna was suggested. It is a very quick read only 78 pages long, with a heart filled message about living life to the fullest. A great way to not only end the year, but start the new year having been inspired by this story. We decided to plan a fun “field trip” of sorts for our final meeting, by gathering for brunch in the club house at the New Orleans Fairgrounds racetrack. Some of us wore hats and once the stormy rain stopped, we enjoyed our lunch and a few races ending the year on a fun note.
It was a great way to end Social Writes Book Clubs 8th year together. Follow and stay in touch to see what we are up to in 2024. Until then Happy Holidays and Happy New Year!
The day finally arrived for my annual Friendsgiving. This gathering of friends is intentionally scheduled before the upcoming holiday rush is in full force and everyone is running in different directions to attend various holiday events and family gatherings. While there’s always a couple of friends that can’t attend, the majority of my group had the opportunity to sit at the table, with relaxing music playing in the background* and visit with each other.
As I worked in the kitchen with my best friend and helper Caryl preparing each dish and then serving, I overheard the group share some of their travel and life experiences of the year. A final group “catch up” if you will, was in progress and filled my heart with joy.
*For this brunch I used the YouTube App on my TV and selected a Fall inspired jazz/piano video as the background music that also provided a fall image on my screen.
For this year’s gathering I wanted a soothing, calm table setting that incorporated gold and white linens and dishes with a white pumpkin theme. The table was accented with a touch of color provided by the floral arrangement that included the soft shades of white, cream, coral, peach, blush and a hint of yellow. A couple of branches from my tree with autumn leaves were tucked at each end, to emphasize the Fall season. While my table was set for a Friendsgiving, it would serve just as well for a simple Fall Dinner Party or Thanksgiving gathering.
To create the floral arrangement I used a long bread loaf baking pan with a log shaped cylinder of chicken wire placed inside. The flower stems were inserted into the various holes and stayed in place as I turned the pan numerous times to place the same pattern of flowers equally on each side. A set of small white pumpkins with picks (The Dollar Tree) was inserted to support my theme. I also used school glue to sprinkle each white pumpkin with some junky white glitter for a little sparkle.
TIP: My favorite source for fresh flowers is Trader Joe’s, but the nearest location is nearly an hour away. So I purchase my flowers as early as the prior weekend, trim the stems when I get home and place all of the bouquets in a bucket or large vase of water in the refrigerator. I usually trim the stems again after a couple of days. The day prior to the party I arrange the flowers and they complete their blooming and fill out overnight. I refill the pan with water daily and the arrangement is still looking as fresh as the first day a week later.
The cream colored napkins are topped with gold flatware tied together with a toffee colored velvet ribbon and a piece of eucalyptus. A place card with each guests’ name is tucked into the folded napkin.
Small white pumpkins (real) that I glittered, dried roses, dried foraged magnolia pods and acorn branches, all set on an antique silver bowl were placed on each end of the table.
You will also note as part of my table decor a printout of Ode on a Grecian Urn (1820) by John Keats. Several of the ladies in my group are also part of my book club. I recommended a book that was optional to read if they wished and we discussed the story as part of the conversation. A small portion of the poem was referenced several times as part of the story, so I printed the entire poem out for everyone. Marigold petals and tarragon blossoms were used to garnish my soup and salad.
Finally, antique silver egg cups were used with small white votive candles were scattered across the table to complete the ambiance I was looking for.
Mulled Apple Cider Mimosa
This cocktail was inspired by She Keeps a Lovely Home‘s Mulled Ginger Cider Mimosa. Gretchen loves to entertain as I do, and has her own consistent style that comes through in each of her hosted parties. I am greatly inspired by her creative ideas and recipes.
For my version, I made a few adjustments because I wanted a little more apple flavored warm Fall spice to my cocktail. So I made an apple syrup with my favorite Chinese Five Spice to add when the final cocktail is put together. My guests really enjoyed this cocktail and it would be great to prepare the mulled cider and apple syrup in advance, ready for anyone who drops by for the holidays or Thanksgiving. It makes a lot, but you’ll be prepared when they ask for refills.
I always prepare a tray of glasses with some kind of adornment, or add edible flowers to my cocktail for a fancy flourish. For this gathering I tied a cinnamon orange velvet ribbon and a small sprig of baby’s breath on each stem for a festive presentation. I fill the glasses as soon as the first guest arrives so that everyone can take a glass to sip on as they mingle and chat waiting on my signal to be seated at the table.
To Make this Cocktail you’ll need:
1 or 2 bottles of chilled champagne, prosecco, Cava or other sparkling white wine
Mulled Cider
1 gallon apple cider
1 package of mulling spices
two inch piece of fresh ginger (sliced)
1 blood orange or tangerine (sliced)
1 lemon (sliced)
1/4 cup brown sugar
two cinnamon sticks
All of the ingredients were placed in a large pot and brought to a rapid simmer, and then lowered to simmer for almost two hours to get the liquid to reduce and become more concentrated. This can be done up to two weeks prior to the party, stored in bottles and refrigerated. (After it cools it can easily be poured back into the original apple cider bottle or plastic gallon container to refrigerate.)
My reduced mulled cider filled three of these bottles. Leftover mulled cider can be warmed on it’s own to enjoy on a crisp cool Fall day!
Apple Syrup
The Apple Syrup
2 small bottles of Martinelli pure apple juice
2 cinnamon sticks
1/4 cup pure maple syrup
1/2 teaspoon Chinese five spice (or Apple pie spice)
1 teaspoon of pure vanilla extract
Pour first four ingredients into a saucepan and bring to a slight boil and then a steady simmer occasionally stirring for one hour, until reduced to about a third of the original volume. It will thicken as it cools, so don’t over-reduce. The end result is about 2/3 cup of syrup. Add vanilla extract. I poured the syrup into one of the glass apple juice jars to cool completely, then cover and store in the refrigerator up to two months.
To serve:
1 tablespoon of Apple syrup in each glass
2 ounces of mulled cider
top off with sparkling prosecco, cava, crémant or champagne
“Want to print this recipe? Just use the print option in your browser’s menu.”
Apple syrup can be used for cocktails, but also for pancakes and waffles.
Final day dessert:
In my prior post (Friendsgiving Part 2) I share the recipe and my “test” version of this Swiss roll. Thankfully, when I recreated the cake the day before the brunch it turned out perfectly. I served it with a small scoop of coffee ice cream and a small bite sized gold sprayed leaf sugar cookie.
You can refer to the previous posts (Part 1 -3) to get the recipes for the Swiss roll, soup, salad and pumpkin brioche rolls.
If you’re looking for something a little lighter to serve at your Friendsgiving or Thanksgiving gathering, I hope you’ll be inspired by some of the items I used for my gathering.
Thanksgiving is a time for reflection on the things we are most thankful for, it’s a time where family and friends plan to gather – some you may only see a few times a year, most importantly it’s a time to be giving and generous. It’s the beginning of the season for giving and gratitude. Nothing gives me more pleasure than spoiling my family and friends to tasty food and a comforting environment. It’s the season to take some time, to slow down and enjoy each other. Let go of the rush of life for just a day if it’s all you can spare to enjoy the people you love and create memories to be cherished. It’s hands down, my absolute favorite season of the year. Nature gives us the gift of it’s colorful change, our only requirement is to take in all of it’s spectacular splendor with heart filled appreciation.
PART 4 – Honey Roasted Pumpkin Ravioli in Balsamic Brown Butter Sauce, Autumn Crunch Salad and Pumpkin Brioche Rolls
Here in the South, Fall has arrived and we are really soaking in the cool refreshing temperatures and enjoying the comfort of gathering outdoors. Windows opened wide, the change of season is palpable as Fall decorations adorn homes in the neighborhood and subtle changes appear in the trees and shrubbery, the last to see these changes is the deep South. Sitting outside with the morning sun no longer scorching, sipping my cup of tea and listening the breeze and the birds is a wonderful was to welcome the day.
In just a couple of weeks friends will gather around my table for my White Pumpkin Friendsgiving Brunch, so it’s time to finalize the menu. My recipe testing now complete, I’m sharing the last of the decided menu.
Part 2 and 3 (previous posts) shared the dessert and soup recipes.
While I enjoy cooking most of menu items from scratch, I don’t shy away from a store bought item that can balance out the workload.
The time consuming courses can be made ahead and usually have an enriched flavor when re-warmed before serving. The soup can be made up to two days ahead. The dessert is best made a day ahead for the filling to set in the refrigerator and the flavor and spices in the pumpkin brioche rolls deepen if made a day ahead as well. The soup and rolls will need re-warming leaving only the ravioli appetizer and salad to be prepared on the day of the brunch.
So here is a reminder of the previous posts regarding my menu and the final items that will complete my Friendsgiving menu.
The Appetizer
Honey Roasted Pumpkin Ravioliwith Balsamic Brown Butter
This ravioli dish is delicious and the ravioli cook in less than 3 minutes. To elevate the flavor and they will be topped with a balsamic brown butter sauce, toasted pecans and a fresh crispy fried sage leaf. The sauce recipe I used is in the link below (Perfectleehungry.com) I’m serving two ravioli per guest.
Honey roasted pumpkin ravioli can be found at Trader Joe’s.
Garnish: Toasted chopped pecans and fried fresh sage leaves
Garnish: Prepare a plate with a layer of paper toweling. Fill a small shallow pan with a thin layer of olive oil. Heat the oil until it shimmers slightly. Using metal tongs or a slotted spoon, place one fresh sage leaf at a time in the hot oil (carefully because the moisture in the leaf will make the oil pop). Fry for about 20 seconds, turn over the leaf and fry a few seconds more, then move to the paper lined tray and sprinkle with kosher or sea salt.
Salad Course:
Autumn Crush Salad with Maple Cream Dressing
My autumn crunch salad was also pulled together with a store bought slaw kit and the addition of thinly sliced apple, dried cranberries and toasted pepitas. I especially like the Trader Joe’s kit in the photo because the slaw is shaved very thinly. Any slaw would work, but may be a more coarse shave. The ingredients below were combined to serve 10-12.
2 bags Trader Joe’s organic coleslaw kitl
1 package of arugula or baby spring mix (set some leaves aside to garnish)
2 green apples (thinly sliced- I used a mandoline.) Note: place in a bowl of water with the juice of half a lemon to prevent browning. Strain before adding to the salad bowl.
1/2 cup dried cranberries (if not fortified – soak in warm water for 15 minutes to plump up)
1/2 cup of pepitas (toasted)
4 tablespoons maple syrup
2 teaspoons dijon mustard
Remove the packs of dressing from the slaw kit. Pour all of the contents into a small bowl, add maple syrup and mustard. Whisk until thoroughly combined.
In a large bowl add slaw, apples, and cranberries. Add 1/2 of the dressing and gently toss. Gradually add more dressing to lightly coat rather than drown the slaw making it overly wet. (I wanted a salad texture rather than a slaw texture so I used only enough dressing to lightly coat the slaw and greens.) Gently toss in arugula or mixed spring mix. Prepare serving bowls or plates. Garnish with reserved greens, pepitas and edible flower if desired.
PRINT:Want to print this recipe? Just use the “Print” option in your browser’s menu.
Roasted Delicata Squash Soup ( in Part 3 Post)
Honey Pumpkin Brioche Rolls
Prep time: 30 minutes Cook time: 25 to 30 minutes
Rest time: 2 hours Yields 12 rolls.
Brioche bread is one of my favorite breads. If I’m going to have bread I want it to be light, fluffy and flavor filled, and brioche always delivers. This recipe was adapted from Buttermilk by Sam. I found a couple of errors in the recipe instructions where a couple of ingredients on the list were excluded in the instructions. (The sugar and salt are mentioned below the step by step photos, but not in the actual printed recipe.) So I rewrote the recipe which include some of my own additions to avoid confusion.
I also consulted instructions from other Pinterest posts on tying the string to create the pumpkin shape. In my test bake, the string did not remove easily and would pull the pieces of the roll apart. I chose to just leave the string in and advise guests to pull the sections away (as in pull apart breads) leaving the string behind and let the top strands create the stem. I may try a different method on my next preparation.
PRINT:Want to print this recipe? Just use the “Print” option in your browser’s menu.
Ingredients
1 tablespoon active dry yeast
2 tablespoons whole milk or 2%
50 g or ¼ cup brown sugar
125 g or ½ cup canned pumpkin puree
2 large eggs
½ tsp kosher salt
1/2 teaspoon Chinese Five Spice or Pumpkin Spice (optional)
350 g or 2 3/4 cups all purpose flour
113 g or ½ cup softened butter (cut into tablespoons)
1 tablespoon finely chopped fresh sage
2 tablespoon honey (slightly warmed)
Flaky Maldon Salt (optional)
Optional: Cinnamon butter when served
Make the brioche dough
Place the yeast into the bowl of a stand mixer.
Heat the milk until it’s just warm to touch (comfortably touch the milk with your finger without it burning). I put it in the microwave for 10 seconds. If too hot it will kill the yeast. Pour the milk over the yeast and gently mix to combine. Give the mix a minute or two so the yeast can begin to dissolve.
Add the brown sugar gently stir.
Add the pumpkin puree to the bowl and mix gently. Add the eggs and stir. Add salt, and spices.
Pour in the flour and using the dough hook attachment start kneading on low. As it gradually comes together, raise the speed to medium. Once the dough starts to resemble a sticky ball, start adding the butter one tablespoon at a time. When the butter has completely mixed into the dough, add the next tablespoon of butter. Waiting until completely mixed into the dough and continue until all butter has been added.
Knead the dough on medium speed for about 10-12 minutes. The dough will be very wet and shapeless, sticking fully to the sides, but as it kneads it will start to come together and pull away from the bowl. Add the chopped fresh sage and mix until evenly dispersed in the dough.
Once the dough fully comes together around the dough hook, and the sides of the bowl are clean (you might want to scrape up some of the dough from the sides to add it to the ball) knead for another minute or so. The dough should be shiny and cohesive.
Gather the dough ball and place into an oiled bowl (I used grapeseed oil, but any flavorless oil will work) and cover the bowl with plastic wrap. Let rise in a warm area (I placed the bowl into my room temperature oven) until almost doubled in size. (This can take from 1 to 2 hours based on different temperatures and elevations. Check after one hour to determine if ready or more time is required. My rise was ready in 1 hour.)
On a surface lightly dusted with flour, using your hands, roll the dough into a 20 inch log shape. Cut into 12 pieces. (My method is to cut log in half at the center, then cut the two pieces in half again, and thoses in half again and so on.) Roll each piece into balls.
Shape dough: Take a long piece of cooking twine and place it horizontally on a work surface. Place a dough ball at the midpoint of the string. Take the edges of the string, loop them once (as if tying the first knot of a shoe string), crossing the edges and gently place the string vertically on the dough ball (forming quadrants). Flip the dough and loop/cross the string edges again and place the string diagonally (forming sixths). Flip the dough again and loop/cross the string edges and place the string diagonally on the opposite side (forming eights). Tie the ends together with a final knot and cut off any excess string. Don’t cross and/or tie the strings too tight, maintain some breathing room, allowing the dough to rise further. *** There are photos and videos on how to do this on multiple pinterest posts if help is needed).
Place pumpkin shaped rolls on a parchment lined baking sheet about 2 inches apart (you may need two baking sheets). Cover with a tea towel and place in a warm spot to proof another 30 minutes. (Note: If you just want a pull apart roll without the pumpkin shape, place the balls into a buttered rectangle 9″ x 13″ baking pan with sides and cover with towel for second 30 minute proof. When baked they should come together in the pan and can be pulled apart.)
Preheat oven to 350 degrees F. Place baking sheets in the oven and bake 25 to 30 minutes.
Place honey in the microwave for 10 seconds. When rolls come out of the oven, brush with warmed honey and sprinkle with flaked salt. Serve warmed rolls with cinnamon butter.
Walnut, Coffee, Salted-Caramel Swiss Rollserved with Coffee Ice Cream (In Part 2 Post)
With my menu planned and tested, my next (Part 5) and the finale, will include the cocktail aperitif, floral arrangements for the table and a few last minute surprises.
While this menu was designed for my Friendsgiving gathering, clearly any of these courses would easily fit into a Thanksgiving Day menu or Fall Dinner party. A friend recently said she had invited a couple of ladies to meet at her house and then was stumped about what to serve them. Planning ahead is a big help, and simply making the soup and cake over the weekend ready to serve with the salad fixings prepared that morning are simple way to entertain a small group gathering.
I hope these ideas inspire you. Make sure to follow or subscribe to receive notice of the finale post and other inspiration for social gathering! Thank you for stopping by!
Welcome to Part 3 of my Annual Friendsgiving preparations. In Part 1, I shared inspiration for the table setting, and in Part 2, I shared the dessert I plan to serve. In Part 3, I’ll share the soup course I’ve chosen.
My theme this year is White Pumpkin, but when it comes to the menu – not everyone is a pumpkin fan. So I’ve decided to use squash to represent the pumpkin. The thing that I try to keep in mind when serving squash is that it’s very fibrous and filling, just like a serving of mashed potatoes, for example. So I try to make a conscious attempt to balance my menu so that everything isn’t overly heavy. I want my guests to leave satiated but not uncomfortable or overly full.
Within the past six years or so, I discovered Delicata Squash when watching one of the many cooking shows I frequent. There are so many wonderful squash varieties to bring into the menu at this time of year, and all are slightly different in taste and texture. Delicata, as its name implies, is a delicate squash. When roasted, even the skin can be eaten. I’ve seen versions where it’s been roasted, boiled, and one where it was dipped in a batter and fried. While I’ve not had the fried version, anyone familiar with Erin French of The Lost Kitchen in Freedom, Maine, has seen her frying technique that I have no doubt is absolutely delicious. I do prefer the oven-roasted flavor to boiling it, and I’ve added it to an autumnal salad or as a simple side dish.
Delicata squash is the easiest to slice and clear of pulp and seeds. Some squashes are so difficult to cut into that you have to fear the possibility of losing a digit in the process.
My recipe was adapted from the original version on The Movement Menu. As always I made some adjustments to the recipe to create a version I wanted to serve my guests.
Roasted Delicata Soup
Ingredients: Yields approximately 4-6 1 cup servings.
3 pounds delicata squash cut into 1/4 to 1/2 inch rings (pulp and seeds removed)
avocado or olive oil
kosher salt to taste
black pepper to taste
4-6 large garlic cloves in the skin (more if small)
1 yellow onion thickly sliced
4 cups bone broth, chicken broth or veggie broth (low sodium)
22 ounces coconut milk about 1 1/2 cans
2 tablespoons dijon mustard
1/2 teaspoon red chili flakes
1 teaspoon fresh thyme
1 teaspoon fresh oregano
1 lime
Chives (for garnish)
Optional garnish- Toasted pepitas for crunch and edible flowers or petals (i.e. marigold petals); a little shaved parmesan cheese would also be delicious.
Instructions
Preheat the oven to 375 degrees Fahrenheit, and adjust the oven rack to the middle position. Set the squash rings on a rimmed baking sheet. Generously spray or brush with 2 tbsp of oil and season with salt and pepper.
On a separate small baking sheet add a 1 tbsp of oil to the pan, sliced onions and cloves of garlic and toss.
Place both baking sheets in the oven and roast for 40 minutes, turning over each slice of squash after 20 minutes until fork tender. Remove both trays from the oven and set aside to cool. RESERVE at least 1 thin slice per bowl being served for garnish.
In a large saucepan or Dutch oven, pour the stock, coconut milk, and dijon mustard. Bring to a full simmer and cook for about 20 minutes until the liquid is reduced by 1/4th. Whisk to make sure the mustard is evenly dispersed.
Add the roasted squash, onions, garlic, red pepper flakes and herbs.
Simmer for about 10 minutes for all of the flavors to come together.
Transfer (in batches is necessary) all of the ingredients to a blender and purée. You may need another bowl or pitcher to pour each batch into and then return all to the pot.
When all of the soup has been puréed, rewarm and prior to serving squeeze the juice of one medium lime into the soup.
Ladle soup into a bowl and garnish with one of the reserved roasted squash rings, chopped chives, and toasted pepitas for a crunchy texture.
PRINT:Want to print this recipe? Just use the “Print” option in your browser’s menu.
After my original post – I decided to add fried crispy sage leaves for garnish and they are absolutely delicious. A great addition but optional.
The flower used in this photo is not edible. It was dried and only used for demonstration.
Part 2 – Coffee, Salted-Caramel, Walnut Swiss Roll Cake
My White Pumpkin themed Friendsgiving plan is moving forward to the menu. The invitation was emailed to my friends (a prior save the date sent in September) and my previous post (Part 1) shared my inspiration for the table setting.
I have a few ideas for the menu, but decided I should test some recipes prior to the actual brunch date. When serving food that you’ve not prepared in the past, it’s best to test it to avoid a flop. I’m glad I did, because my first attempt at the Coffee Walnut Roll did not work as I’d hoped. I decided to combine a couple of recipes and add a few of my own ingredients to achieve a lighter cake with more Fall flavor.
“White Pumpkin” as the theme, I usually try to weave the it into the menu, but not everyone is a pumpkin fan, so I don’t want to hit them over the head with pumpkin. Fall offers a beautiful variety of squashes to represent the pumpkin in my savory dishes that I intend to use. For dessert I decided to make a unique Fall spiced swiss roll that highlights walnuts rather than pumpkin.
This dessert really doesn’t take that long to make (about an hour to an hour and a half if the cooling and chilling time are included). I would recommend making this cake a day prior to the gathering so it has sufficient time to set well in the refrigerator overnight.
As mentioned above I combined a couple of different recipes and then added some of my own ingredients. This recipe was adapted from Martha Stewart’s Raspberry Jelly Roll (the sponge portion with my own added spices) and the filling from BBC.com (Katie Davies) Walnut and Coffee Swiss Roll (with the addition of salted caramel.).
Coffee, Salted -Caramel ,Walnut Swiss Roll
Ingredients:
Unsalted butter, for pans
3/4 cup all-purpose flour, plus more for pans
3/4 cup cornstarch
6 large eggs, separated
3/4 cup plus 6 tablespoons granulated sugar (separated)
1 tablespoon Chinese Five Spice (or 1 tsp each cinnamon, cardamon, ginger, 1/4 teaspoon each ground cloves, anise and fennel seed, or pumpkin spice)
1 1/2 teaspoons pure vanilla extract
1/4 teaspoon salt
Confectioner’s sugar, for dusting
1 1/2 cups heavy cream
1/3 cup confectioners sugar (and extra for dusting – Tip: mix 1/2 cup confectioners sugar with 1 teaspoon of Chinese Five Spice to sprinkle through a sieve over the top when serving)
1 1/2 teaspoons granulated espresso
1 1/2 teaspoons boiling water
1 cup toasted walnuts (reserve 4 to 6 whole halves for decorating the top) finely chop the rest.
1 jar of Smucker’s Caramel Sauce (place 1/2 cup of sauce in a bowl and add 1/2 teaspoon kosher salt taste, if too salty add more sauce if not salty enough add a pinch more salt- set aside)
Directions
Preheat oven to 350 degrees. Butter bottom and sides of an 11-by-17-inch rimmed baking sheet. Line pan with parchment paper and butter again. Dust with flour; tap out excess. In a small bowl, sift together flour and cornstarch.
In the bowl of an electric mixer fitted with the whisk attachment, beat egg yolks, 3/4 cup granulated sugar, vanilla, and salt on high speed until thick and pale, about 3 minutes. Transfer egg-yolk mixture to a large bowl. Wash and dry mixer bowl and whisk attachment.
Place remaining egg whites in mixer bowl, and whisk on medium speed until soft peaks form, about 1 1/2 minutes. With mixer running, slowly add remaining 6 tablespoons granulated sugar; continue whisking until stiff and glossy, about 1 minute more.
Fold egg-white mixture into egg-yolk mixture. In three additions, sift flour, cornstarch and Chinese Five Spice and fold gently into egg mixture, folding to combine after each addition. When no streaks of flour remain, gently fold in 1/3 cup of chopped nuts until evenly combined. Transfer batter to prepared baking sheet, smoothing top with an offset spatula. Bake until light golden brown and a cake tester inserted in the center comes out clean, about 20 minutes. (Do not allow cake to cool – work quickly. Have step 5 ready before the baking is complete.)
Place a dish towel (flour sack towel works best) on a flat surface and heavily dust with confectioners sugar.
Run a knife around the sides of cake. Invert cake onto the dusted kitchen towel; remove parchment. Lightly dust with confectioners’ sugar using a sieve. Using the towel and starting at a short end, roll up cake and towel. Let cool completely, seam side down.
In a small bowl combine espresso powder and boiling water. Mix well and set aside to cool to room temperature.
In a clean mixing bowl add the heavy cream, 6 tablespoons of sugar, two tablespoons of jarred caramel and espresso mixture. Whip until soft peaks form. Keep refrigerated until ready to use.
Unroll the cooled cake. Reserve 1/3 cup of the filling (to decorate the top). Spread the whipped cream on top of cake, leaving a 1/2-inch border. Sprinkle the remaining chopped walnuts over the surface. Using a fork, dip into the caramel and drizzle over the whipped cream filling. Starting at a short end, roll up cake without towel. Wrap jelly roll cake in towel. Transfer to baking sheet, seam side down to maintain cylindrical shape. Refrigerate at least 30 minutes and up to 3 hours. Using a serrated knife, cut a small slice off of each end for a clean straight edge.
Move the set cake to a serving platter. Place pieces of parchment or waxed paper along bottom to keep the dish clean. Dust with confectioners’ sugar before slicing and serving. Place teaspoon sized dollops of the reserved filling on top of the cake and insert one whole walnut halve. Drizzle caramel sauce lightly over the surface.
“Want to print this recipe? Just use the print option in your browser’s menu.”
The original cake I tested lacked in flavor (in my opinion) so I amped it up with Chinese Five Spice and salted caramel sauce. I believe these additions also balanced the strong coffee flavor of the other cake as well. This cake’s coffee flavor was milder due to the increased size and supports my original idea to serve it with a quenelle of coffee ice cream.
Stop by, follow or subscribe to stay in touch and get notified when the next post for this gathering and future gatherings are updated. The rest of the menu will be shared in Part 3.
Slice of cake served with a quenelle of coffee ice cream.
Gratitude is the light that glows constantly within us, providing courage during difficult times, hope in disappointment, appreciation for all of our blessings and love in every form imaginable. Expressing and feeling gratitude sustains our souls and promises that tomorrow will be filled with new life, new opportunities, new friendships, new family, and new blessings.
While we should express gratitude each and every day, November highlights “Thanksgiving”, a time for gathering and expressing those pivotal moments in the past year that we are grateful for. For several years now, I have set aside the first Sunday in November to gather my gal pals for a Friendsgiving Brunch to show my appreciation for their support and encouragement throughout each year.
The day highlights beautiful moments of sharing each other’s growth, accomplishments, renewed faith, travel experiences, health journeys and new beginnings. A time of celebrating each other and feeling joy for the blessings we have experienced individually and together.
I choose a new and different theme for the table decor and menu each year to keep the experience fresh for my guests. (Prior themes can be found in the Friendsgiving search tab.) The past themes have varied from an Alpine Fondue inspired by a girl’s trip in Germany, Alsace-France and the Swiss Alps; another featured a celebration of apples; and last year was a figgy-plum theme, rich in shades of plum and violet.
This year I’ve chosen a white pumpkin theme, accented with soft blush and caramel, sage green and apricot hues. While it is too early to know exactly how I will arrange the white pumpkins (real and faux) into the centerpiece, I did glitter (white) four small white pumpkins and I will either use them on the table or tuck in other areas of my entertaining space.
Baby acorns from an oak tree.
I was in a parking lot parked under an oak tree recently and the branches were hanging so far down that they were touching the roof of my car. When I got out of my car, I noticed the branches were filled with small green acorns. I trimmed a few of the low hanging branches to bring home and set aside to use in some of the decor. This time of years is a great time to look around outdoors, there’s no telling what kind of pretty seasonal items you can find to use.
Below are the center pods of magnolia blossoms when they finish their blooming cycle. They’re filled with pretty red seeds that add to floral decor also.
Magnolia Pods with red seeds picked from the tree.
Joann’s had Halloween and Fall items on sale (50% off) in mid-September. I found a few white and light orange velvet pumpkins on picks and rolls of rich velvet ribbon in shades of salted caramel and pumpkin that add a soft elegant touch to my table along with the gold table runner, cutlery and chargers. A pack of three small sage and dark forest green velvet pumpkins with clips on the back where found at The Dollar Tree.
The velvet ribbon was used for my napkins and I will incorporate the little velvet pumpkins into the floral centerpiece.
One 21 ft. roll of velvet ribbon was sufficient to make 12 sashes on 12 napkins. I would also recommend saving the ribbons after the party in a zip bag for the future. These can be easily reused or repurposed.
Below are a few easy examples of napkin ties. A simple velvet tie (ribbon $3.00 a roll on sale) on it’s own or by tucking in something from the yard or garden is an inexpensive way to elevate your table.
Party planning has to be started well in advance of the scheduled date in order to seek out items for decor. I’m often asked about all of the dishes, etc. that appear in my photos. I actually do not have all of the decorative dishes you see in the blog. Obviously that would cost a fortune – but it’s been a fantasy for me to have different dishes for each time I set the table and trust me- I have many dishes! But realistically the cost and storage issues are real. I have a set of all white and all black dishes and the simple china below in addition is a similar black and gold version that was my Mother’s that you will see has been used a many different ways of the years.
Typically I will purchase one plate and one bowl (like the green and white pumpkin gourd plates here and the white pumpkin covered soup bowl) for the purpose of the blog. For the day of the actual party, I will use my lace and gold trimmed china and white bowls for a group of 8 to 10 guests. The centerpiece and menu will capture the White Pumpkin theme and as you can see below, is just as pretty. It looks very gold, cream and beige, but the florals will add blush and a little peach color later.
In my next edition, I will share the menu plan when I’ve finished testing and creating recipes. There are no rules, use what you have, add little inexpensive flourishes and delicious food – and you’ll have a memorial day with friends that will last a lifetime. See you soon! (Don’t forget to like and share!)
Instagram: Social_Interactions_parties
Resources: *Items preowned for some time or purchased several years ago.
Welcome back to my 4th and final edition of planning for “A” Beer-witching Beer Tasting”.
In Part 1, I shared the process for etching beer tasting glasses and how to make a thrifty beer-flight tray.
Part 2 provided inspiration for an elegant and moody table setting.
Part 3 provided inspiration for how to set the scene from the welcome mat to the various areas of your home that guests will gather, carrying the moody environment and ambiance that encapsulates the party theme.
Now that the table and home decor are all in place, it’s time to focus on the final edition that offers some beer and food inspiration.
As the hostess I usually contribute an aperitif, the cheese course and dessert course to the party. My guests are asked to bring a small bite and their assigned wine or beer. To avoid duplications, I ask that each guest send me a picture of the label of their bottle and advise what small bite they are bringing. It’s important to me as the hostess to make every effort to encourage a healthy balance of vegetables and protein to essentially come together as a balanced meal rather than just party food. Fortunately, my group of friends are all hearty foodies and for the few that are picky, they’ve opened up to trying new things.
The Aperitif
A SNAKE BITE
An Aperitif is a nice way to welcome my guests to sip, gather and visit, while I’m pouring wine or beer into the designated glasses and making final preparation for the cheese course. Guests are given time to rewarm or place their small bite contributions on platters (usually arriving in plastic containers with garnishes, etc.) When it appears all is ready I make my announcement to gather for a lessing and then everyone to be seated at the table.
The aperitif is usually wine based (for wine tasting parties), so for this beer tasting party it will be beer based. I don’t serve hors d’oeuvres with the aperitif because I’m trying to keep the palate clear for the tasting of the wine or beer prior to introducing food to the palate. It is served in either a tall shot glass or half glass, for just a small something to get things started since there will be 5 to 6 partially filled glasses of wine or beer on the table for the tasting.
I searched Pinterest for some beer cocktail ideas and found the following that would fit into my Beer-Witching theme:
Snake Bite – Half Hard Cider and half Lager (photo above)
Black Velvet -Guinness and blackberry liqueur.
Cider Beer Sangria -made with Hard Cider, Wheat Beer, Ginger Beer, Calvados and sliced pears, apples and oranges
Pumpkin Ale Beermosa – Pumpkin beer, apple cider and pumpkin spice (or Chinese 5 spice rim
The Beer Tasting Options
Full disclosure I am no beer expert. I know absolutely nothing about beer and frankly I’ve never been able to develop a taste for it. This is why I was interested in hosting a tasting with the idea of discovering a beer that and some of my guests that also may not be found of beer, make actually enjoy.
Recommendations in my research for the top types of beer to consider for a tasting included:
IPA/APPA
German light lager
Something Belgian
Sour or funky beer
Pilsner
Porter
Pale Ale
Wheat Beer
Oatmeal Stout
Marzen Style Beer
In order to ensure we have five different types of beer, I would assign each couple or individual guest a type of beer to bring. I visited a few of my local liquor stores and took pictures of some of the varieties found. Of course being in Louisiana, and living just miles from Abita Brewing, I included some of the local brews as well.
The Cheese Course
The cutest ideas are shared on Pinterest and Instagram that anyone can search for and make their own interpretation. Over the years, I’ve moved away from charcuterie boards that are expensive to put together and frankly a little predictable and boring in my opinion.
Since I’m trying to capture more of an elegant moody aesthetic rather than kitschy, I’ve started looking for special ways to serve cheese as a dish rather than just the cheese itself at all of my parties. In the past I made a savory honey goat cheese tart, white truffle brie souffles and a manchego fennel salad, just to name a few.
For this party and theme, I like the idea of a beer cheese fondue served in small black bowls or cauldrons, with sliced apples and mini homemade (or freezer section) pretzels, like the one in this photo from Me and Annabelle Lee. There are multiple beer cheese fondues to choose from on Pinterest. I like serving one small bowl per couple at the table and a side plate or small basket of dipping accoutrements.
NOTE -IDEA: As I was making the serpent breadsticks further below, I thought it would be fun to use pretzel dough and shape it into little coiled serpents sprinkled with black sea salt to dip into this cheese fondue.
One year four puffed pastry dishes and another two tomato caprese salads were brought at the same party. From that point forward, I asked guests to advise what they were bringing in order to avoid duplications and too much of one thing like puffed pastry. As stated previously, I try to encourage a balanced meal of protein and vegetables making it more of a dinner party. If there isn’t enough protein coming in, I may have to add something myself, or if I’m not getting anything fresh and light to balance a lot of protein or heavy rich items, I may have to add vegetables or a salad.
Not everyone shares in my love of cooking, so being sensitive to that, I do search through pinterest and send a list of inspirational posts to my guests to generate ideas they might consider that doesn’t require a lot of time or technique. I’m so fortunate that most of my group has a cook among their household that truly enjoys creating something delicious for the party and honestly the food has gotten better and better over the years if not a little competitive as well.
A small bite can be something as simple as this Devil’s Tails on Ice. No cooking required. A simple shrimp cocktail kit from the grocery store elevated. Place a teaspoon of the seafood sauce provided with the kit into the bottom of tall shot glass. Straighten the boiled shrimp with a cocktail pick or long toothpick. A little garnish of lemon and fresh dill transformed this store bought kit into a small bite with character. Rock candy was placed around the shot glasses to look like ice, but actual crushed ice would also be a nice flourish.
Garden of Eden Autumn Salad With Serpent Breadsticks
The idea for this salad started with the serpent breadsticks at my previous Haunting themed wine party. As I prepared to recreate it, I found shortcuts and most items unintentionally were purchased at Trader Joe’s. So here’s what I used to make the salad. This has a very simple prep with no chopping or slicing if you omit the pecans or use pecan pieces.
The following would serve approximately 4 – 6 depending on the serving size. In my case these are considered small bites, so small portions would be served.
Starting with the cooking part:
1 cup Black rice (cook per package instructions) set aside.++
Optional: Preheat oven 350 degrees F: The seeds and nuts that are included in the slaw kit can be used, but I used about 1/4 cup each pecans and/or pepitas instead. (Toast in the oven for 10 minutes – chop the pecans) set aside
Preheat oven 425 degrees. One pkg. of peeled and cubed fresh butternut squash. Toss cubed squash in olive oil, salt and pepper and spread in one layer on a baking sheet. Roast 15 minutes, toss the squash and roast another 15 minutes. (Set aside to cool.)
The cold part and putting it all together:
1 Broccoli and Kale Slaw Kit (remove the envelope with dried fruit, sunflower seeds and dressing and set aside).
2 cups baby darugula
1 package of shredded carrots (or shred carrots in the food processor)
Optional: One Granny Smith apple cubed into bite sized pieces
Optional: Grated parmesan cheese
Start with cooking the black rice per package instructions. Next if using pecans and pepitas roast per note above then set aside. Increase the oven temperature to 425 degrees. Prepare the squash in olive oil salt and pepper and place on baking sheet in a single layer. Roast 15 minutes toss and roast another 15 minutes. Set aside.
In a large bowl, add the Broccoli and Kale Slaw only (the packets will come in later), shredded carrots, apple and arugula. Toss to mix evenly. When the the rice is cooked and squash is roasted, add the salad dressing packet contents to the bowl with the slaw, carrots, apples and arugula. Toss to combine evenly. Add the dried fruit, 1/4 cup cooked black rice, seeds and nuts. Gently toss to distribute evenly. Add roasted squash again gently toss. When serving sprinkle with grated parmesan cheese.
++ The leftover black rice can be used make arancini balls, a black rice sushi or a variety of ideas that can be found on pinterest which is my source for inspiration.
Serpent Parmesan Breadsticks
Pillsbury bread stick (in pop open can) ** [makes about 6 per canister.]
Olive oil for brushing surface
Grated parmesan cheese
Hawaiian black salt or black sesame seeds (everything bagel spices also would be a tasty option)
Black peppercorns
Grape tomato flesh (cut into serpent tongues)
Preheat oven 425 degrees.
Removed bread dough from the can and roll out into a rectangle – using a pizza cutter or knife cut into 1″ strips. Making the widest end the head, insert two peppercorns for eyes. Insert tomato tongue at the end of the head and pinch the dough around it securely.
Brush the surface with olive oil. Sprinkle oiled surface with parmesan cheese (adds much needed flavor) and then with black salt, black sesame seeds or everything bagel seasoning. (if using only black sesame seed, add a light sprinkle of kosher salt – it needs salt for flavor). Form a point at the tail end and coil the body. This works better that the straight versions and makes it easier to use as a garnish on the salad bowls.
Bake per package instructions, however adjustments may be required. I recommend starting with half the time indicated and then adding a couple of minutes at a time until golden.
** For my practice run I used the pizza dough from the can because the bread stick version was not available at my store. The breadstick dough results in a softer chewy serpent (as a normal breadstick would be), the pizza dough was more of a crunchy consistency, but works as long as you don’t over bake it. It was golden brown in 12 minutes in my oven at 425 degrees.
Some small bite options that your guests could bring to the party are listed below. It’s a fun time for taking something normal and rethinking it into a spooky presentation.
Black rice arancini balls
Black ink pasta dish with roasted butternut squash
Dates wrapped in bacon
Deviled eggs ( several spooky options can be found on Pinterest)
Chicken wings glassed with a dark barbecue or asian glaze for bat wings
I purchased a pack of honey roasted pumpkin ravioli at Trader Joe’s and while looking for sauce options I found the post above @perfectleehungry. Ironically she used the same ravioli. Premade honey roasted pumpkin ravioli (takes only 2 1/2 minutes to cook in boiling salted water) and a simple balsamic brown butter sauce and pecans is made so quickly it’s finished when the second batch of ravioli is cooked. A simple preparation that is flavorful and two per person qualifies as a small bite. There were 11 in each packet, so 5 servings with each person getting 2.
Time for Dessert
Chocolate Guinness Stout Cupcakes
Halloween and witches make me lean toward chocolate for dessert. Wanting to use beer as part of the dessert, I used the Chocolate Guinness Cupcake recipe from Sally’s Baking Addiction site. The cake is light and rich. I used a chocolate guinness.
Note: Noting the term “malt” on the chocolate guinness bottle, I bought a box of Whoppers Malted ChocolateBalls. I chopped up some of the candy to tuck into the batter after pouring into the cups and covered over with batter before baking to add a little surprise crunch inside and for decoration on the top once the whipped topping was added.
The buttercream for Sally’s recipe looks perfectly lovely, but I wanted something lighter with less sugar. The menu of the night includes a variety of rich and somewhat heavy food so I wanted to have a light dessert to finish the evening. I made a stabilized chocolate stout whipped cream to create somewhat of a bubbling cauldron.
Start with placing a mixing bowl and whisk beater into the freezer for 30 minutes. Use a very cold bowl. Meanwhile:
2 oz. cream cheese at room temperature
Place in a small bowl and whisk until smooth. Set aside.
1/3 cup of bittersweet or dark chocolate chips
2 tablespoons milk
Place chocolate and milk in a microwave safe bowl and warm in 30 second intervals twice. Stir to combine until a smooth ganache is formed (with additional 15 seconds if needed). Set side to cool to room temperature.
1 1/2 cups heavy whipping cream
4 tablespoons powdered sugar
reserved stout with espresso from the cake recipe
Whopper malt chocolate candy
Remove the mixing bowl from the freezer and fill with cold whipping cream. Using a hand or stand mixer, whip the cream until slightly thicker. Add cream cheese and whip to combine, then add the powdered sugar. Whip to distributed. Add the chocolate ganache and stout espresso liquid (from the cake recipe for the buttercream). Start stirring on a slow speed to distribute. Then whip to stiff peaks. Place into a piping bag with a large round tip (or cut off the corner of a flat ziplock bag) and pipe bubbles on top of each cupcake in various sizes. I also added malt ball candy and some white chocolate crisp pearls that are similar to malt balls.
Welcome back to my Beer-witching beer tasting party event plan. When having friends over a few times a year, I don’t want it to feel routine or dull. I always want to create an element of surprise with a fun energy. With each party theme I’ve imagined over the past several years, I try to make each experience new and fresh, while repurposing some of the same decor items. Purchasing all new items for a home party is just not what most of us can afford to do. Borrowing items from some of the guests is also a way to add fun decor without breaking the bank. This is why selecting good quality items that will last for a long time at a great price is the best practice.
Decor from a past Hauntingly Elegant Wine Party
My themes are also not usually repeated, however something like Halloween can be interpreted in many ways and I lean toward an elegant translation rather than a kitschy version. I haven’t had a Halloween party for several years and it wasn’t called a Halloween party. The theme was A Hauntingly Elegant Wine Party that featured skull heads purchased at The Dollar Tree, Spanish moss, cork spiders and dried flowers.
The picture above and several below are from that party. I typically buy a bouquet of fresh flowers every other week. Since it is my practice to start brainstorming a few months prior to a party, I noticed how some of the roses were drying in tack. So I trimmed their stems and laid them out of a baking sheet allowing them to continue to dry on their own. Once completely dried I set them gently aside in an open container (to prevent any possible molding) and when setting my table I combined the dried flowers with glittered black twigs, and sprinkled some of the petals with the Spanish moss to create a moody centerpiece. I had enough roses to add a sheer black bow and lay one on each place setting.
Some of the dried roses that didn’t stay attached to their stems were used to fill lanterns with battery operated candles and Spanish moss.
The Hauntingly Elegant party featured red wines -each guest brought bottles with spooky labels. I used my black and gold china dinner plates, goldware and a paper plate that was removed for dinner, but then used to serve the dessert.
For my beer tasting plan, you will recognize some of the items in these pictures are being repurposed in a new way. No skulls for the Beer-Witching theme, in its place are black crows, spiders and a some Witch decor.
Decor for a Beer-Witching Party
In Part 1 – I shared how to make a beer flight tray and etch numbers on beer glasses.
In Part 2– I shared ideas for setting the table. (Resources were provided at the end of the blog post).
In this edition, I’m sharing ideas of how to repeat some of the table decor in other parts of the house or at least the areas of your home where your guests will gather prior to sitting at the table for the tasting. Setting the scene and creating an environment.
The Welcome Mat
The first impression starts with guests arriving at your front door. Whether using Fall decorations or combining Fall with your theme, a fun welcome sets the party mood before the guests enter your home. A little lighting, luminaries along the path to the door and hint of the spooky Witch theme says there’s a party inside. Use what you have like I did, or create something new.
JoAnn’s currently 50% off – sale price $13.00
Big Lots $13
A Welcome Party Environment
In my home, I have an open living area that includes the dining room, living room, kitchen and breakfast room. Typically my guests gather at the kitchen island for an aperitif while I and a couple of my guests open the wine or in this case the beer, assign a number (for blind tastings) and then pour the contents into the glasses on the table with the matching number.
To carry the decor to my kitchen island I used a large binder clip to attach one of the black crows to my pendant light and draped dried Spanish moss and some of the crusted crepe myrtle tree branches to continue a spooky moment.
Using tarnished silver, brass or copper adds to the moody ambiance of the theme. I used an antique silver slightly tarnished vase filled with more of the crusted branches in addition to branches with dried crepe myrtle flowers. No fresh flowers for this event, dead and dried is in!
Guests contribute to the party by bringing a small bite in addition to an assigned wine or in this case beer. As everyone arrives some of the food brought in plastic containers for travel, requires rewarming and/or will be placed on a serving platter and garnished. Final touches are being made and then all of the food is displayed on my breakfast room table. Some of the guests may gather in the living room and sit while waiting for me to signal that it’s time for everyone to find their places at the table.
Since all of these areas are being used as part of the evening, I continue small flourishes of the same style decor items used on my table.
Placing decorations in higher areas (light fixtures and mantels) rather than only on the surface of tables and end tables, helps to draw the eye up and around the room when placed at different levels.
Years ago I purchased these black lacy spider webbed lamp shade covers that I’m repurposing. As a thrifty alternative The DollarTree has gauze/cheesecloth -like spider webs in gray or black that can be draped over lampshades or other areas in your room to create a moody ambiance.
The Dollar Tree also had these fun spiders that can hang from chandeliers or be tucked into decor.
For the witch element I chose to place my hat and broom in the largest surface area of the living room that would not be used for food or drink.
During my morning walk, specs of bright red caught my eye on some of the magnolia tree branches that line the medians. For the first time, I realized that the center pod of the magnolia flower had shed it’s petals, but wasn’t finished. Plump red seed shaped but berry-like folicles (per my internet search) are growing from the cone.
I decided these red studded cones would add some additional Fall interest to my decor. I snapped a few off with some of their foliage and tucked each among the moss and dried flower petals on the table and other areas of the house. The great part about all of the Fall foraging items is that when the moss, crows and spiders are removed, it still works as beautiful Fall decor that can be carried on through Thanksgiving.
Per my search: Most magnolia seeds are found in large cone-like fruits called follicles. Once the follicles open up and reveal the seed which is often red and covered in a waxy coat, the seed can be harvested.
The magnolia seed pods can be used for simple Fall decor, but for the party I added one of these fun spiders from The Dollar Tree.
Don’t forget the bathroom. Add a little matching floral decor, provide napkins for drying hands and a little scented candlelight or a lamp.
Earlier this year, I hosted A Starry Winter’s Night wine party and used a star projector used for a kid’s room to project stars on the ceiling of my dining room. I decided to return it because I didn’t plan to use it again, however it had various settings where the sky could be changed to green, purple or red and it also had bluetooth connection for music if desired. The version I used is no longer available (Galaxy Night Light Projector) and regrettably I could have added another layer of spooky – moody ambiance by projecting a purple sky for this party. If you or a friend’s child had a galaxy projector it may be something to consider using.
Entertaining for me, is creating a memorable afternoon or evening where my guests feel cared for, special. Where they enjoy each other’s company while at the same time, learn a little about the culture and traditions of different countries as we take a small dip into the wines, cuisines and this case beers from around the world.
Be sure to Follow or Subscribe to receive notification of the final planning of this party and many more to come.
Resources: * items purchased years ago
Black lace spider web tablecloth and lampshade covers, Amazon
Black cows (Michaels*) also can be found online
Black spiders, Witch Shoes (front door), The Dollar Tree
My prior post (Part 1) shared how I prepared my beer tasting glasses with etched numbers and how I put together my thrifty beer flight tray. Part 2 will address the special touches that add ambiance and beauty to the event.
The table and room decor creates the party’s point of view, theme, spirit and theatrics. As they say we eat with our eyes first and the same goes for a party. When guests arrive to a well dressed table and room filled with theme decorations, it creates excitement and enhances the the party experience.
The decor is my favorite part of the planning process and starts with very basic items. As the days prior to the party progress, the decor continues to evolve with small embellishments and well thought out flourishes. This is why I usually set my table a couple of weeks in advance of the party. It’s a 3-D vision board, that each time I pass by, something may come to mind that I can add, or display in a different way to make everything look its best.
I take pictures from different angles and find ways to move items around to improve the overall look. In the pictures above, I’m using only half of my dining room table to stage and determine placement of items.
The black plates and gold chargers provide the moody, spooky, but elegant setting that I’m trying to achieve. The chargers match the beer flight trays and I’m using my Mom’s bronzeware wood handled cutlery. Dark burnt orange flickering candles add a soft ambiance. Black crows and glittered floral twigs from a prior Hauntingly Elegant Wine party (Sept 2019 post) are being repurposed to add to the dark and spooky ambiance.
My neighborhood has a very active Halloween night with almost 100 trick or treaters each year. I’m known as the “Spider Witch”. My doorway and wreath are spider themed, so when I found this spider witch hat it was the perfect witch hat to greet my little trick or treaters with. I’m using my witch had and a cute little sparkly witch broom found at The Dollar Tree as part of my room decor.
The summer heat has really given my shrubs and trees a beating. As I looked around the yard, I found items I could forage to use in lieu of fresh flowers. The decayed botanicals, moss and green crust like bark on branches that I found throughout my neighborhood walk, fit perfectly into my spooky witch tablescape.
The crepe myrtles were still blooming, so I cut a few branches that I placed in a vase with water and was able to enjoy their fresh blooms for a few days. Slowly the flowers and leaves began to wither and dry and I was about to toss them in the garbage when I realized they could add a lovely pop of color among the grays of the moss and branches. Save roses, hydrangeas and other flowers as they begin to wither and sprinkle the dried petals over moss. (Note: If using moss I would recommend buying some rather than using some from the yard unless you thoroughly wash and dry it. You may be bringing bugs other unwanted insects into the house. The Dollar Tree has had bags of it in their floral-craft section over the years.)
Tarnished silver, pewter, brass and copper items also fit well into decor for this witchy spooky theme and can be used to make the dried bouquets, hold candles or serve some of the food items. to my table t
I returned to my table to add some of the branches, moss and dried flower petals to for layered interest.
Below is an example of the before and after of this one section of the table. While the original version is fine, the little bit of natural adornments elevate the setting.
WITHOUT TREE BRANCHESCRUSTED TREE BRANCHES ADDED
I have black cloth napkins that I could use, but I found this pack of BLACK MAGIC paper napkins that I thought would add some interest to the table. The napkins can displayed next to the bathroom sink so guests can use a fresh napkin rather than sharing a towel for drying their hands.
In the next edition, I’ll share ways to add decorations to your room and surrounding areas to create a fun and festive environment for this Beer-witching theme.
Resources: * items purchased within past 6 years
Black salad/lunch size plates The Dollar Tree *
Gold charger plates and rectangle trays The DollarTree*
Immediately after Labor Day most of us are pulling out the Fall decor and ready for the especially hot summer days to simmer down. As we look forward to the beautiful colors of the changing season (which is still some time away), my thoughts shift to another themed party.
Several years ago I purchased small beer glasses hoping to gather my wine group for a beer tasting event (Websrestaurant store website). While I’m not a beer drinker, over the years so many new crafted beers along with an ongoing evolving variety of options now available, make it possible that everyone may be able to find something they do like after all in the beer world. That is what is so great about these parties, they’re designed to help us explore not only friendship connections, but also a variety of food and beverages that we might not have otherwise experienced.
October seems like an appropriate time for this party due to the traditional Oktoberfestivals that take place around the world featuring beers, and I thought it would be fun to combine the tasting with a Halloween theme inspired by the “Witch’s Brew”. As the ideas started “brewing”, I thought I would share the planning and creative process in a series of posts, rather than combining everything in one post as I have in the past.
When hosting a “tasting” party, there’s the option to rent glasses or purchase glasses. (In the case of beer, even disposable clear plastic cups would be an option). In my case I intended to have a future of wine tasting parties throughout the year and beyond, so I chose to purchase similar shaped glasses at places like Homegoods and TJ Maxx. Eight years later, the glasses remain stored (between wine club parties) in their original boxes and are stacked on the shelf of a spare room closet. I chose to purchase sturdy, but inexpensive glasses so that there was no guilt if some were broken over time. I’ve probably lost about 6 to 8 glasses (which is not bad for 8 years) for various reasons (even something as simple as cutting the rim from the glass because I placed my hand inside to dry it and my small diamond ring made a clean circular cut and the top half of the glass popped off. ) You just learn as you go what to do and what not to do when cleaning.
Several years ago my gal pals came over one afternoon and we etched numbers on all of the wine glasses. Previously I was writing the numbers on each glass with a glass marker and then had to make the extra effort when washing them to wash away the number and reapply it for each party. A friend suggested etching and it not only turned out to be beautiful and professional looking, but it also made my job as a hostess so much easier.
Etching glass is a very easy process, but time consuming and I’ve made a few mistakes that I’ve learned from that I put in the “tips” list below. I’m reusing the same vinyl peel and stick stencils I used for the wine glasses, so they aren’t as crisp, but they are doing the job. I purchased a set of 3 of the numbers 1 through 7 on Etsy for a very reasonable price. The etching cream can be purchased at craft stores or online. I am using what remains in the bottles I used for the wine glasses.
Tips to avoid errors:
Use plastic disposable cups or bowls to pour out the etching cream. Anything that is glass or metal, etc. will be etched or ruined by the solution. Also be careful in your sink. Use a large plastic bowl with some water in it for rinsing and dump the water outside in a safe area. (I have a brass tinted stainless steel sink that I ruined with two small spots left by the etching cream.)
Cover the surface you are working on with a plastic garbage bag.
Wear disposable rubber gloves when washing the cream off of the glass.
A wet paper towel easily removes the cream (under warm running water) when the 15 minute setting time is complete.
Use a 1 inch masking tape to apply to the top rim of your glass. This provides a guide for the starting placement of each stencil so that all of the numbers on the glasses are uniform.
Peel the vinyl stencil and it’s top clear cover from the paper backing and line up the stencil right up against the masking tape line.
With the clear cover still attached, use a craft bone folder knife or the backside of a plastic knife to scrape and press out all of the bubbles along the edges of the number. The outside edges aren’t as important, but the area all around the number has to be firmly sealed so that the etching cream does not bleed outside or under the number. Then remove the clear cover. The vinyl stencil may be easier to even out without the top cover.
When applying the etching cream, be very careful not to exceed the borders of the vinyl stencil. If concerned, add masking tape all along the exterior to avoid going outside of the stencil border. Etching cream is applied with a special short brush, however a medium flat artist’s brush can also be used. Take caution to place the brush on a piece of paper towel between applications. This etching cream will get on unwanted surfaces and containers if caution is not applied.
Apply a thick layer of the cream over the entire number (only). Set a timer for 15 minutes. ( I have prepared up to 6 glasses at a time and then set the timer).
Wearing gloves use a wet piece of paper towel and light stream of warm water (over a plastic bucket or container) and wash off the solution in an upward motion. I recommend this to avoid spreading any of it on to the other areas of the glass.
Gently peel off the tape and stencil (I immediately put the vinyl stencil back on to it’s paper backing and then replace the clear covering. Once fully dry it can be reused).
Wash the glass thoroughly and dry inside and out to ensure all solution has been washed off. ( I use flour sack cotton towels that I find leaves each glass unstreaked and without lint and I’ve cleaned A LOT of glasses over the past 8 years. ) I also use liquid Finish in water (in the dishwasher detergent area) to wash my glasses after use.
Creating a Beer Flight Paddle
Next came the beer flight paddles, commonly used for beer tastings at breweries and pubs. The paddles are costly and finding a place for storing them away knowing I probably won’t have another beer tasting had me looking for a creative alternative.
I remembered I had purchased these gold rectangle trays at The Dollar Tree a few years ago ($1.25 each). They are the perfect size to display five glasses. (I previously used these to serve desserts for two.) I wasn’t sure at the time how I would use them, but for the price and how nice they are, I continue to find more options.
Trays used to serve desserts for two.
Conveniently, an 8 1/2″ x 11″ piece of cardstock folded in half lengthwise and then cut in half using a paper cutter, fit perfectly into the center of the each tray. I then placed five glasses in an even pattern on the cardstock and traced the bottom of each glass with a pencil. Using a pair of curved manicure scissors ✂️ I cut out each circle.
I sprayed each completed card on one side with left over black paint from a prior party. When the paint was completely dried, I placed a card inside each tray with the etched glasses.
I chose black to fit in with the “Witch” theme. The final result looks both elegant and fits into my spooky Beer-Witching theme; a beer flight tray, rather than a paddle.
A successful themed party starts with preparation and inspiration long before that scheduled date. In order to avoid stress by trying to pack everything into a short period of time I search through items I already have to control the overall cost. I repurpose items when I can and look for ways to elevate inexpensive finds. My intention is to share my planning and preparation process in hope that it will inspire my readers to put together their own themed parties to share with family and friends.
My next edition will offer ideas for table and house decor to set the scene for this beer-witching party. Come back again soon or I’ll cast a spell on you!
I was searching for a “pink” soup for the Barbie Pink Brunch and did not want to serve a fruit or cold soup. I remembered that Erin French of The Lost Kitchen on Magnolia Network made a radish soup in the second season of the show. While she didn’t provide or publish her recipe, I used some of the ingredients she mentioned in the episode to inspire me for this soup. I must confess that I didn’t technically measure the amounts and since potatoes, leeks and radish all vary in sizes the measurements could vary, but the flavor should be the same regardless. It is best served lukewarm.
Note: All pieces of vegetables should be cut into similar size in order for all to share the same cooking time.
For the soup: Approximately 12 one cup servings serve lukewarm
2 lbs. peeled and cubed Yukon Gold potatoes
2 large bunches of red radish ( reserve 4-6 to shave on mandolin for garnishing bottom of bowl) clean and cube the rest do not remove the red exterior
3 medium leeks (whites only chopped and cleaned)
3 celery stalks (chopped) clean and reserve celery leaves for garnish
Approximately 1 quart of water
2 teaspoons chopped fresh thyme
1 tablespoon salt
2 teaspoons fresh ground black pepper
1 stick of butter (cut into tablespoons)
1 16 oz. can of evaporated milk
1 cup heavy cream
2 tablespoons white balsamic vinegar
Optional: (for a darker pink color add 1 tablespoon of beetroot powder)
Optional: (migro greens and pink edible flower petals to garnish)
For the pesto:
1 cup of sunflower seeds (without shells)
1 cup cilantro
1 cup fresh Italian parsley
zest and 1 teaspoon juice of one small lemon
1/2 teaspoon white balsamic vinegar
1/4 cup grated parmesan cheese (optional)
1/4 cup olive oil (may vary see note)
Salt and pepper to taste
Soup: Place potatoes, radish, leeks, celery and thyme into a dutch oven pot or other large soup pot. Fill the pot with water until all of the vegetables are submerged. Add salt and pepper. Bring pot to a boil and cook until potatoes are tender when pierced with a fork. (Meanwhile make the pesto – see below).
Using a chinese spider strainer or spoon, carefully mix and remove some of the cooked vegetables to a blender. Fill the blender 3/4 and add some of the broth from the soup pot to puree the vegetables. (Caution – when blending hot items in a blender make sure to leave the pour spout or center open and hold a dish towel over the opening. Hot liquids can rise quickly and cause burns – so be careful not to overfill the blender prior to processing.) Pour the processed vegetables into a different pot. Continue to work in batches to process the remaining vegetables and pour into the second pot.
Once all of the vegetables have been processed add 1 stick of butter and the can of evaporated milk. On a medium low heat stir the puree and work in the butter until it is melted. Then add the heavy cream. Taste the soup and add salt and pepper as needed. Add additional broth, or heavy cream as needed to establish the consistency you prefer. Simmer stirring frequently, until heated through. (If a deeper pink color is desired, add the beet root powder). Add white balsamic vinegar. (Not dark balsamic will brown the color- it will not have an appetizing color).
Sunflower cilantro pesto:
Place sunflower seeds, cilantro and parsley into a small food processor and process until just slightly chunky. Add lemon zest and juice, vinegar and parmesan cheese and process. Add olive oil until creamy but with a slight chunkiness. It is best to have some of the crunch of the sunflower seeds to add texture to the soup when stirred. Add salt and pepper to taste. Scoop into sealable jar (to save the leftover pesto).
To Serve:
Place a dollop of pesto in the bottom center of the bowl. Using the shaved raw radish create a little flower. For the party, I poured the lukewarm soup into a ceramic pitcher and poured the soup into the bowls tableside. Sprinkle the top with micro greens and edible pink flower petals (if placed in the bottom of the bowl the greens and flowers are weighted down by the soup).
My guests slowly stirred the pesto into the soup and the crunch from it and the sliced raw radishes added a nice fresh texture to the silky soup. While this soup was served in the heat of summer, it would be a great soup for any time of the year. Enjoy!
The centerpiece of my brunch table was a pair of Michael Kors high heels purchased at Goodwill for $4.00 and then painted hot pink and filled with flowers, but I still had more high heels planned!
I found a picture of these cupcakes on Pinterest, but there were no recipes or instructions provided. That left me with finding the courage to take on the challenge of putting it all together.
Since my cocktails for this party started with a cherry flavor, I decided to also include the cherry flavor in my cupcake with chocolate – I mean Barbie would have to love chocolate right? So I decided to make black forest cupcakes.
I found black and white striped cupcake paper liners (Hobby Lobby) that linked with the black and white swimming suit worn by the first Barbie in 1959. The chocolate cake once baked made it harder to see, but I did explain the reference to my guests. A white cake would probably leave the stripes more visible, but I don’t regret the chocolate!
Following the recipe in the link below from Food Duchess blog, with my only variation to the cake portion, I used Amarena cherries to fill the center of each cupcake after baked and cooled. It is best to make these a day ahead and refrigerate overnight allowing the cake and topping to firm up and hold together to ensure stability. This cupcake was light and fluffy and not overly rich.
I made a stabilized whipped cream cherry flavored topping – instructions provided below.
NEXT: After the cupcakes are baked and completely cooled, use an apple corer or a small spoon to scoop out some of the center of the cake and save in a small bowl. Insert two Amarena cherries and then return the pieces of cake that was removed on top and gently push the cake down over the cherries. If you’ve never had an Amarena cherry I highly recommend you buy some. Smaller jars can be found online and different brands at places like Total Wine and Cost Plus World Market or gourmet specialty and liquor stores. They are fabulous for cocktails and desserts with a rich cherry flavor like you’ve never known could exist. While visiting my daughter in Houston these rich cherries were found mixed into vanilla gelato at different locations. Absolutely delicious! This type of cherry is usually pricey but worth the price and a jar also would make a great hostess gift. This extra large jar was purchased at Costco for $12 which is an incredible deal.
With the cupcake baked, cooled and filled – we move on to the topping. I didn’t want a heavy, sugary buttercream, so I made a whipped cream cherry flavored topping. The gelatin stabilizes the whipped cream making it firmer, easier to pipe and holds together nicely when the completed cupcake is refrigerated overnight.
Cherry Whipped Cream Topping
Ingredients
2 cups heavy cream
2 tablespoons cherry jello powder
1/2 cup powdered sugar
Freeze the Bowl
Chill a metal mixing bowl and beaters in freezer for 15 minutes or more.
Remove from the freezer and immediately:
Put all 3 ingredients in the chilled bowl and beat with an electric mixer until stiff peaks form / it’s scoopable with a spoon and holds its shape. Place into a piping bag with decorator tip of your choice and swirl on top of the baked cupcake.
With the topping completed, I used chocolate raspberry Pepperidge Farm Milano cookies and Pirouline chocolate hazelnut cookies to complete the shoe. It look a couple of tries, but I cut the Pirouline cookie in half on a diagonal. I then held the two cookies together in place to form the heel and determine the angle that the Milano cookie needed to be pushed into the cupcake. Then using Betty Crocker (generic Great Value at Walmart) pink icing to connect the two cookies to form the heel. I had some large candy pearls that I stuck to the icing for a better finish. I also made a small piped line along the sole (Milano cookie).
Finally, I used edible wafer flowers (Hobby Lobby) and pressed a large candy pearl in the center of the flower prior to pressing it into the center top of the whipped topping of the cupcake. It was the perfect dessert for my Barbie Pink themed Brunch and not nearly as difficult as I had anticipated. The choices I made were light and not overly sweet for a comfortable finish.
This was a fun playful dessert and great way to surprise your daughter, granddaughter or friends for a fun gal pal tea with this iconic symbol of Barbie!
My parties alway begin with an Aperitif or cocktail and some kind of small bite(s) giving guests something to sip on while visiting with each other while I’m readying the wine bottles or finishing up food prep. When wine tasting is involved I do my best to select or create an aperitif that includes wine so that the palate is not disrupted with a harsh alcohol or flavors prior to the wine tasting. I also do not usually offer food for the same reason. But this is a brunch, and while wine tasting is included it’s more about the brunch than the wine.
I named this cocktail Ms. Shirley Temple as it includes cherry syrup, cherries and sparkling wine. Frozen dragon fruit and water were used to create little flamingo ice cubes that made the cocktail a hot pink color as it dissolved.
Ms. Shirley Temple
1 teaspoon Amarena cherry syrup
1 teaspoon Kirsch liqueur
1 dragon fruit ice cube (flamingo)
top with Prosecco, Cava or Sparkling wine
top with 3 blush pink maraschino cherries (or Amarena cherries)
Pink Small Bites
A favorite charcuterie item at my parties have been Trader Joe’s crisps, specifically the Fig and Olive flavored. While visiting Trader Joe’s in the Spring I found a new flavor -Strawberry and Jalapeno that I tucked away in the pantry for a future party. This version was quite spicy so to slightly cool it down and add the pop of pink I used a hibiscus berry honey goat cheese (room temperature) to spread on the top of the crisp and then tiny sweet basil leaves and a fresh raspberry. The result was a real flavor bomb. A combination of tart, sweet, sour and ending with heat. This small bite was a really fun surprise. (If made too far in advance the crisp will get soggy, so serve within an hour of putting it together).
Trader Joe’s Strawberry and Jalapeno Crisps
Hibiscus berry honey goatcheese ***
Small sweet basil leaves
Fresh raspberry
*** This goat cheese is seasonal also and may be hard to find, but it can be made with room temperature goat cheese. Place about 6 to 8 fresh raspberries and a tablespoon of water in a small saucepan. Slowly cook until the raspberries burst and create a syrup. Push through a small sieve to remove the seeds and when cooled down, stir into the honey goat cheese. (Optional: add a tablespoon of hibiscus syrup from a jar of cocktail hibiscus flowers can be found at liquor stores.) Mix together thoroughly and then spread on crisps.
A few days prior to the Brunch I made another trip to Trader Joe’s to purchase my last minute items and flowers for the centerpiece. It was a surprise to find that figs were in season. I decided I needed to buy some to add to my small bites.
Fresh fig cut a cross shape without going all the way through
Fill with Onion Bacon Jam (recipe below)
Top with crumbled blue cheese
Using a dropper drizzle a few drops of balsamic creama
Garnish with edible pink flower petals and chopped chives
The third pink small bite was made with watermelon and feta cheese.
Fresh watermelon cut into small retangles
Block of feta (also sliced to same size as the watermelon)
Lavender balsamic vinegar (or balsamic)
Thai basil and small thai basil flowers
toothpicks or picks
In the early Spring I refresh my herb garden with new plants of sweet basil and thai basil that both bloom all summer. The smallest leaves and tiny blossoms were used to garnish this small bite.
One slice of watermelon, feta on top, drizzle with vinegar, top with another slice of watermelon and then garnish with basil and blossom.
The platters garnished with some fresh hot pink spray roses combined with my pink small bites were the perfect start to my Barbie Pink Brunch, but would also make a beautiful group of summer small bites for any party.
The summer of 2023 was buzzing with everything Barbie due to the release of a must anticipated “The Barbie Movie”. Everyone was seeing PINK and inspired my Barbie “Pink” themed brunch with Vin Gris (light Rose’) wines for my wine gal pals. (The full party plan to post separately following this edition of Simply Elevated.)
In an effort to create a “pink” menu, I worked on a pink soup, followed by pink crêpes filled with shrimp and crab, served with a butter lettuce, arugula, grapefruit citrus salad and a pink dessert.
I had no prior experience with making a savory crêpe previously, so I knew I had to work on it well before the scheduled brunch to ensure it had the elevated flavor and the pink color that I wanted.
My hot pink water infused with frozen dragon fruit (found in the frozen fruit section at the grocer) and the filtered through a coffee filter to remove all of the pulp and seeds, gave me the idea to steep the milk in the recipe with dragon fruit, but the color was too muted so added about one to two tablespoons of beet root powder also. When cooked the crêpes brown on one side and slightly browned on the other that also creates a challenge to maintain the color. Note: carefully add beet root powder to avoid a full RED unless that is what you want. Of course if not looking for any color, just follow the recipe without adding any color options.
To start I selected a Martha Stewart recipe that I can always count on working perfectly.
From there I added items to elevate the flavor and compliment the filling. . Follow the recipe in the link – above and consider the list below that I used to elevate the flavor. You can easily substitute any of these items to achieve the flavors you prefer. My goal was to add flavor without overpowering the flavors of my filling (delicate crab and shrimp in a classic velouté sauce). Beet root powder or cooked beet liquid could also be used, but the color looked more red to me than pink. (DO NOT USE PICKLED BEET JUICE).
Ingredients:from recipe and my additions (in bold) to create more flavor...
YIELDS 12
1 cup unbleached all-purpose flour
1 tablespoon beet root powder (for pink color)
1 tablespoon granulated sugar
¼ teaspoon kosher salt
1 tablespoon crushed pink peppercorns
1 ½ cups whole milk, room temperature (steeped with 1 tablespoon frozen dragon fruit for 1 hour)
4 large eggs, room temperature
3 tablespoons unsalted butter, melted, plus more for brushing
2 chopped scallions
1 tablespoon chopped parsley
pink himalayan salt for sprinkling once poured in the pan (or koscher salt)
REFER TO THE MARTHA STEWART LINK FOR COOKING INSTRUCTIONS. READ THROUGH COMPLETELY AND NOTE “ROOM TEMPERATURE” ITEMS AND REFRIGERATION OF THE BATTER PRIOR TO COOKING – I REFRIGERATED OVERNIGHT and mixed ingredients in a blender.
Be prepared with waxed or parchment paper. I preferred separating each with paper to avoid sticking together. Using a small ladle (mine is a 1/4 cup) into an 8″ nonstick skillet, for consistent measurement of each crêpe. Pour the batter into a good non-stick pan (mine did not require any oil or butter – the butter in the batter was enough), immediately swirl to get an even distribution and watch closely. The first one (like pancakes) using flops, just clean it out with a paper towel and move on. I think it may have something to do with the temperature of the skillet. I kept mine a med-high. Once completely the batter is evenly dispersed lightly sprinkle with fine himalayan or kosher salt.
When you see the browned edges and very little fluidness in the batter, gently release the edges with an offset spatula. Then using a larger rubber spatula gently lift and flip. See below that the color on the first side is mostly brown, however after allowing the other side to cook for about a minute (you’ll have to figure out your own timing due to different heat temps), the other side retains more of the pink color.
Shrimp and Crab Filling
The filling was extremely simple, but flavorful.
1/2 cup (1 stick) of butter (cut into 1 tablespoon squares)
4 tablespoons all-purpose flour
1 1/2 to 2 cups heavy cream
Zest of one medium to large lemon
1 tablespoon lemon juice
1/2 to 1 cup shrimp or seafood stock
kosher salt)
ground white pepper (black is also acceptable)
1 1/2 – 2 lbs. small to medium peeled and deveined shrimp
1/2 lb. lump white crab meat (cleaned of any pieces of shell)
micro greens or chopped parsley for garnish
In a large deep skillet melt butter and flour whisking and watching closely to cook the flour taste out, but do not brown. This is like a white roux. Add cream (start with 1 cup and then 1/2 cup at a time) lemon zest and lemon juice. Continue to whisk until thickened. If using stock (adds seafood flavor) add 1/2 cup at a time and/or heavy cream continuing to whisk until consistency is similar to a thick ranch dressing. Add salt and pepper to taste. Once the sauce is the desired thickness and flavor add the shrimp. Continue to watch closely stirring occasionally and when the shrimp are a pink coral shade (stir around to make sure all are the right color) they are cooked. Remove from the heat to avoid over cooking. (The crab is already cooked, so just place the container in the microwave for about 30 seconds to remove the chill only, it will be added below.)
To assemble, use the browner side for the interior. Spoon some of the shrimp and velouté sauce on one side of the crêpe, top with some of the crabmeat and sprinkle with chopped chives. Fold over to create a half moon shape and garnish with micro greens or chopped parsley.
My “pink” side salad was simple and light:
2 heads of mini butter lettuce (or large torn smaller)
1 bag or container of arugula (I used oneTrader Joe’s Lemony Arugula Basil Salad Kit that also has shaved rainbow carrots – but I did not use the dressing or nuts, just the salad greens)
2 large pink grapefruits (remove peel and pith of 2 and then slice into round disks -I had 12 pieces, the 3rd juiced into a small bowl to make the dressing)
1 7.5 to 8 oz. container of creme fraiche (room temperature)
1 to 1 1/2 tablespoons white balsamic vinegar
1/2 cup (divided) finely chopped chives
1/2 cup chopped mint
salt and pepper to taste
1/2 cup chopped pistachios
Pink edible flower petals (optional)
In a large bowl toss butter lettuce and arugula together to evenly disperse
In a separate bowl whisk creme fraiche, grapefruit juice, white balsamic vinegar, salt and pepper to taste. (I poured into a plastic squeeze bottle with pointed tip to squirt over the greens)
Place a handful of the lettuce arugula mixture on the plate (mindful of dividing equally for the number of servings you need); place a grapefruit slice on top of the greens; squirt or drizzle with the creme fraiche dressing; sprinkle with chopped mint, chives and pistachios. (Edible flower petals optional)
The pink hued soup recipe, Potato Leek Radish Soup with Sunflower seed cilantro pesto will appear in another edition of “Simply Elevated”.
Please like, share and subscribe for future home entertaining ideas. Thank you for your support!
Hola! Welcome to my Flamenco Dance themed wine club party! Last year I watched the José Andrés and Family in Spain series on Discovery + and it became the immediate inspiration for this wine party. Chef Andréshas such an infectious enthusiasm for not only food, but life, as heand his daughters venture to experience the food and culture of various regions of Spain in the six episode series. In the city of De La Frontera, they attend the Festival de Jerez famous for flamenco music and dance that was filled with celebratory, cheerful and colorful charm. This festival provided the direction for my wine party featuring Spanish food and wine.
The show that inspired this Wine Club Party Theme. Chef Andrés founder of the World Central Kitchen, serving hot nutritious meals to those in need and renown chef of Spanish cuisine. He and his daughters take the viewer on a culinary tour of Spain.
My group loves an excuse to dress up. Over the years we have fashioned bow ties and fascinators for a Derby themed party, worn masks for a Rio de Janeiro Carnival theme and dressed as characters in Murder Mysteries. This time I have requested flamenco dancer attire and I’ll play Spanish guitar background music (Spanish Guitar Radio on Pandora) to set the mood.
At my last wine party gathering, I presented each of the ladies with a sequined black fan in various colors that I purchased at the Dollar Tree and announced that this would be our next theme. I found the same fans reasonably priced on Amazon.com in the link under resources at the end.
The invitation was emailed to all of my guests with assigned red wines and everyone was asked to bring a tapas small bite. As host I provide an aperitif, the cheese course and dessert course and one of my guest is helping me out by preparing paella.
Table Decor
Starting with the place cards: Black stock card can be cut and folded to create the background of these, but I repurposed my black metal chalkboard set by placing images of flamenca dancers with ribbon for theme and color. A black tablecloth, topped with one yard of fabric purchased at Hobby Lobby in the traditional black, red and white set on the diagonal added some interest for an España vibe and pop of color.
Black napkins folded to look like the male Flamenco suit coat (or some may say matador) for each male guest added some fun to the table. Rectangle white doilies were used to create the ruffled shirt that is tucked inside the napkin. Black candy balls (for baking) were hot glued on top to form the buttons (school glue was too wet and made the coating of the candy ball bleed). Small dried rose buds (from a knock out rose bush in the yard) were pinned to the lapel of the coat to complete the look.
For the ladies, the napkin was folded like a fan, cinched with ribbon and a silk rose.
Two fans (purchased at the Dollar Tree), glued together and surrounded by fragrant red roses created the centerpiece. The container is a Dollar Tree galvanized container found in the floral supplies, painted black, with two images of flamena dancers and red ribbon. Due to the number of wine glasses, and to ensure guests can comfortably converse across the table during the party, the table decor should always be kept low and to a minimum.
The table will also be flanked with lit red candles.
The glass hurricane cylinders (Hobby Lobby) protect the flame from the blowing a/c vent overhead..
Small bottles of water with a little clip art label for cleansing the palate.
The photos above were staged for the pre-planning, and below the photos are a few from the actual party table photos. I originally used a thrifty option of roses cut from a knockout rosebush, but as the heat increased in the south, the flowers that bloom are very small and don’t survive the high heat. A dozen red roses were purchased for the day of the party to create the centerpiece, five on each side and the other two roses where used on other decor.
Ready for the my guests to arrive!
Attire:
Since my guests and I are dressing in character, I found a very inexpensive background screen (less than $10) on Amazon, that I pinned to the wall and used the timer on my iphone and a camera easel to take memorable pictures of everyone.
Fun Facts from Google Search about Flamenco Dance
The flamenco dress, traje de flamenca or sevillana dress is the traditional suit for Spanish ferias and romerías. Nowadays, it is worn at the stage thanks to flamenco performances. Red is often the color of choice, representing strength, bravery, vitality and passion in flamenco style, not to mention adding the necessary sass and sex appeal.
Why do flamenco dancers wear flowers?
In flamenco dancing, it is used as an ornament in the hair of dancers. The flower also appears in religious contexts, bullfighting, and parades. Romantic lovers propose to their beloved ones by holding the flower in their mouths while playing Spanish guitar under a window. The red rose is the standard flower of the flamenco dance usually in medium to large size.
What is a Spanish hair comb called?
In Spain and in the rest of the Hispanic world, a peineta is a large decorative comb usually worn under a mantilla, or lace head covering. The hair ornament, worn by women, consists of a convex body and a set of teeth that affix it to hair worn in a bun.
The Wines
What is a Spanish red wine called?
In Spain, wine is called vino, red wine is called vino tinto and white wine is called vino blanco. Usually the red wines of Spain are named after the region they come from but may also list the variety on the label.
The Aperitif
To start the party I always prepare a “wine forward” aperitif so that my guests have a little start to the party while visiting and allows me a few minutes to uncork bottles, bag, number and pour each into the numbered glasses. A delicate wine forward aperitif (opposed to other forms of alcohol) prevents the risk of blowing out everyone’s taste buds for the actual wine tasting that follows. We also refrain from any type of food to keep the palate clean until after all of the wines have been tasted.
This white wine sangria looks amber because I used coconut sugar instead of white granulated sugar, which also gives a little of a caramel flavor to the sangria. All ingredients were mixed into a glass pitcher a day ahead and kept in the refrigerator. Serve over ice.
1 bottle of white wine from Spain
2 tablespoons of coconut sugar (or white granulated sugar)
1/2 cup of ginger simple syrup ( 1 cup of granulated sugar and 1 cup of water heated until dissolved, removed from heat, steep 1 inch of peeled fresh ginger for 15 minutes and strain)
1/3 cup of amaretto (or brandy)
1 each sliced peach, nectarine, apricot
1/2 cup of plump blackberries or pitted halved cherries
Cheese Course
The cheese course can be pricey, and when presented with a charcuterie board, guests can be filled up on cheese before they get to the other items being served. After eight years with an average of three wine parties per year, a charcuterie board also can become predictable and boring. So I decided to shuffle and search for alternative affordable and interesting cheese course options, which has included cheese tarts, souffle’s and salads.
For this party I made a sweet and spicy tomato chutney that I covered in sliced Spanish manchego cheese, dusted with Spanish smoked paprika then broiled for a few minutes until the cheese is melted and bubbly, in small ramekins – served with toasted baguettes.
1 shallot or 1/2 of a small white or yellow onion finely diced
0live oil
1clove of garlic minced or grated
1 1/2 teaspoons brown sugar
1 16 ounce can of petite diced tomatoes
1 teaspoon apple cider vinegar
1/2 teaspoon red pepper flakes and /or sriracha
salt and pepper
Manchego Cheese (about 2 oz per guest)
Spanish smoked paprika
In a medium skillet add olive oil (1-2 tablespoons) saute shallots/onions until translucent, add garlic until fragrant but not brown (about 1 minute); add brown sugar; vinegar, tomatoes, and red pepper or sriracha (adjus t sweet and heat to your preference), salt and pepper to taste. Simmer for about 15 minutes until chutney-like in texture. Spoon into individual ramekins. Slice cheese and place on top of sauce, sprinkle with smoked paprika. Place under the broiler until cheese is melted and bubbly. Serve with sliced toasted baguette or french bread.
Paella & Tapas(Main Course)
My guests are asked to bring a small bite for the main entree. For this party we have:
Paella
Bacon wrapped shrimp
Lamb empanadas
Spanish garlic fried zucchini
Warm marinated olives (pitted for more flavor)
Gazpaucho
Dessert Course
Born in Spain in the 1990’s, Basque style cheesecake is unlike its NYC cousin. This burnt cheesecake as it is known, has no crust and is baked at a high heat, yielding a rustic, nearly charred exterior and an ultra-creamy center.
The traditional version does not contain fruit. After reviewing several versions, I chose a version with canned apricots that were diced (reserving 6 halves for the top) and fresh blueberries added to the batter that I fell adds some freshness and color to the rich cake. I also saw a version where brandy was added to the batter and decided to add 1/3rd cup of Spanish dessert sherry (that will also be served on the side in a liqueur glass). The link to the recipe used can be found below in resources.
Fruit filled batter, topped with apricot halves and fresh blueberries.
To plate: Black lace doily, rose petals, shot glass filled with Vina 25 Spanish sweet sherry (also in the cheesecake); with one large slice of cheesecake per couple.
We found that the wines we tried were are fairly light with little or no tannins. While smooth and light when sipped on their own, the flavors were a bit mild and would work as a nice drinking wine. Once we started adding food to the palate, each had a little hint of spiciness. It’s always so interesting how food can completely change the tasting experience and that’s why we do this!
Gather with a group of your wine fan friends and explore the multitude of grape varietals, regions, food and cultures together. An evening of food, wine and conversation with people I really care for, is one of the most joyful experiences of my life. We’ve learned together, grown together, laughed together and look forward to what is yet to come.
On the first Sunday of May I gathered with friends for our Fifth Annual Mother’s Tea celebrating one of our heavenly Mom’s. This year’s honored mother, Cintra Pemberton, was a colorful and vibrant woman with many interests, but is was her faith that lead her to her calling in her later years and she became an Episcopalian Nun who devoted her life to serving and practicing the Celtic faith. As part of her service she traveled the world on faith based pilgrimages, with her favorite location being among the British Isles, especially Wales, a place well known for the afternoon tea. To honor this special Mom I called the theme for this year’s tea “Travel Journeys Steeped with Faith”.
Each year we dress my little jewelry mannequin in something that represents our honored Mom. With the help of my friend Lydia, she created a traditional habit including the black sash and tassel as per photos of the nuns of The Order of St. Helena, where Cintra started her devotion faith journey. A black corded cross similar to the one in the photo of Cintra completed the look, however Pemmie told us that her mother usually dressed in civilian clothing most of the time.
My friend Pemmie describes her Mom (Cintra) as a highly educated woman who tended to master anything she attempted. From hobbies to work, she excelled and was a true high achiever that Pemmie shows great pride in.
Among her talents, she had a green thumb, kept journals and authored a book about Celtic Spirituality, loved music and played as well as taught the piano to both children and adults for a period of time. She later applied her piano skills to daily office chants as part of her faith journey and Pemmie remembers her regularly singing the harmonies to many Episcopal hymns.
She also had a appreciation for the arts and Pemmie has a pen and ink drawing and another family member has a water lily watercolor as the only pieces of art created by her Mom who only considered this talent a hobby.
Cintra also loved the mountains and camping. Her favorite color was yellow and daffodils are the flower Pemmie best associates with her mother’s memory.
My task was to take these special memories of Cintra’s life and attempt to translate them with little props for my table decor.
A small dollhouse piano on music sheet wrapping paper was used in the table decor to represent Cintra’s love for music and the piano.
This little rustic tent with a campfire is a nod to her love for the mountains and camping.
This Angel mother holding a child is the symbol of our annual tea.
While daffodils are the flower Pemmie most associated with her mother, they are not available this time of year. She said her mother loved all flowers, so the best I could do was use yellow spray roses and white tulips with purple stripes to create the floral arrangements around the house. Trader Joe’s also had one of my favorites – lilacs that provide a lovely fragrance, are simply beautiful, and give an added pop of purple-lavender to the decor.
Earl Grey was this Mom’s favorite tea and was highlighted in a Victorian London Fog as our tea for the day, made with Earl Grey Lavender with a splash of warmed half and half (slightly sweetened with agave) garnished with culinary lavender buds. The welcoming cocktail, an Earl Grey French 75 (Earl Grey Lavender tea steeped in Gin, combined with lemon juice, a honey simple syrup topped with champagne).
Victorian London Fog: Twinings Earl Grey Lavender Tea (Amazon), one teaspoon agave and a splash of warm half and half and garnished with culinary lavender buds.
The Menu:
The Soup:
Roasted Yellow Pepper Coconut with Sauteed Crawfish
Note: Recipe will be shared in a Simply Elevated Edition soon-crawfish was a Louisiana favorite of Cintra’s and the yellow pepper celebrates her favorite sunny color.
The Tea Sandwich Course
Pemmie remembered her mother loved afternoon tea time and among her favorite tea sandwiches was the cucumber watercress and curried chicken salad. I used fresh mint that was added to the cream cheese spread on the cucumber sandwich and Trader Joe’s curried chicken salad as a shortcut to the many items that required preparation.
Irish Egg Salad
Mushroom Bolognese Pies
Cucumber Mint Watercress
Curry Chicken Salad
Roasted Garlic Chipotle Turkey
Irish Egg SaladCucumber Mint Watercress Curry Chicken Salad
The Scone Course
Current Welsh Cake
The traditional Welsh cake was chosen to represent Cintra’s beloved Wales.
This recipe was in a 2018 issue of Teatime Magazine and I’ve not been able to find a printed version online to share. The recipe was simple and used freeze dried strawberries rather than fresh. I added a fresh slice of strawberry in the last five minutes of the bake. The strawberry was listed as one of Cintra’s favorite fruits.
Welsh Cakes originated in Wales in the late 1800’s and are also known as bakestones or griddle scones because they are made on a griddle. Think of a mini pancake or flat circular scone with sultanas/raisins, and dusted with caster sugar. (These can be made ahead and froze without the sugar dusting. On the day of the tea, I warmed them in the oven at 300 degrees for 10 minutes (after thawing) and then rolled each in sugar while still warm).
The Sweet Course
Cintra’s love for Heath bars, lace cookies, Belgian chocolate and strawberries inspired the sweet course.
Heath Bar Cookie
Almond Lemon Ginger Florentines
Chocolate Dipped Strawberries
White Chocolate Lemon Victoria Sponge
Heath bar sheet cookies were made as a nod to Mom’s favorite candy bar. A cookie dough base, with melted dark chocolate on top, sprinkled with crumbled heath bar and Mauldon flake salt.
I make a half batch of this recipe, sprayed a mini muffin pan with baking spray to make mini cakes. I would recommend filling each cup with only 3/4th to avoid cake spilling over like mine did. I had to trim all of the tops because I filled the tin with a two tablespoon scoop. The flower on top is a lilac blossom.
Scenes From the Table
A matching floral arrangement in the Guest Bathroom
Each year as we get older and take time to sit and remember or recall things we may have forgotten about our mothers, we grow more grateful and appreciative of the guidance and love received from them. We also reflect on our own motherhood and the relationships we have with our daughters. As we observe their generation of mothering and the new and very different challenges that none of us could have prepared them for, it is clear that from generation to generation, we’ve all done the best job we could to manage the circumstance, stress, frustrations, fears, joys and pleasures of being a Mom. The common intention from mother to daughter to daughter and beyond is love.
It’s time to begin the planning for my Fifth Annual Mothers’ Tea, a tradition formed when after losing my mother to the Lord (now 9 years ago), created an intense void especially around Mother’s Day when I would normally plan a special way to spend the day with her, but no longer can. Each year I invite friends who have also lost their mothers, for an afternoon tea of “remembering our Moms”. (See the blog’s category Tradition and Tea for previous posts).
The first tea was an introduction to this annual tea with no specific theme. At the 2nd year’s meeting, I decided to add another tradition to the tea that I hoped would generate new topics of conversation and continue to draw new memories to the surface of our mothers from year to year. Each of my guests names were written on a piece of paper, folded and placed in a teapot. At the end of the tea we pulled a name and that friend’s mother would be honored at the next tea with a theme that represented one of their passions.
In the years that followed our honored mothers had the the following themes:
“Stitching Together-Seamstress” Memories of Mom – A seamstress theme.
“Mother’s Life of Service-Nurse” A nurse theme and
“A Little Racey, Beachy-Peacock” A colorful Mom who loved Nascar, beaches and whose last name was Peacock.
To prepare for each year’s celebration, I provide a questionnaire in order to collect information that will inspire the table and menu. It also questions the mother’s favorite flowers, food, interests and passions all meant to help inspire my tea and it’s theme.
This year’s honored mother, Cintra Pemberton, after her divorce, became an Episcopalian Nun who devoted her life to serving and practicing the Celtic faith. As part of her service she traveled the world on faith based pilgrimages, her favorite location being in the British Isles, especially Wales, a place well known for the afternoon tea. Based on this information, my theme for this year’s tea will be “Travel Journeys Steeped with Faith”.
When I asked about flowers, my friend (Pemmie) said she was unsure of her mother’s favorite, but that she loved to garden and had a green thumb. Wherever they went her mother could name all of the flowers. She said that for some reason she associated her Mom with Spring flowers, such as narcissus (that I currently have growing in my garden, hoping to have multiple blooms ready by the first week of May), rhododendron, wild flowers and daffodils; but if she had to pick one, she would have to say yellow daffodils as well as the color yellow.
Pemmie also shared a memory of tying green ribbons around daffodils as a gift to trip attendees. When her mother passed away, St. David’s Cathedral in Wales, planted a plot of daffodils in her honor at the entrance of the Cathedral. What a beautiful gesture in memory of her mother! St. David is the patron saint of Wales, and died in 589 AD. The Welsh celebrate this saint by wearing emblems such as the daffodil pins, or the Welsh dragon and hold an annual celebration in his honor on March 1st.
St. David’s Cathedral
While the beginning of Spring is plentiful with daffodils and tulips, by the first of May, fresh daffodils are nearly impossible to find. I won’t be able to count on finding them for the actual day of the tea, but wanted pictures for the blog using the symbolic flower while they were in season.
A simple invitation which includes a photo of our honored mother was mailed out the first week of April (a month out from the scheduled date) using this decided theme.
While the table plan is not yet complete, I made place cards using some clip art in the yellow that represents both the color that Pemmie most associated with her mother Cintra, her Celtic Faith and green ribbon as used in those lovely daffodils bouquets.
In the coming weeks, I will begin to put my table together and form the tea menu that best represents not only our honored Mom, but a little of each mother that we are remembering on this special day.
Follow or subscribe to stay connected to see how this lovely memorable day comes together.
When small green specs are dotting the bare branches of my drake elm tree that my mother propagated from her own tree a year before she passed, its resurrection each year reminds me that she is still near and so is Spring.
The lawn has grown partially green, the sound of lawn mowers humming in the distance, and daylight has begun to span slightly longer from week to week. The temperatures in the South have been unseasonably hot (80’s), waking up the dreadful weeds that always emerge first for pulling and encouraging the colorful blooming time of the azalea bushes that will soon after require trimming. By the time this planned afternoon arrives the leaves of my drake elm will have been fully revealed, swaying in the warm sunny breeze like happy dancers in the golden sunlight, my herb garden will be replanted with fresh herb plants and edible flowers, and the shrubbery in the landscaping will grow fuller with new foliage.
Springtime brings that much needed breath of fresh air and gentle warmth, following the bracing gestures of a cold winter that causes us to tighten our stance and escape its abrasiveness with layers of warm sweaters and cozy fires. I truly love the coziness of winter, but when the lights are turned on by Spring, who can resist its milder temperatures and color bursting displays. Like the flowers, we can’t wait to be outside and bask in the sunlight.
Last year (2022) I saw a post on Instagram of hand painted eggs for Spring that inspired this Egg Painting Spring Brunch celebration. While only a couple of those in my group of gal pals consider themselves artistic, I really enjoy getting my friends to open up to new experiences that challenge them and may reveal a hidden skill they had not yet explored. We shared a similar exercise before Christmas by decorating cookies, sharing some new and creative designs that everyone could be proud of.
With printed images of the decorated eggs from Instagram as my inspiration, I searched through my stock of collected items to determine what I might be able to repurpose for my table and began planning.
I’m not usually a fan of using paper products, but I wanted a colorful table that I couldn’t achieve with the dishes I have and since we do have a crafty activity following the meal, I wanted an easy clean up.
If it’s possible to think of paper plates as elegant, this scalloped, gold edged version found at Homegoods fits the term. Its field of mint green, pink and yellow; with bunnies, speckled eggs and bird nests, contribute a soft cheerful feminine color palette for this gal pal day. Matching utensils were found at The Dollar Tree. A square of green toile fabric, used for my daughter’s expectant baby shower 16 years ago, along with leftover pink and green toile napkins came together to form my color palette. I haven’t seen toile napkins like these since, so over purchasing years ago paid off.
Small gold bunnies from Target ( I was tempted to buy the little hens too), white porcelain bunnies and large egg cookie jar Homegoods; small cabbage napkin rings Pier One.
The combination of gold, pink and green pastels provides a cheerful, feminine and fresh Spring place setting for a ladies’ afternoon.
Alternating green and pink toile napkins folded into bunny ears with plastic gold eggs from The Dollar Tree have been loosely decorated using metallic pens (also The Dollar Tree). Hand written names appear on each to serve as place cards. I even repurposed ribbon from the baby shower stock.
The examples of painted eggs I found were printed and added to card stock, then placed on the table for inspiration. Metallic pens from The Dollar Tree,acrylic paints, pencils and small pointed brushes are placed around the table to create original designs. For those who may feel they are not very “artistic”, these examples will jump start each guest to invision their own unique egg creations.
The eggs, made of wood (easier for paint pens and acrylics to adhere ) were sold in little cartons of six as multi colored or plain natural wood. (Target $3.00 for set of 6). I decided the version with coated colors would be more fun to work with, especially when using the acrylic paints and require less drying time. The acrylics did dry fairly quickly, usually about 5 to 7 minutes. So while drying – it’s easy enough to move on to a different egg for a short period.
I have a habit of setting my table a couple of weeks before a party. I originally staged the table with fresh white roses I had purchased that week, but the following week it was tulips and the week of the brunch, daffodils. It never fails that whatever flower I set my heart on, it’s not usually available on the day of my event and I have to pivot.
A collection of items purchased over the years combined with new items found, large decorated egg cookie canister (Homegoods); cabbage napkin rings (Pier One); green vase (Michaels), gold bunnies (Target).
Porcelain bunnies (Homegoods); pink glass candle holders (The Dollar Tree) and green bud vase (Michael’s) with bright colored fresh tulips.
For a little over head drama, an eggcellently dressed chandelier – multicolored golden eggs nested with Easter basket grass in the center and pearl finished faux eggs dangle from ribbons all from my collection of annual Easter decorations (some have names written on them -they were once used as place cards for a past Easter family lunch).
Greeting with a Cocktail – Rosemary Grapefruit MoscowMule
We always start the party with a toast and a special cocktail or aperitif. This Rosemary Grapefruit Moscow Mule was perfect- light and refreshing just like Spring!
This light refreshing ROSEMARY GRAPEFRUIT MOSCOW MULE is the perfect start to a Spring Brunch. Citrusy, with a little floral hit from the elderflower and the gentle touch of heat from the ginger beer. Well balanced and easy to sip on a sunny afternoon. It received lots of Ooo’s and Ahh’s ratings!
Makes 3 to 4 small servings in my delicate coupe stemware or 2 regular cocktail glasses.
Half of a freshly squeezed pink grapefruit Half of a freshly squeezed lime 2 oz. Absolute Juice Pear & Elderflower Vodka (or Vodka) Rosemary simple syrup (1 cup of sugar 1 cup of water bring to a low boil until sugar is dissolved – remove from the heat and add 3 sprigs of fresh rosemary. Steep for 3 minutes and then discard rosemary and chill) Ginger Beer (I used Fever-Tree) Fresh rosemary sprigs
Place first four ingredients into a cocktail shaker with ice (I used one large cocktail cube to minimize the deluge). Pour 3/4 of a small coupe glass – top off with ginger beer and rosemary sprig. Cheers to Spring!
Cheese Plate with Cocktails
Spicy tomato jam made with these beautiful dark tomatoes (almost looked charred) purchased at Trader Joes. A variety of soft, hard and blue cheeses were plated with the jam and goat cheese left out to room temperature for easy spreading. Slices of Kalamata Olive Farm Loaf bread (Whole Foods) toasted in the oven, brushed with kalamata olive oil and a sprinkle of kosher salt were offered with the cheeses. A schmear of goat cheese on the bread helped balance and mellow out the spiciness of the jam.
🍃🌷🍃My favorite part of entertaining (besides spoiling everyone and having them leave with a pleasing memorable time) is introducing my friends to new flavors and foods.
One of my less adventurous eaters told me a couple of years ago that he finally surrendered his palate to me. “Lori you change my mind about what I think I won’t like every time!” Other than enthusiastically showing up for each invite, it’s the best compliment I could hope to receive.
🍃🦋🌷🍃 Brunch Menu🍃🦋🌷🍃
Ham and Potato Bake
Rainbow Carrot Ribbon Salad
Large Profiteroles filled with homemade chocolate balsamic Louisiana strawberry ice cream and strawberry coulis
Louisiana strawberries are at peak season, and it was a wonderful time to highlight them as part of my brunch.
The homemade strawberry chocolate balsamic ice cream and jumbo profiteroles were both made a week ahead and stored in the freezer until the day prior to the brunch. The day before, I pulled the zip freezer bags of profiteroles out and set them on the kitchen counter to fully thaw. I then lined a small rimmed baking sheet with clear wrap and pre-scooped the ice cream, then sealed it tight with clear wrap and returned it to the freezer. (easier for serving on the day of the brunch). The recipe for the ice cream is in the link below – my only addition was a tablespoon of chocolate balsamic vinegar (optional).
The strawberries are perfectly ripe, red and sweet.
The strawberries are so fresh, so fully ripe, sweet and large that I added one on each plate. I used a pink pearl cocktail pick to attach an edible flower to each for a touch of whimsy. When serving the composed dessert, I used a small mound of canned chocolate whipped cream to hold the fresh strawberry up on the side of the profiterole.
A small mound of chocolate whipped cream from a can used to help the strawberry stand.
(Strawberry three ways, fresh, in a coulis sauce and creamy ice cream.) Each profiterole was filled with a scoop of strawberry ice cream, sprinkled with powdered sugar, topped with strawberry coulis and garnished with a fresh strawberry.
🎨 Egg Painting Activity 👩🏻🎨
In addition to the printed images of painted eggs, I also place a variety of silk flowers on the table as inspiration for shapes and color. Each of my guests were supplied with a piece of artist’s watercolor paper, a glass of water a fine pointed paint brush and paper napkins. The watercolor paper was a place to test their mixed paint colors, the water to rinse out their brushes between color changes and the paper towel to wipe off the brush after each rinse. A mixture of acrylic paints and pens were used to create their individual designs.
There’s a beautiful sense of self satisfaction in creating something beautiful. As the painting and decorating began, the room grew extremely quiet. Everyone was so focused, concentrating on decorating their eggs. They also said while there was a little anxiety about how to start at the beginning, in the end the whole experience was very relaxing.
Another option for a painting exercise are clay pots (used for plants). I’ve seen some painted completely black and then decorated with painted bright wildflowers that popped on top of the black background.
Whether you’re hosting a Sunday brunch, an Easter lunch or a simple Springtime gathering, a few simple ingredients for the menu and a fun activity will guarantee that everyone leaves with a special memory. I have the best group of friends. Whatever I dream up, they are all enthusiastically ready to come along for the ride!
FOLLOW or SUBSCRIBE to receive notification of future posts and thank you for visiting Social Interactions and Parties!
It’s time for a new year of wine club parties, with new themes, new wines and delicious food to experience and share. With seven years of themed parties behind me, I’m having to seek out new forms of inspiration for themes that inject a fun experience for everyone. While a wine party doesn’t necessarily require a theme, it’s my way of continually creating an element of surprise for my guests, giving them something new and unexpected to look forward to in addition to leaving with a little more knowledge about wine.
This party’s theme was inspired by a visit a while back with my daughter and grandchildren in the Houston area. I treated them all to see the Vincent Van Gogh immersion exhibit that offered a modern way of introducing my grandchildren to one of the many wonderful artists of his time. What may arguably be one of the artist’s more memorable and popular paintings, “Starry Starry Night” was the finale of the immersion experience. At the time I made a mental note that this could serve as inspiration for a winter evening wine party, I just had to figure out how to transform it from the canvas to my table.
The invitation was emailed to my group with the theme and assignments for three couples to bring a Cabernet Franc and three others to bring Cabernet Sauvignon wines along with a small bite that pairs with these wines.
The Invitation
The plan for this meeting was to compare Cabernet Franc with Cabernet Sauvignons, with an emphasis on “mountain wines”. (Mountain wines are those grown at elevation on a mountain or hillside.) Cabernet Francs are limited compared to the Sauvigons (at least in our area) and some found were outside (over) our usual price range of $20 to $30, which is why I chose to compare the two varieties limiting the Francs to only three for the tasting. As for finding a mountain wine, that became optional due to the limited number available. The bottles we have may not be the best representation of Francs, but at least we have a few to try.
Where is the best Cabernet Franc from?
France. Though mostly a blending grape in Bordeaux, Cabernet Franc plays a starring role in the Loire Valley. Its single-variety red wines are highly regarded, and some of the best examples come from Anjou-Villages, Bourgueil, Chinon and Saumur-Champigny.
What Is the Difference Between Cabernet Franc and Cabernet Sauvignon? Cabernet franc is, with sauvignon blanc, one of the parent grapes of cabernet sauvignon. The cabernet franc grape has a thinner skin than cabernet sauvignon, so the wines made from cabernet franc tend to be lighter in color and lower in tannin.
FOOD PAIRINGS: Hearty red meats (no seafood), root vegetables, mushrooms, squash, eggplant, potato, sweet potato, cabbage, polenta.
With the help of an inexpensive projector (normally used for a child’s bedroom to play soft music and project stars around the room), I was able to set a “starry night” ambience on the ceiling and small portion of the walls of my dining room. The projector provides color variations and the option to project stars with or without a moon and clouds. It’s kind of fun to have an audio visual for the first time. Music can be played using Bluetooth if desired.
For the table, I purchased a dark navy blue (inexpensive) tablecloth at Party City, and a few yards of dark navy tulle with stars and moons on Etsy. I had set aside my battery operated twinkle lights from the holidays, knowing I would use them for the table setting.
The beginning stages.
I added my large cobalt blue candle lanterns (filling each with the twinkle lights) and the small votives with candles. On the actual evening of the party, I will weave fresh flowers in the center through the lights ( I chose baby’s breath for something simple see pictures later in the post).
We use the salad plate for the parties due to the small bite everyone brings and the limited space at the table. The grid above shows some examples of options for the actual place settings that I had and considered.
For the charger, I used dark blue plastic dinner plates from the party section at The Dollar Tree. While the setting looks perfectly fine without any additional adornments, I added white iridescent glitter (already in my supplies from prior creations) along the edges with school glue to represent the “the winter” in my starry night. It gives the impression of glittery, frosty snow that really sparkles in the twinkle lights. (The charger plate would have also looked pretty with the splash of metallic gold paint along the edges like the glass plate above.)
While in Homegoods I found this plate that would also be perfect for this theme.
My favorite is the first option with its splash of bold gold around a frosted glass edge. Unfortunately, I only have of one of these plates. I have a total of 10 including myself attending. The second option, also a frosty (bubbly) glass with a gold edge would also be pretty, but I only have 6 of this plate. So my only remaining option is my china with a thin gold rim on the inside and outside of the plate that will work just as nicely and adds some contrast to the table setting.
It would seem after all of these years of entertaining, that I would have every color possible in cloth napkins, but I do not. I found dark blue paper napkins with a little white pattern that adds some additional visual interest to the table, works just as well as cloth napkins and there is a stack of extras on the side if more are needed by my guests.
I saw a cupcake set at Homegoods that had gold and silver glitter stars on toothpicks. After passing them up for about four weeks, I finally decided to buy the box that was very inexpensive and used the gold stars to tuck into the folded napkins and used the silver stars to attach to the place cards. The time it would have taken to hand make these wasn’t worth the $2.99 price for having them already made.
Baby’s breath lasts for quite some time and dries nicely. So early in the week I purchased two bunches and made four small bouquets in gold ribbed glasses. I then wove the twinkle lights through the little flowers. It created a soft starlight glow across the entire table.
Baby’s Breath in gold rimmed glasses.
The glow from the twinkle lights reflect on the wine glasses.
Table from end to end.
We ended up with 8 bottles of wine for this blind tasting, which is highly unusual (usually we have 6), but I found some bottles in my wine cooler that I decided to throw into the mix.
One of my members won our Hauntingly Elegant wine party in 2018 (everyone brought a red with a spooky label). We usually have a “wine off” of the winning bottles for each year, but eventually the pandemic paused our parties and we didn’t have enough competitors to do a wine off. So I’ve added her 2015 La Catrina Cabernet Sauvignon AND
A friend gave me a 2013 Francis Coppola Claret several years ago that was hidden away, also a Cabernet Sauvignon, I thought it would be fun to include it as well. Both being aged wines.
I always provide a sheet we call a Scorecard with a pen or pencil so guests can make notes as they try each wine to determine their favorite. Due to the number of wines this time, I did disclose which glasses were Francs and the rest Sauvignons, just to provide a point of separation – but it was still a blind tasting.
The Aperitif
We start the evening with a light aperitif, something with similar flavor profiles to the wines so that it doesn’t interfere with the palate. In the spirit of Valentine’s Day just a few days away, I created this chocolate raspberry spritz. Starting with a thin layer of Chambord in the bottom of each glass, two drops of chocolate bitters, then topped with a sparkling champagne, Cava or Prosecco and fresh raspberries.
The Amuse Bouche
This small amuse bouche with a tasty punch was made with a roll of pre-made polenta – sliced, cut with a biscuit cutter and then sauteed in a little olive oil until golden. Place the warmed polenta on a wire rack in the oven at 200 degrees until about an hour before the party is scheduled to start. This allows the slices to dry of its oiliness from the warm up and creates a crispy exterior. Finally, I topped the polenta with a semisoft cheese rosette from Trader Joe’s, bacon onion jam (made earlier in the week) and a parsley leaf garnish.
Charcuterie boards can be expensive and bit predictable at a wine tasting party, so after so many years of planning different themed events, I sought out alternative methods to the cheese course. As mentioned in a previous post, I found a back issue of Wine Spectator magazine at a local wine store that was in a stack marked “take for free”. I shuffled through the issues. The Cheese Issue – September 2016 caught my attention. As I fanned quickly through the pages, I found recipes from well known chefs made with cheese. It turned out to be the perfect source to update my cheese course. Over the years I’ve made a few of the unique creations. For this meeting I’m making the “Apple and Fennel Salad With Manchego Cheese, Walnuts and Sherry Dressing” created by Chef Jose Andres.
Serves 4, 20 minutes prep time.
Directions
In a large bowl, whisk together olive oil and vinegar. Season with salt to taste.
Cut the Manchego into thin batons. Halve and core the fennel and slice it thinly lengthwise. Place the cheese and fennel in the bowl with the vinaigrette.
Core and halve the apples. Dice the first one into small cubes and slice the second one thinly lengthwise. Add to bowl, along with the walnuts.
Add chives, toss salad, and garnish with fennel fronds. Taste and adjust seasoning, if necessary. Serve.
Everyone contributes to the meal by bringing “a small bite”. I provide the cheese and dessert courses. Occasionally I may also add to the main menu small bites as well if I feel I need to balance out what’s coming or to provide a little more variety.
The small bite sides brought by my guests from top left to right: Beef crostini with horseradish sauce and cornichon, Confit tomatoes with goat cheese, stuffed mushrooms, smashed roasted small potatoes with chimichurri sauce, roasted carrots with yogurt sauce and toasted sliced almonds, and roasted leg of lamb pitas with tzatziki sauce and lima bean hummus.
The Dessert Course
As with the aperitif (we started with a Valentine cocktail), we then ended with a Valentine dessert. These bittersweet chocolate soufflés with raspberry coulis were feather light, not overly sweet and the perfect way to end the evening.
This recipe was easy to follow and can be made ahead, ramekins filled and refrigerated up to two days prior to the party. I used Ghirardelli bittersweet chocolate, I always have Chinese Five Spice mixed with my powdered sugar to add an unexpected warmth and made a raspberry coulis to add a pop of red. https://thecafesucrefarine.com/easy-raspberry-coulis/ *** click below for the soufflé recipe.
While the voting was not unanimous, the 2013 Francis Coppola Claret (an older wine from my cooler) received the most votes. I asked everyone to pick a second wine so that I could have a winner from the bottles purchased by my guests. The 2020 Mascota Vineyards Cabernet Franc received the next higher number of votes and a close third was the 2017 Chateau Cabonnieux with a mix of Cabernet Sauvignon, Merlot and very small amount ( 3%) Cab Franc and (2/%) Petit Vendot.
Overall, we were not especially impressed with the Cabernet Francs (even though one is the winner, the vote was only 4 out of 9). The two aged bottles of Cabernet Sauvignon stood out the most of the Sauvignons and then the French version above.
TO BE NOTIFIED OF FUTURE POSTS – CLICK ON THE LINK TO FOLLOW. YOU CAN ALSO FOLLOW POSTS ON INSTAGRAM @SocialInteractionsandparties.
The romance and elegance of the gilded age era Pratt Mansion and the original two joined hearts of Olive and Harry in “The Forgotten Room” inspired my table. Love letters, a large ruby filigree pendant necklace, artist’s brushes, paint tubes and an imagined mini portrait of Olive were represented. (See the post “The Forgotten Room” Inspired Bookclub Table)
The cocktail and menu were inspired by
Lucy, John and Philip’s generation in the 1920’s.
FROM THE 1920’S ERA: Philp invites Lucy to have a drink with him at a speakeasy. “The cat’s pajamas are the bees knees” was the password at the door of the bar. After a few drinks Philip tries to kiss Lucy. This caused Lucy to feel hideous shame. Philip Schuyler stared at her in genuine consternation. Or perhaps that was just the gin, slowing his wits, wrinkling his forehead. “I never thought – You’re a girl in a million, Lucy. Has anyone ever told you that? You’re the bee’s knees. The cat’s meow.” Grandly, he declared, “You’re the best secretary I’ve ever had.”
The Cocktail
It is our tradition to start with a little cocktail, so I searched for one on pinterest that referenced “the cat’s meow or the bees knees”. I found the recipe below, but it was extremely strong, much stronger that I know my group would appreciate. So much to the original mixologist’s displeasure, I added a lot more honey syrup, some grand marnier and tonic water or club soda to water it down before adding the champagne floater. I also strained the lime juice (not in the original instructions) to remove the pulp. I would suggest you make the drink ahead of time and test taste to ensure the flavors and strength of the drink will not be too overpowering for your guests to talk about the book or drive home safely! My guests said it was very honey forward, and tasty – they seemed to enjoy my doctored version.
Cat’s Meow Cocktail with the Bee’s Knees
Ingredients: (See my notes above for changes made)
2oz (60mls) Appleton 8-year-old rum (I used Bacardi Golden)
0.75oz (22mls) Lime Juice
0.5oz (15mls) Honey Syrup
dash Angostura Bitters
Top with Champagne
Garnish with a sliver of honeycomb (I made a cocktail pick with little bees).
Add the first four ingredients to an ice-filled shaker, then strain into a coupe. Top with Champagne.
Cocktail picks made with Dollar Tree picks and craft store bees to and the “bees knees” flourish.
I made a pitcher full of the base cocktail before everyone arrived and place it in the refrigerator. This saved time when I was ready to serve and I just had to fill the glasses with the mixed drink and top it with a little champagne.
Soup and Salad
“Defiantly, Lucy ordered lobster Newburgh. If Philip Schuyler wanted a steak, he could have one himself.”
My meeting menu is usually composed of a soup and salad. As a nod to Lucy’s decision to have “lobster” at Delmonico’s, I served a small rich creamy bowl of lobster bisque with a citrus fennel salad as a fresh crispy bite to balance out the richness of the bisque. Each guest received a warm mini baguette straight from the oven.
I used the recipe in the above link. In order to form 8 to 10 servings, I bought one fairly large boiled whole lobster and four uncooked tails. I found the lobsters on sale in the freezer section at my grocer discounted to make this affordable. The meat from the claws and larger tail on the whole lobster along with four other tails provided sufficient meat to fulfill the required servings.
I doubled the ingredients in the bisque. I cooked the lobster tails per the recipe and once all of the meat was pulled from the shells, I made the stock/broth with the shells from all of the lobster shells (except the body) along with a carrot, a celery stalk and half an onion.
I followed the recipe exactly up to pureeing the simmered soup. The bisque is so rich that I felt it needed some acid, so I added the zest and juice of one large lemon. I stopped at this pointed (without adding the cream) allowing the pureed soup to cool and then placed it in a sealed container and placed in the refrigerator until the meeting. (Two days later). An hour prior to the meeting, I placed the bisque in a large pot and added two cups of cream and slowly warmed. I placed the butter and garlic in a separate small skillet and slowly warmed (careful not to burn the garlic), then gently tossed the chopped lobster in the garlic butter. I was unable to find fresh tarragon, so I used fennel fronds (from the fennel bulbs used for the salad) to garnish.
The lobster bisque is so rich that I made a light fennel citrus salad to accompany it. Nothing complicated…
Fennel Citrus Salad
2 fennel bulbs (shaved on a mandolin or very thinly sliced)
3 large navel oranges (segmented)
1 bag baby arugula
1/3 cup chopped toasted almonds
Shaved parmesan
Dressing:
2 shallots (finely chopped)
4 tablespoons rice vinegar (or until shallots are covered)
Allow the two ingredients to marinate for about 20 minutes
Whisk in:
1/2 cup extra virgin olive oil
1 teaspoon honey
Vigorously whisk until emulsified
salt and pepper to taste
I found mini single serving French baguettes at Trader Joe’s. I didn’t realize how small they were until I got them home and opened the package (of 6). They are the perfect size for each guest to receive one each and take only 8-10 minutes to warm up in the oven (frozen) or in an air fryer. Since they were hot from the oven, I made little paper napkin cozies to wrap around each so my guests wouldn’t burn their fingers. They’re perfect for one serving without the hassle of tearing or cutting a larger loaf into pieces and everyone having their hands on the loaf.
Chocolate Icebox Cake withCaramel Cream
“They stopped at a street cart for ice-cream sandwiches, Mr. Ravenel teasing Lucy for the dainty way she licked the ice cream from the sides first, so the melting treat wouldn’t drip on her gloves.”
Dessert was inspired by Lucy and John’s day spent together riding the carousel and eating ice cream sandwiches. I chose a vintage recipe from the 1920’s modernized by Zoë François, and served a slice with chocolate dipped strawberry hearts.
This is the chocolate wafer cookies and caramel whipped cream (after an overnight stay in a loaf pan in the refrigerator) before the top coat of vanilla whipped cream is added. The concept is for the whipped cream between and around the cookies should soak into the cookies overnight, softening the cookies into a cakelike texture. While mine set in the refrigerator for a good 12 hours, the cookies were still a little too crispy and make it difficult to cut, but I got exactly 8 slices. Regardless it was still delicious.
Below is the final cake with the vanilla whipped cream outer coat, shaved salted chocolate and chocolate dipped strawberry hearts.
How often do you purchase a container of strawberries where every single berry is perfectly ripe and sweet? I always look forward to these beautiful Louisiana jewels from Baglio Farms, LLC in Independence, Louisiana. Simply cut the stem into a “V” to remove and then dip into melted bittersweet chocolate . Valentine hearts to simply eat or garnish a dessert.
What’s hanging from the chandelier??? First let me explain that I left the evergreen branches from the holidays there since Olive and Harry’s final days together were during Christmas and New Year’s Eve. My daughter saw this ornament idea that I couldn’t resist (after Christmas).
By this time all of its components were on clearance, so they cost nearly nothing to make. Inside are small replicas of the books my club read in 2022 (the year charm on top) by printing very small images of the cover for both the back and front of each book so that when it flipped is shows the same book cover. A sheet of foam (99 cents) was used to represent the pages. Unfortunately, when folding each little book to push it through the opening of the clear ornament, the paper crumbled. I told my group they look like worn out paperbacks (HA! HA!). Since we only read about 5 books a year, if I would have used thinner foam it would have been easier to insert the little books, but it would have looked like hardly anything was inside and they would have settled too flatly. I gave each of my members one of these at the end of this meeting.
Several years ago, I learned that the legendary chef and long time friend of Julia Child, Jacques Pépin published a book with sketches and art (from his hand) along the edges of the pages. When open faced the left page provides a place for guests to write a note and or sign and the opposite page on the right provides a space for noting the type of gathering and recording the menu. I host several luncheons and dinners each year, so I loved the idea of this book. Prior to each gathering I search for pages with art that in some way relates to our gathering.
Menus: A Book for Your Meals and Memories by Jacques Pépin.
It was fun to find this page with what resembled a vintage looking sketch of a couple that appears to be a bride and groom encircled by a heart. This of course was a great place to record our day for this book.
Our group enjoyed this book and appreciate the talented authors that composed this mind bending, hopeful, love mystery. I hope the ideas shared from this book club meeting with inspire you for your next book club. Remember to follow or subscribe to see future book club, wine club and entertaining inspiration! Thank you for stopping by!
Is it possible that two souls that are meant to be together, will continue to seek each other out in future generations? If you are a hopeless romantic like me, you will love the way this book explores such a possibility. A beautifully, sometimes purposely confusing (with the mystery not cleared up until the very end), hopeful and romantic tale of the lives of three generations of women (Olive, Lucy and Kate) will take you on such a journey. As we draw closer to Valentine’s Day, The Forgotten Room by co-authors Karen White, Beatriz Williams and Lauren Willig offers a richly complex story of love that reaches far into the next two generations.
Olive withholds the secrets of an unforgettable love throughout her life leaving both her daughter (Lucy) and granddaughter (Kate) searching for answers after her death. Explanations were never provided from the past in regard to a gilded age mansion Olive (accompanied by her little girl Lucy) strolled by to simply stare at and a delicate filigree chain, weighed down by a prodigious crimson (ruby) stone, handed down to daughter and then from her daughter to her granddaughter, each without knowing exactly why it was secretly maintained by her or it’s significance.
Olive and Harry meet and fall in love in 1892. A forbidden love match, common for the gilded age and beyond where “financial status” suproceeds matters of the heart. The novel is peppered with three eras that could have easily inspired the table decor and menu for my book club luncheon, starting with the elegance of the gilded age, to the art deco style of the 1920’s and finally the turbulent aftermath of World War II of the mid-1940’s.
As I tried to imagine a theme for my table, “the forgotten room” in many ways a character all its own, remained a common theme throughout the generations and is after all the title of the book (while not at all forgotten by its characters). The title of the book should have been something like “The Room Where Memories Remain”.
After some thought, I decided the starting place and era of this love story deserved to be the theme. Olive’s first impression of “the room”. . . . . .
“when she stepped through the doorway, she lost her breath. Olive turned in a circle, coated in moonlight from the long Palladian windows. The brick walls – they were like a secret garden. She gazed upward at the beautiful dome, a smaller version of the one at the top of the staircase, except this one was paned in clear glass, suspending her in the center of a velvet star-flecked Manhattan night. A beautiful and unexpected gift. “
As I brainstormed to put this book club meeting and menu together, I was also in the process of planning an upcoming wine club meeting with a theme of “Starry Winter’s Night”. With the idea of projecting stars on the ceiling and walls of my dining room, I remembered a small projector that plays soft music that my grandchildren had in their rooms (in a turtle form) when they were younger. This one purchased on Amazon, also projects (if desired) a beautiful half moon and cloud and can be changed to different colors. When I recalled the caption of Olive’s first impression of “the room” and how she described the velvet star-flecked Manhattan sky… I realized I could use it for this gathering as well.
It’s not 7 stories tall, but this table lantern was used to represent the Pratt Mansion.
With a budget in mind, creating inexpensive props and points of interest pushes me to be creative. The mini portrait of Olive was also a recurring part of the story. If I were a graphic designer I could probably execute my ideas with a more professional result, but since I am not, I have to use my own resources of amateur design. I found an image of a gold oval frame online and just snipped it, then pasted it onto a blank Word document page. From there I had to play with sizing the image, including printing it a couple of times to achieve the size I wanted.
I was able to fit four frames on a 8 1/2″ x 11″ page. Next I worked to line up the names of my guests into the center of the frame. I’m sure there was a better way to do this, but I printed a page of frames and then re-fed the paper back through the printer to add the names. Some are slightly off center as in my example. I created the backing of the frame with card stock templates I made and then thread some narrow ribbon (just like a real frame) from the front of the frame to the back folding stand. I also found one sheet of dark floral paper that reminded me of the time period that I glued to the back side to give a finished appearance and hide the taped ribbon. Finally I bought teardrop ruby rhinestones to hot glue to the front (to resemble Olive’s necklace.)
A description of the miniature portrait as described by Kate…
“The woman appeared to be nude, her long dark hair tumbling around her shoulders, her only accessory a filigree gold necklace about her slender, pale neck, a perfect large ruby dangling from the center.“
While the book did not provide a photo of Olive, I searched the internet for a portrait of a young, beautiful women with dark flowing hair (released from its hairpins) and bare shoulders attempting to get as close as I could to this imaginary character. I happened upon this glittered Christmas ornament frame over the holidays, with a slot for inserting a photo that perfectly displays the portrait with a gilded age elegance and added sparkle.
Those Pratt family dinners were unquestionably served in the ambiance of flickering candles, and the elegance of fine china, crystal and ornate silver. I placed my candelabra to one side of the table with soft cream lit candles to create a similar ambiance and hung the portrait to bask in the glow of candlelight.
With the help of a craft store filigree gold chain and one of the ruby rhinestones, I created an imagined version of Olive’s necklace and displayed in on this similar era bust of a young girl I purchased from an antique store several years ago.
“Olive lowered herself carefully onto the cushions, which were upholstered in silk and threadbare velvel and released a comfortable scent of dusty lavender as she sank among them.”
A red velvet table runner draped across the center of the table was used as the base of my table’s center. A set of old metal keys (similar to the opening page of the book), paint stained artist brushes and tubes of paint with an antique candle snuffer are randomly displayed over the cushion of velvet.
“Harry led her to the wall next to the small fireplace, where a pile of angry coals hissed heat into the room, and pointed to three square tiles above the mantel. Olive hadn’t noticed, and them before, and now she wondered why: They were beautiful, full of color, depicting intricate heraldic shields on either side and a central figure of Saint George bearing his crimson white-crossed flag.
He released her hand and worked the bricks free from the mortar in a single irregular shingle, revealing the cavity within. “You see? There’sa hollow here, as if the builder forgot to put in a few bricks. Well, he didn’t forget. I got to know the architect a little bit, when they were building this place, and he showed me. I guess he like to do that when he designed houses, to put in some little secret. So, if you need anything, if you want to leave me a message of any kind, just put it in here. I’ll find it, I promise.”
Harry revealed a secret hiding place in the wall with loose bricks where he and Olive could leave letters for one another (shown to him by Olive’s father). We can’t have a romantic table without love letters! I recreated the stained letters with a calligraphy inspired font from the two letters written out in the book and then brushed the pages with a mixture of instant espresso powder and water to create a strong coffee. After about 30 minutes I then finished the drying process with a hair blow dryer. Following some examples for following letters from the time period, I folded and sealed the letters with a wax stamp. Two are crumbled, aged and slightly torn at the edges and displayed open on the table and with a few others that are unopened and sealed.
A beautiful heart with thin wooden flower petals I purchased on sale at Hobby Lobby, added a beautiful shot of red and drama to the table for a story that is clearly a matter of the heart.
Narrow dark red velvet ribbon was used to cinch the napkins.
I also used a piece of the dark red velvet ribbon to cinc the excess chain (for the necklace) at the back of the bust. At a glance, it resembles the back of a corset.
With the table set and ready to greet my group and discuss this complex love story filled with surprises and mysteries that require solving all the way to the end, I will pause here. A little note taking is recommended to keep track of all of the twists and clues. I’ve actually created a timeline family tree for each of the main characters to help everyone confirm if they sorted out everything correctly.
My next post will provide the cocktail and luncheon menu for this meeting. So come back soon! Happy reading!
What better way to spend a cold winter’s night during this holiday season than to invite a couple of friends over to gather around the table near the twinkling lights of the Christmas tree for a cozy Sunday supper? This gathering was pulled together in a short 48 hours. I reached out to my friends on a Friday afternoon and once they confirmed they could come, I began to pull my plan for the evening together.
I always start with my table decor, It helps me to set the stage for the evening, starting with my basic gold rimmed china dinner plates and gold inexpensive chargers. A few years ago I used a wide roll of dark red velvet ribbon to cut pieces that fold over and under the chargers for an elegant touch. I fold them one on top of the other on the original cardboard roll to store the pieces away to use from year to year. Finally I placed my Lenox “Pomegranate with Mistletoe” salad plates (a gift from a friend many years ago) on top of the dinner plate for a festive pop of color.
I started collecting pieces of silver cutlery this year and had just enough place settings to use for this small dinner party. I also pulled out my special crystal wine glasses that are not used for my wine parties, but deserved a spot at the table for this ocassion.
With a bag of mandarin oranges and a jar of whole cloves I studded patterns on some of the mandarins and then added a plaid ribbon in Christmas colors to complete their look. I created a centerpiece with fragrant evergreen branches (purchased at Fresh Market) placed across the center of the table with a string of jingle bell garland and battery operated twinkle lights. A clove studded mandarin was placed in the center of each plate and some were placed over the evergreens in the center of the table.
A holiday dinner party deserves the elegance of the season. The house is filled with beautiful twinkle lights and colors throughout the house, making it easy to create a warm ambiance that is perfect for an evening such as this. Why not take advantage of the added glow in the house?
For an easy Hors D’oeuvre, I bought a package of endive (also known as chicory) that contained two light green tipped heads and one purple tipped head. I filled the bottom of the green leaves with sushi snow crab salad and the purple with a small ball of Bouisin carmelized onion cheese rolled in pistachio crumbs and topped with a pomegranate seed. A small silver serving tray presented raisin rosemary crackers from Trader Joe’s, a citrus studded English cheese and toasted whole walnuts.
The Hors D’oeuvres were served with a holiday Lambrusco punch from the link below. Hint: I used all of the Autumn simple syrup from the recipe (not just the 1/2 cup per instructions). The syrup is delicious and added a lot of flavor.
I also made cocktail ice cubes (using the large square silicone trays) made with pomegranate juice and a little water, filling the tray sections with fresh rosemary, fresh cranberries and pomegranate seeds. One large cube was placed in each glass and the punch poured over and then garnished with a sprig of fresh rosemary.
The Menu
Champagne Citrus Salad
Coq Au Vin with Mashed Potatoes
Sweet soy glaze and Agave Roasted brussel sprouts with pomegranate seeds
Gingerbread Eggnog Custard Tarts
I started with a citrus salad to follow along with the table decor, that unfortunately did not get photographed. The ingredients are as follows:
Two navel oranges segmented
Arugula and mixed greens
Sliced (leftover endive) for cruch
Pomegranate seeds
Dried Cranberries 1/2 soaked in orange juice to rehydrate
Place the greens and endive in a bowl and toss with the vinaigrette. Divide into 4 to 6 portions in separate plates. Top with orange segments, pomegranate seeds, rehydrated cranberries, and nuts.
For the entree I made a one pot comfort dish, French coq au vin served over rosemary roasted garlic mashed potatoes (achieved by simmering evaporated milk with a few sprigs of Greg rosemary and adding severs cloves of roasted garlic).
The side was roasted brussels (with sweet soy sauce, tamarin, a little agave tossed after cooking) and sprinkled with pomegranate seeds.
Finally we ended the evening with gingerbread eggnog custard tarts. I had a half a bottle of eggnog leftover from my cookie decorating gathering and decided this would be a great way to finish the bottle off. The recipe I used made one full tart with a thick filling. I decided to make individual tarts so the custard was not as deep (thick) as the single tart, but it was still delicious. I also can recommend making just the eggnog custard and serve in little bowls that was also delicious on its own. My leftover custard was poured into small desserts dishes for another day.
Two of my guests had birthdays (one prior to the dinner and one due on Christmas day), so I put a single candle in each of their tarts so we could celebrate their birthdays.
Here’s proof that using what you have for the table and selecting a simple comfort food menu will enable you to throw together a quick festive winter holiday supper for a few of your friends or family in very little time.
However long you keep your Christmas decorations in place… there’s still time for a small gathering even once the day has come and gone.
Wishing everyone a safe and Merry Christmas and a Happy New Year! Thank you so much for your support! I’m looking forward to new gatherings with new themes and getting my wine club back together in 2023. See you soon!
A last minute informal invite was sent to a few family and friends to gather on a Sunday afternoon to decorate Christmas cookies, listen to Christmas tunes, nibble on some snacks, and sip Vin Chaud (mulled wine) and eggnog.
Since the group would be small, it gave me the opportunity to use some of my collected sterling silver and vintage (looking) ornaments in the decor that added an elegant charm reminiscent of photos in the stacks of back issues I have of Victoria magazine.
With less than a week to plan, I searched throughout my home and Christmas boxes for things I may have forgotten I had to use for this quickly pulled together gathering. I also tried to imagine how I would set up the table comfortably for everyone to have room to eat while decorating their cookies.
I found my retro Santa mug that my mother made in her ceramics class in 1968. When my daughter’s family comes to stay with me over the Christmas holiday, we’ve used the mug to leave cookies and milk for Santa. I thought it would make a cute centerpiece container to hold culinary tweezers and some brushes for edible gold powder. The mug, surrounded by small bowls with various sprinkles and dragees were placed on a clear plastic lazy susan for easier access to everyone. Two layers of inexpensive plastic red tablecloths were used to protect the table.
Half rimmed baking sheets from Tuesday Morning were used to decorate each cookie. A folded piece of parchment paper placed inside. The rimmed baking sheet provides a clean surface and captures sprinkles when used. The piece of parchment can be folded and helps pour the sprinkles back into the bowl (all to control mess). The rectangle gold plates on the side are from the Dollar Tree.
I baked one per guest of three different cookie shapes, a gingerbread person, a snowflake and a detailed back view of a vintage car. I didn’t want all of the cookies to be too difficult since this was a first attempt at decorating for most of my group. However while the open freestyle cookie would seem the easier version, it took some coaxing to get everyone to tackle them. I shared photos of different snowflake cookies from instagram for inspiration.
The car cookie is very detailed, but provides exactly what you need to do. Simply coloring in the spots like a coloring book with crayons. Time consuming, but already thought out. The task of these three cookies provided just the right amount of time for a little gathering.
I used the scraps of cookie dough to cut out small stars, and place a drop of icing on each for a sample taste.
In lieu of pastry bags and mixing and coloring icing, I’ve always used the Betty Crocker or generic Walmart icings with one pointed tip that is snipped off with a pair of scissors. When I first started decorating cookies with my grandchildren, these icing tubes were only $1.98 each. They gradually moved up to $2.98 and this year they had increased to $5.00 each. I was thrilled when I found the white, red and green at a nearby Dollar General for $3.00.
While at the Dollar General (this was only my second visit there in nine years), I found these reindeer socks and luckily there were 6 – exactly enough to give as favors. So I rolled each one up and tied with some green garland ties (Michaels) and a jiggle bell (pack of 9 from Dollar Tree). I also made with jingle bell necklaces with some narrow ribbon.
I placed a copper bowl at each end of the table and filled each with one red, green, white and lavender (that I had left over from Halloween) tube of icing. On the side I had another bowl with one tube of chocolate, and other leftover Halloween colors of black and orange to share. I also found a box with four very small tubes that included yellow and blue for $3 at Dollar General that included in the share bowl.
I purchased a bouquet of evergreen branches at the grocer and laid those in the center of the table. I then nestled the bowls of icing and lazy susan over the evergreens. I used a string of battery powered snowflake bulbs to drape around the center.
Happy with the table, I moved on to the flowers and food, that were displayed on my kitchen island.
Referencing a couple of cute ideas from instagram, I made stacked Christmas tree turkey sandwiches with black truffle mayo.
Adapted from Gretchen’s post “She Keeps a Lovely Home” – I found water crackers in the pantry, purchased cherry tomatoes sliced in half), a yellow bell pepper (for small ornament tops); Boursin caramelized onion and herb spreadable cheese, and a few sprigs of dill to make these little festive small bites.
Icebox pecan and blue cheese crackers (a Martha Stewart recipe I’ve used for years), usually rolled into a log and sliced – updated by rolling out and cutting with a cookie cutter shapes of stars and small snowflakes to add to the cheese board. The stars are sprinkled with a little crushed pink peppercorn. (Must be made ahead and refrigerated for 24 hours before baking so prepare!)
An easy small bite of mini cocktail sausages, wrapped in store bought pie dough (cut into strips with a pastry cutter with scalloped edges), brushed with egg wash and sprinkled with everything bagel seasoning (or sesame seeds would also work). Baked at 450 degrees (f) for 20 to 25 minutes or until golden.
I also made a quick batch of sweet and spicy pecans the day before. The cheese board had raisin rosemary crackers from Trader Joe’s, my pecan blue cheese homemade crackers, a cranberry cheese from England, a Black truffle sheep cheese, a honey goat cheese rolled in chopped dried cranberries and crystalized ginger and a small bunch of black seedless grapes.
For dessert, I found this Flourless Chocolate Chestnut cake. Regrettably, I’ve never eaten chestnuts. I was in New York just before the holidays on two occasions and didn’t grab the chance to try roasted chestnuts! A mistake I will not make again. This cake was light while also being rich with a truffle like texture and not too sweet. It was very lovely and everyone was a fan.
My Vin Chaud was so well liked that I was making a second batch while the others were decorating cookies! Toss in a few fresh cranberries for garnish. (Note to self- make a double batch next year!)
Before departing with their wrapped up cookies, we did a small toast to the holidays and a festive day with a chilled glass of eggnog topped with a fresh grating of nutmeg!
None of us, including me, are professional bakers. Our decorated cookies prove to be homemade and we could not be prouder of them. They represent an afternoon well spent, a first attempt by some who may have been previously intimidated by the idea of decorating cookies and a lot of fun. (I think this will become a new annual tradition).
P. S. My 89 year old mother-in-law REALLY loved the cake and left with some to take home … and the star cookie samples. Happy Holidays!
A Vintage Nativity found in a local antique store for $15; faux or fresh evergreen branches, a silk rose with gold and red velvet ribbon purchased many years ago and a Dollar Tree gold tone jingle bell hot glued to a mini clothespin.
It’s that time of year when the boxes of Christmas decorations are pulled out of the attic or storage and the decorating begins. I’m sure like me, you have some items in those boxes that you’ve either held on to year after year, or some vintage items passed down from family members, that may or may not make the cut for this year’s displays.
This is a perfect time to look through those collected items to create your Christmas tablescape. This issue is to show you that making the table look beautiful doesn’t have to cost a lot, and that you can use things you already have to make a creative display for everyone to enjoy.
Same dishes, same napkin fold, added white glittered church ornament from the Dollar Tree.
The examples in my photos all have the same white tablecloth with gold polka dots, plain white gold rimmed china plate, a gold charger (from the Dollar True); gold tone flatware and gold rimmed glasses. Below each photo is a description of what was used to create each presentation.
The only important thing to remember, is to keep the centerpiece area low so that your guests can see and converse easily. Candlestick or votives are also a beautiful alternative to the battery twinkle lights, but in my situation I have an air conditioning vent that blows over my dining room table and usually blows the wax all over the place. So I only use candles that have a glass cylinder around them to protect my tablecloths or when I don’t need to have the a/c on – weather permitting. In the south we never know if it’s going to be hot or cold for Christmas. Always consider your elements in your room and ways to prevent small disasters.
Different napkin fold topped the same gold tone jingle bell. A red velvet wired ribbon wrapped around the charger. Centerpiece same evergreens with gold and red vintage glass ornaments and golden tree place card holders purchased at Homegoods.
Faux evergreen branches work just fine, but fresh branches can be picked up at the local hardware store and Christmas tree lot for free. Yes – places like Home Depot have a large wood bin next to the tent where the trunks of trees are being trimmed, with free fresh branches for the taking.
Berry branched napkins (from Homegoods), an embroidered Christmas cocktail napkin and Christmas ornament (frame) that a name or picture of your guest can be inserted as a place card. (Wouldn’t it be fun to have photos of everyone on Santa’s lap as a child?)
I often use place cards, just to mix up my group. The same people tend to sit together and I want everyone to visit with a family member or friend they haven’t seen in a while.
For the centerpiece, I used my small collection of Hallmark 1980’s village buildings, a clay timber cottage that was a gift from a friend who sent it from Germany, same faux evergreens, a couple of small red glass ornaments and three sets of battery operated mini string lights. I also swapped out the tablecloth for a muslin and gold stitched version and a table runner with a Christmas village, both from Homegoods.
To elevate this village landscape one step more, I snipped a few roses from my knockout rose bush and tucked them randomly into the evergreen branches.
Evergreens and lights remained, Spode round gift box tied with red ribbon, topped with the knockout roses, a trumpet ornament and two large instrument ornaments.
A string of multiple sized gold toned jingle bells added to the evergreen.
Clipped jingle bell on top of cocktail napkin.
Changed out the jingle bell clip for that silk white rose with gold and red velvet ribbon and clipped the jingle bell to the floral arrangement.
One last version, a golden angel playing a violin and an angel wing ornament. My book club read a Christian fiction novel a few years ago that was filled with angels. I found these wings on sale at a local gift shop after Christmas and bought one as a favor to give each of my members.
With a rose bud.Without a rose bud.
I could probably find many other ways to use this same place setting. If your collection includes items of the same color tones, you can easily mix and match items, tuck in pops of color and create themes. With a little thought, you can use the same items for years to come in different ways and no one will ever know it isn’t new. I hope these example inspire you to create your own beautiful Christmas tables.
This year, my party planning was thrown off by a kitchen island renovation, and it’s taken me a little while to channel my creative energy and get back to entertaining. It seems this has also been the year that most of my group (including myself) scheduled a much needed vacation after the long pandemic concerns, making it harder to get the group together. Fortunately, we’ve all settled down and I’ll have a full table of guests for this year’s Friendsgiving.
Each year I try to draw from a fruit and/or a color that inspires my table decor and menu. Last year apples were the theme. This year I was inspired by the bouquets of purple, burgundy, maroon, blush, plum, and cream flowers at the market and chose to create a “figgy plum” themed table and menu.
I tend to pick fruits, flowers or vegetables that are in season for about two weeks before my scheduled party and then they are nowhere to be found the actual week of my event! A good plan always requires a little flexibility, but I was thrilled to find a few plums the week before and fresh figs the day before my event. The universe has been kind and given me everything I imagined.
Colorful place cards and this plum cut glass candle by Rachel Zoe were part of what dressed up my table.
Braided placemat, gold charger, Royal Stafford pheasant dinner plates (England), black “cmg” bowls (Portugal), purple table runner and cloth napkins all from Homegoods.
A week prior to the scheduled event, I stocked up on what I could find and stored everything in the refrigerator (including flowers). I could only find small plums (but dark black plums were nowhere to be found) and plumcots. As an alternative, large seedless black grapes provided that moody dark plum color I wanted to achieve. Figs are so perishable I had to wait until the day before the luncheon to purchase them.
THE FLOWERS
These copper bowls with floral oasis (hot glued to the bottom) and chicken wire were used for the centerpieces. The bowls had an original tag on the bottom from Thirstystone for $33.00 each, but at Homegoods they were $6.99 each. Always love a Homegoods deal!
THE TABLE DECOR
Silver bowls collected from antique stores and Rachel Zoe plum colored cut glass with citrus scented candles from Homegoods. (The breakfast table.)
I have ten guests (eleven including myself). I can sit ten tightly at my dining room table, but not eleven – for more comfort I’m setting up three, myself and two of my helpers) at the breakfast table on the other side of the room. We are up and down so much from serving and taking dishes away, that it’s less disruptive to the main table and easier if we are together. None of these events could succeed without the loving help of my sister team of Lanie and Caryl.
While we were sitting at a separate table there were no shortcuts when decorating it. I wanted my two friends (also my guests) to enjoy the same beautiful rich colors of the flowers, fruits and candle just like the others. So the breakfast table had all of the same elements.
Silver plated antique store finds – bowls and creamer filled with large black grapes and figs.
THE PLUM FRENCH BRANDY SANGRIA
French brandy with plums, cinnamon sticks and star anise.
Three to five days before the event, start the plum brandy. I used an extra large mason jar that could be sealed tightly. Place one plum and one plumcot (sliced into wedges), two cinnamon sticks and two star anise into two cups of French brandy (I used Trader Joe’s). Store in the refrigerator to macerate.
Plum brandy (above chilled)
1 bottle of Rioja or other red wine (chilled)
1 25 oz bottle of sparkling water (chilled)
2 to 3 cups of chilled apple cider (chilled)
One day before serving, mix all of the ingredients and divide into two large jars or pitchers. Place half of two sliced plums, two sliced plumcots, a handful of black grapes (halved) into each container and allow all of the ingredients to macerate for at least 24 hours.
One hour prior guests’ arrival prepare the glasses: Fill each with sliced plums, pomegranate seeds, blackberries, black seedless grapes, fresh rosemary. When the guests arrive as host you can fill each glass with sangria or allow guests to fill their own glass.
Optional : One hour prior to your guests arrival, pour both containers into a beverage dispenser so guest can self serve and refill their glasses.
THE CHARCUTERIE BOARD
A nibble board for guests to enjoy with their sangria while waiting for everyone to arrive. It’s always a good idea to have a little something to eat while drinking alcohol.
From left to right caperberries, Mini basque sheep’s cheese, deli meats, Spanish manchego cheese, blackberries, cornichons, soft blue gorgonzola, and Trader Joe’s pumpkin cranberry and fig olive crackers.
FIGGY PLUM MENU
AUTUMN CRUNCH SALAD WITH QUINOA
WITH FIG BALSAMIC DRESSING
The recipe will be shared in an upcoming edition of “Simply Elevated”.
ROASTED SWEET POTATO AND FIG SOUP WITH CRAB
Those who are familiar with Erin French of The Lost Kitchen will recognize this method for serving soup. The bowls were set out across my kitchen island filled with a mound of fresh Louisiana lump crab, microgreens, edible flowers, a swirl of lime creme fraiche and a parmesan crisp. After the salad course, a bowl was placed in front of each guest with instructions to wait for the soup to be poured.
The soup that was prepared two days before was reheated. The juice of a lime was added and some heavy cream. The hot soup was ladled into a white pitcher and poured into each bowl at tableside (Erin French style).
The recipe for this can be found in the most recent Simply Elevated post (Fall Soup)
DESSERT: PLUM, FIG AND FRANGIPANETART
WITH FRESH WHIPPED CREAM
To end the meal, I made simple puffed pastry tarts cut into squares filled with frangipane, fig butter, sliced plums and one slice of fresh fig with the corners pulled together over the top. All were prepped before everyone arrived and placed in the refrigerator until the soup course was served.
During that course the trays were pulled from the refrigerator, brushed with egg wash, sprinkled with chocolate sea salt and baked 25 minutes. Fresh from the oven each placed on a plate, dusted with a mixture of powdered sugar and Chinese five spice with a side of fresh Chinese five spice whipped cream.
This very low sugar fresh fruit dessert was a great way to end our fall themed menu, featuring the end of season plums and figs while filled with gratitude for another year of books and wine shared with these special friends in a celebration of Friendsgiving.
The first weekend in November, I will be hosting my annual Friendsgiving luncheon for ten guests. Inspired by the warm fall colors of a floral bouquet with shades of plum, burgundy, purple, and cream, I decided on a Figgy Plum menu. Figs and plums are both at the end of their season, naturally just before my scheduled date. I managed to find some plumcots, a few plums and dried figs to make this menu work.
A couple of days before my scheduled luncheon, I’ve made the soup, stopping after the purée process. I will add the cream and lime after rewarming just prior to serving.
Roasted Sweet Potato & Fig Soup with Crab
This recipe will serve 4 to 6 depending of the thickness you choose and the size of the bowl.
4 medium sized sweet potatoes
1 medium onion (sliced)
1 head of garlic (pre- roasted) **
Olive oil
4 – 6 dried figs (chopped) – if you can’t find dried figs, a ½ cup of fig preserves can be substituted
4 -6 cups chicken or vegetable stock
1 teaspoon kosher salt (or more to taste)
Ground black pepper
1/2 teaspoon red pepper flakes (spiciness to your liking)
½ cup heavy cream or half and half
2 large limes
Crème fraiche (1 container about 4-6 oz)
1 plastic condiment squeeze bottle with screw on top
Parmesan (crisps) can be purchased or made *** see link below for recipe (can be made ahead)
Lump crab meat (optional)
Fresh edible flowers, microgreens and/or fresh herb leaves such as flat leaf parsley or mini Thai basil leaves (optional)
This recipe requires some time, but results in added flavor. I keep a jar of garlic confit (**garlic cloves roasted in olive oil until sweet and soft) in my refrigerator that helps speed up the process and I caramelize my sliced onion is a non-stick pan on the stove. But if you don’t have roasted garlic and would rather not caramelize the onions on the stove you can do the following.
Preheat oven to 400 degrees Fahrenheit
Drizzle olive on lightly on to a rimmed, foil lined baking sheet. ( If everything does not fit in one even layer, a second prepared sheet can be used).
Cut sweet potatoes in half lengthwise and place face down on the tray. Pierce each potato on the skin side several times with the point of a knife.
**Place a head of garlic into aluminum foil, drizzle generously with olive oil and tightly close and seal the foil around the garlic, place on baking.
Peel and slice the onion into about ¼ inch slices and spread (one layer) on baking sheet.
Lightly drizzle everything with olive oil.
Bake for 25 minutes and check onions (they may require stirring to ensure roasting or they may be golden enough. If golden remove and place in the blender –waiting on the rest of the ingredients and to limit dirty dishes).
Continue to bake potatoes and garlic for another 15 to 20 minutes. ( Time may vary based on size of potatoes and differences in ovens, until potatoes are soft when pricked and garlic is soft.)
Meanwhile – prepare Crème fraiche
Zest one lime onto a board (or turn the microplane upside down and zest, the zest will remain on the microplane to easily slide into the opening of the squeeze bottle)
Scoop the Crème fraiche into a small zip bag. Cut one of the bottom corners, twist the top tightly and press contents like a pastry bag into the squeeze bottle. (easier method than using a spoon to transfer to the bottle.)
Cut the lime in half and add the juice of one half of the lime. Reserve the other half for later.
Close the squeeze bottle tightly and with finger over the pointed top hole, shake until well combined.
Squeeze onto a piece of the foil to check consistency and determine if loose enough to swirl on top of the served soup. (It should not be watery just loosened to easily squeeze out. If too watery, place in the refrigerator the it to firm up a little).
Next:
Remove roasted potatoes, garlic and onions if still on the sheet, from the oven and allow to cool to room temperature (or cool enough to handle)
Using a teaspoon scoop the flesh from the skins and place in the blender with the onions.
Squeeze the soft roasted garlic from their skins on to the foil (to ensure no skins get into the pulp) and then place the roasted garlic pulp into the blender
Add chopped dried figs, some of the stock and puree.
Add salt, black pepper, red pepper flakes. Process. Add additional stock to achieve the thickness you prefer and continue to season to taste.
Pour the pureed vegetables into a large pot and simmer to warm to preferred temperature, stirring frequently to avoid sticking to the bottom on the pot. When completely warmed until fully combined. Here’s where I recommend tasting the soup and adding any additional salt if needed.
Add the juice of the remaining 1½ limes just before serving. Taste for seasoning and taste make sure there was enough lime to brighten the soup up.
Parmesan crisps: (optional – serve with the soup or a side salad)
Garnish with edible flowers and microgreens or fresh herb leaves
To serve Erin French style: (The Lost Kitchen)
A wider shallow bowl would be required for this presentation (rather than a cup sized version).
Swirl lime crème fraiche into the bottom of the bowl
Place small mound of crab to one side / sick parmesan crisp into the crab mound
Garnish with edible flowers/ microgreens/herbs
(Place bowls in front of each guest) Pour pureed soup from a pitcher into the bowl until just below the crab mound.)
I will share the rest of our Friendsgiving Menu in my next post, until then enjoy this beautiful Fall weather wherever you may be!Thank you for stopping by!
Autumn or Fall is my favorite time of year. It’s the most colorful and inviting of all seasons filled with an intense kaleidoscope of every shade of orange, mellon, paprika, cantaloupe, peach, pumpkin, squash, yellow, gold, red, plum, eggplant, chocolate and evergreens that can go on and on in description forever as far as the eye can see. The air is lighter, crisp and cool, with invigorating breezes that encourage outdoor activities and road trips to encircle ourselves with all of its beauty and comfort.
I grow excited at the first cold snap that encourages me to pull out my cozy sweaters and boots, only to be disappointed a couple of days later when the temperatures rise again causing me to abandon them feeling teased by a temporary glimpse at Fall such as it is in the South.
In mid-October I enjoyed a wonderful long weekend visiting family in the northern suburbs of Atlanta. The weather cooperated with cold crisp nights and mornings that then comfortably warmed as the day progressed. I was introduced to the beautiful Georgia mountains where the color was in its early stages of transforming, pleasantly advancing slightly more each day. We visited several of my cousin and her husband’s favorite wineries (I’ll call research), an apple orchard, several antique shops and a grist mill with a lovely burbling creek that powers it.
Their favorite wineries included a beautiful landscape with a relaxing environment, a selection of wines to try by the glass or in a sample flight, and live acoustic guitar and vocalist playing country or classic rock.
The view was often reminiscent of parts of California (where I grew up) that I ‘ve missed so much. Mountains in the distance are not something seen in southern Louisiana and offer lovely weekend drives for recharging and fresh air.
The Nora Mill and Country Store was a quick stop on our way to Helen, Georgia for their Octoberfest that begins in late September and continues throughout the entire month of October. We arrived on an early Sunday morning, hoping to beat the crowds that were sure to arrive as the day progressed. We enjoyed an outdoor lunch and before leaving I had to have a piece of authentic black forest cake!
Authentic Black Forest Cake
On my list of things I wanted to do during our visit was antique shopping. My cousin and her husband enthusiastically and successfully I might add, helped me in my quest to start a silver spoon collection, I call tasting spoons. What is a tasting spoon? Those of you who may be a fan of Ina Garten, may have seen the container of silver spoons on her counter that she uses to taste the seasoning of her food during it’s cooking process. I planned to search through Paris flea markets one day to start my collection, but having not made that trip yet, I decided to look for spoons from the various places I’ve traveled.
The second spoon (these are all tablespoons) from the left was recently purchased in a shop not far from where I live. The rest of the spoons were found mostly by my cousin’s a husband who was on a mission to send me home successfully equipped. The most interesting of those he found is the last one on the right and below, found in a shop across the street from the grist mill. Once back in the car, I had a closer look and noticed that it looked like arms wrapping around the back to the front.
A tag was attached to help locate information about the pattern, Fraget Plaque Russian, however a quick internet search lead to the pattern where one site calls it Gargoyle.
In another search I found several for sale, but none with the exact same symbol in front of the Fraget name. One stated: “For those who don’t speak French, the pattern name – Peau de Lion – simply means Lion Skin which is what is being portrayed on the flatware and hollowware in this pattern. It was supposed to recall the lion skin worn by the mythical Hercules. The pattern was designed by Charles Rossigneux to be shown at the 1867 Paris Exposition. It was created by several companies though I think that Christofle and Fraget (Russia & Poland) were more prolific than Gorham. I have seen the Christofle and Fraget examples and I noticed that there are some small but definite differences in their versions of the pattern.”
Any way you look at it, it is an interesting find and great conversation piece.
The beginnings of a tasting spoon collection.
While the landscape of the Georgia mountains brought back memories of parts of California, the charming quaint mountain towns reminded me of New England.
Dahlonega
Our first day of sightseeing started in Dahlonega where we ate at a really cute Mediterranean restaurant Capers on the Square where we enjoyed a bowl of Greek chicken, lemon and rice soup that I’m trying to recreate and add to my weekly soup rotation.
There were several cute shops and antiques stores that we also searched through and found a couple of spoons to add to my collection.
***Dahlonega is a small city in northern Georgia. Tasting rooms offering wines from regional vineyards cluster around 19th-century Public Square. Dahlonega Gold Museum, in the 1836 courthouse, chronicles mining in the area from the discovery of gold in 1828. Consolidated Gold Mine includes an underground mine from around 1900. Waterfalls, including towering Amicalola Falls, dot the mountains of north Georgia. Dahlonega, the seat of Lumpkin County, lies about sixty-five miles north of Atlanta in the Blue Ridge province. The town is closely associated with Georgia’s gold history; its name derives from a Cherokee word referring to the yellow color of gold.***
From the airport my cousin drove me to the little town of Marietta (Marietta Square) where we had lunch at Taqueria Tsunami (very good) and then strolled around the square stopping into the first of the antique shops during my time there.
While some may not associate northern Georgia as a place to enjoy the Fall foliage (at least I was completely ignorant to this location), it was a lovely way to enjoy the changing leaves, drink a little wine, listen to some great music and do a little antique shopping. I checked in with my cousin the following weekend and it does not appear that they have reached the peak of their season yet. She’s hopeful to see more color this coming weekend (the last in October) when her Dad is coming for a visit. It was beautiful, relaxing and a budget friendly way to enjoy nature and the magic of Fall.
My first buckwheat pancakes made with flour from Nora Mill Granary (purchased at Grist Mill & Country Store in Helen, GA). I used buttermilk in place of milk in my batter. These pancakes have no sugar – just a slight sweetness from a teaspoon of molasses. Drizzled with maple syrup and sprinkled with sweet pomegranate seeds they are light and tender. Perfect Fall🍁🍂🥞morning breakfast!
Our Social Writes Book Club selection for October 2022 was made by Pemmie. “The Master Craftsman” by Kelli Stuart is a beautifully written historical fiction novel highlighting Peter Karl Fabergé and his jewellery firm House of Fabergé, in Saint Petersburg, Russia. Commissioned by the Imperial family, Karl supervised the many designers and craftsmen, including two women as they created the over fifty elegant jeweled Easter eggs from 1885 to 1917. The first egg of 1885 delivered to the RussianTsar Alexander III was given to his wife Maria Feodorovna as an annual gift and continued later by Tsar Nicholas II.
Stuart injects an intriguing current day treasure hunt for a missing coveted egg that reconnects a daughter and her mother with her estranged father, who orchestrates the hunt from his deathbed. A last attempt to connect with his daughter during the limited time he has left. Unexpected twists and turns concludes with the true treasure of all in hand.
Pemmie will host this meeting for our group, and while the plan will be hers, I shared that Russian black bread and chai appeared in the book more than a couple of times. I’m always seeking for food notes in our books in order to introduce myself and group to the flavors and traditions within the stories we read. A small attempt to erect a little life from the pages.
I found a recipe (in the link below) and told Pemmie I would give this bread a test bake, a little excited to see how it turns out. I’m a baker, but bread is not one of the techniques I’ve frequented. Fortunately this was basically a low maintenance version where the stand mixer did all of the kneading. (A bread machine would have simplified the process even further. ) I did not divert from the recipe, but I have noted a couple of tips from my experience.
The hardest part of the process was finding the flours and caraway seeds. My pantry is filled with more things than the average person might have, but these ingredients were not among my inventory. I really didn’t want a five pound bag of bread flour either. After stopping into three or four different grocers, I found a one pound sack of both the bread and rye flours and a reasonable priced jar of caraway seeds. I tried to borrow some dark Karo syrup from a neighbor (needing only 2 tablespoons), but they didn’t have any. Karo syrup is one of those ingredients like molasses that ends up being used once and then the bottle sits in the pantry for years. (Much like this bottle of caraway seeds will also.)
The recipe was extremely simple, adding all ingredients except for the softened butter to the mixing bowl and using the dough hook, kneading for 10 minutes. Then the softened butter is added for another 5 minute kneading (again with the dough hook). The recipe didn’t warn what to expect of the finished dough, but I will say that it’s very sticky. It also didn’t rise as much as I thought it would.
BAKING TIP: Sometimes you learn a tip from a baker and if you don’t bake frequently, it’s easily forgotten when you decide to take a stab at baking again. This is a tip I remembered. When removing the paper from your softened stick of butter, fold the sheet (butter side) together and store in a zip bag in your refrigerator. When a recipe calls for greasing a bowl or pan, take out the buttered sheet at the beginning of the baking process – the butter softens quickly. Use the remaining butter from the sheet to grease your bowl or pan and while not wasting the small amount that remained on the paper.
The softened butter wrapper’s remaining butter used to grease the bowl and loaf pans. Before risingAfter rising
TIP: I didn’t get a double rise out of my dough. It was more like a single rather than double rise of the original dough. I even let it sit in a warm oven for another 30 minutes (the recipe started with 1 hour so my total was 1 1/2 hours) and then when I prepared to cut the dough into two, placing half in each loaf pan, I had to use more than a sprinkling of bread flour to handle it. Make sure your hands are dusted as well as the surface. The dough is sticky. The second proofing didn’t look like it had much of a rise, so again I left the loaf pans in a warm oven (170 degrees F) for another 20 minutes to get the slight rise in the picture above. It filled the loaf pan more than rose.
While I was concerned that the bread would be a flop, it turned out beautifully. I should have used the bread splitter tool that I bought a year ago (that I forgot I had). The split would have formed at the top rather than the side, but it still turned out great.
After allowing it to cool for about 10 minutes, I used a serrated bread knife to slice a piece and was thrilled to see the airy soft texture and knew it was well baked. (Hopeful Paul Hollywood would agree- but not necessarily give me a handshake! Lol)
A warm steamy cup of chai latte’ (my favorite by the way) was all I needed to complete the black bread and chai experience. The black bread has a bitter slightly sweet note that comes from the combination of the small amounts of brown sugar, corn syrup, unsweetened cocoa powder and apple cider vinegar. The carraway, fennel seeds and rye flour add the savory note reminiscent of rye bread. Interesting ingredients and flavor.
One of my taste testers drizzled it with honey. The blogger said it was good with cheese, but didn’t state what kind of cheese. For now I’ve carefully wrapped up the second bread and placed it in the freezer until our meeting in early October. We will rewarm it on the day of the meeting and let everyone choose their own way to savor it.
While chai tea would be a good choice, I also found this chai cocktail made with chai and Russia’s beloved volka. The addition of Kahlua (a coffee flavored liqueur) creates a cocktail take on the dirty chai, where coffee is added to the tea with milk. My book club gals love a fun cocktail.
Use the leftover concentrate, by warming a half cup of concentrate and separately a half cup of milk – then foam the milk with a frother and top the concentrate in a mug for a chai tea latte. It’s the perfect fall morning drink with a big spicy morning inside hug.It’s my favorite!
In lieu of the chai syrup recipe in the link, I used the chai tea concentrate sold by most grocers in a quart carton by Oregon Chai , but there are other versions by Tazo and a small bottle that works perfectly sold at Trader Joe’s that works just fine and does the same job. If you don’t have a bottle of Kahlua – liquor stores like Total Wine, sell smaller bottles that will provide the amount you need and not leave you with a bottle that will sit around for years to come unused.
The rest of Pemmie’s plan will be a surprise, even to me, which adds an excitement and energy to the day filled with good conversation, laughter, food and spirits!
Russia is one of the largest producers of Sun Flowers.
Pemmie’s table setting, not just because it is Fall, but because Russia is one of the biggest producers of sun flowers!
Hello followers! I’m sure you may be wondering why I haven’t posted any parties lately. A pending renovation of my kitchen island prohibited me from scheduling any parties for the past few months. I’m sharing what has been going on, and what I feel will be a game changer in available counter space for cooking and entertaining.
I never quite understood this high/low counter top-bar design. Some say it was to hide your sink – from what? It’s still out in the open! In any case it is what the builder’s design provided when I bought my home. My neighbor had her’s leveled into an actual kitchen island and it inspired me to do the same.
First I had to decide how I wanted this revamp to look, and that took more time than I originally expected (a couple of years). Something so permanent requires a lot of thought, and time to imagine what the end result may look like. After all it will last for years to come, so I’d best be happy with it! I had a budget in mind, which of course was greatly exceeded (with everything costing more these days). Still I knew the cost over time would only grow and if I didn’t move forward with it, I would regret it in the future.
Before with bar seating.
My cabinets are already very dark and the granite is very busy. (Basically the only choices provided at the time of construction). To lighten this up a bit, I thought and searched a long time before deciding to add this curio chest to fill the large blank wall on one side of my kitchen. It provided additional storage for my many white serving platters and bowls, but no additional counter space. It also added a much needed brightness to the kitchen.
The curio cabinet that inspired the kitchen island design.
With my curio cabinet as inspiration, I wanted to renovate the island to match the two toned color palette and slightly distressed design. The width of the cabinetry would be expanded out to meet the ends of the pony wall, making room for a large drawer to store a hidden garbage pail and move my small narrow cabinet (used to store my baking sheets and cutting boards) to the other side of the island.
SKETCHES FOR THE CONTRACTOR
To ensure that I was correctly communicating what I wanted to the contractor, I created the above sketches that he said where very helpful.
I searched for antique corbels with no luck. I didn’t want it to look as distressed as the first photo, but the vintage feel was appealing and I wanted to add a little distressing to match the curio. Basically I wanted this island to be one of a kind and resemble a piece of furniture rather than traditional cabinetry.
Doors of my Curio Cabinet.
Due to the addition of a farmhouse style apron sink (but in a stainless steel brass color), my existing cabinets could not be reused. The doors under the sink were too tall and couldn’t be refinished to achieve the look that I wanted (similar to the curio).
Before and after the demo.
My contractor constructed the cabinet sections of the island offsite, and then demoed the existing cabinetry to replace it with the newly designed pieces from my sketches. Modifications to the sketch were made as it came together where necessary.
Garbage can drawer.
The first piece to be completed and installed was this drawer to store a garbage container and enough room to store a supply of garbage bags. No more ugly visible garbage can.
Shiplap was first stained and then painted in a color similar to my curio, so that when a little distressing is added, the stained color will show beneath. At least that was the plan, but when the sanding of areas was applied, the stain did not show through at all, it went straight down to the raw wood, but still gave the appearance we were trying to replicate.
A stainless steel brass farmhouse sink, with two handle brass bridge faucet, brass covered electrical outlet and power button for the garbage disposal all added the pop of sparkle that blended in with the other brass and copper accessories throughout my kitchen and living areas.
Aged brass hanging rail and hooks from deVOL in the UK.
I will not be changing out my countertops at this time, but hope to do that in the near future.
Pestle and Mortar from Homegoods, gold clay bowls, mini copper cups (The Lost Kitchen).
Sometimes a project that you imagine will go smoothly, has multiple setbacks that you can do very little to remedy. PATIENCE will be pushed to the extreme. The process and pieces that are needed don’t always come as easily as it may seem on HGTV. I’m a planner as you all know, so when the plan goes off course a lot of stress and aggravation rises to the surface by everyone involved.
A friend who witnessed my frustration first hand said, “It’s like giving birth to a baby. You have long periods of discomfort, but the end result is something you dearly love!”
Lyndhurst 2 handle bridge kitchen faucet with side sprayer in matte gold. – Ebay
InSink Earator (push button for disposal gold) – Perigold
Stain – Hampton Cottage TIS-058
Paint – Cameo White MG3-32 (Behr)
Hickory Hardware P2144-BGB American Diner Collection Cup Pull 3 Inch & 3-3/4 Inch (96mm) Hole Center, Center to Center, Brushed Golden Brass (on garbage drawer) – Amazon
Leviton PFUS1-BR Pop-Up Floor Box with Dual Type A, 3.6 USB Charger, 15 Amp Outlet, Brass (electrical outlet)
After many, many snafooz, I ended up with a different quartz countertop than I originally selected being advised on the day of installation that my original choice was discontinued. I’ve learned that renovations involve a lot of disappointing promises not kept, lip service and pivoting on materials. In the end the alternative quartz option the stone company offered was more expensive (but they did not charge me the difference due to the multiple forms of miscommunication on their part) and in the end may be a better look that I originally planned.
The top trim is hard to see without squatting and standing very far away to see it (and I’m very short), but it’s there.
I had two decorative tins leftover that match my backsplash, so to tie the island to the backsplash one was placed on each side and framed. Finally a little distressing was added similar to my curio cabinet.
Leviton PFUS1-BR Pop-Up Floor Box with Dual Type A, 3.6 USB Charger, 15 Amp Outlet, Brass (electrical outlet)
My original bar stools were now too tall and I sold them on Facebook marketplace to a very happy new homeowner, rather quickly. Bar stools vary in pricing and I didn’t want to buy anything overly expensive. I started shopping online for that high end look, at a low price. As always, I pinned multiple versions to a board on Pinterest (Loiret Kitchen Island inspiration); and looked at the photos over and over for a few days, trying to imagine how they would look in my space.
I finally decided on these Abbott 26″ Spindle Stool that I found the best price for on Overstock.com. I had a 15% off coupon, but of course more than a week later they went on sale for another 19% off. I’ve gambled in the past, waiting out a possible sale and the item I want ended up selling out and I couldn’t get it anymore. So I decided the overall price for these was reasonable enough with the discount and free shipping to move forward with my order. The stools do require some assembling, but it wasn’t difficult and I was very happy with the little added visual interest the spindled legs provided to the room.
The summer heat has been especially brutal this year, but somehow my herb garden has managed to persevere. So much so, that the abundance has resulted in little bouquet deliveries to my neighbors from time to time including a little Mother’s Day gift this past May when my nasturtiums, tarragon and chives were still blooming.
In the colder months to come, when portions of the herb garden may go dormant, those dried herbs in the pantry are more frequently used. How old are the dry herbs in your pantry? Do you even remember when you bought them? Now is a great time to empty those jars and refill them with freshly dried herbs.
To start I cut bunches of each herb (in the garden) and give each bundle a good trim, discard dead or discolored stems and wash well setting the bundle on a tray lined with paper towel to slightly dry.
For the drying process I used the microwave oven, and two paper plates, with one method for thyme, oregano and tarragon and a different method for rosemary and sage. I didn’t dry basil or mint, as those are always best fresh, but I did share a use for using up the large crop of sweet basil below to add elevated flavor to your recipes.
Fresh Tarragon (on top) dried below. Dried Tarragon
For thyme, oregano and tarragon, I simply laid the washed stems in a small bunch in the middle of the paper plate and then covered it with another paper plate. Place covered plate into the microwave and process for three 30 second intervals. This allows the herb leaves to slowly dry and maintain a green color without burning. Test your microwave (as they are all different) by checking the level of dryness after two 30 second processes. If your leaves are still slightly “fresh” or wet, process a third time and check again. Some may have to process it for less time and others may have to process it a little longer.
Once dried, using your fingertips, gently roll the leaves from the stems and discard the stems. Store the dried herbs into glass jars to prevent crushing.
Fresh ThymeDried Thyme
For rosemary, pinch the stem with two fingers at the top and slide down to remove all of the rosemary leaves. Place the leaves between the two paper plates and process for two 30 second intervals. I found that this was dry enough for my liking and know that they will continue to dry over time in the pantry.
For sage, pull the leaves from their stems, stack three or four leaves and then roll tightly like a cigar. Thinly slice into strips (called chiffonade) and depending on the size of the leaves it may require slicing the strips in half.
Placing the chiffonade sage leaves between the two paper plates, process in 30 second intervals in the microwave watching for the level of dryness you prefer.
For many years, my Thanksgiving centerpiece has been a sage butter roasted turkey, with a sage apple cider gravy that requires both dried and fresh sage. Dried sage pressed together into coarse salt is rubbed all over the turkey skin and then placed in the refrigerator overnight. When baking the following day, it is based with melted butter and fresh chopped sage. Both the aroma and flavors are absolutely amazing! My freshy dried sage will be stored and ready for the big day.
A practiced cook knows that recipes that go into the oven often call for dried herbs rather than fresh because they tend to better handle the heat and long periods of baking, but less amounts are used because the flavor of the herb intensifies when dried. The Fall and Winter seasons are usually enjoyed by savoring rich stews, roasted vegetables and meats that are often cooked in the oven. Having a pantry stocked with freshly grown and dried herbs is not only a tasty plan, but a thrifty plan since buying dried herbs can be very expensive.
If your garden is plentiful, the holidays are just around the corner. Why not consider gifting freshly dried herbs to friends and family as Christmas gifts? Purchase inexpensive jars or use small dollar store zip labeled pouches filled with freshly dried herbs and then nested in a small basket as a hostess or holiday gift is something the recipient can use and enjoy all year. If gifting sealed pouches of herbs, just as you have refreshed your spice jars, your friends and family can toss out the old dried herbs in their pantry and refill their jars with your gifted herbs. A jar of confit garlic and local fresh baked bread (if you don’t bake yourself) and or a jar of pesto (made with your basil) and encourage the least interested cook into creating something easy and flavorful.
Let’s not forget about the basil. I have both sweet basil and thai basil growing in my garden. Both have grown to nearly three feet tall and this is what they look like after a good trim. While dried basil is not something I personally use, a large amount of fresh basil can be used to make fresh pesto. Using a recipe from Pinterest, basil, garlic, lemon juice, toasted pine nuts, grated parmesan cheese and extra virgin olive oil whirled in a small food processor creates a bright and fresh pesto that is flavorful and delicious spread over grilled chicken or tossed in fresh pasta. It also can be stored in the refrigerator for a couple of weeks and can be spread on wraps or used to make a vinaigrette to toss on a fresh spinach salad. https://www.foodnetwork.com/recipes/ina-garten/pesto-pea-salad-recipe-2040302
Sweet basil and spicy thai basil with lavender blossoms that the bees are enjoying.Freshly made pesto.
For my last little project, I made confit garlic and garlic roasted olive oil. Recipes can be found on Pinterest, but for mine I did the following.
For confit: I used a mini ceramic bread loaf pan, and filled with two large garlic bulbs -cloves separated and peeled and then poured extra virgin olive oil close to the top of the pan. Also place on a small baking sheet to protect from spilling. Place in the oven at 250 degrees for two hours. Let cool and store in tightly sealed jar in refrigerator for a couple of weeks. Cover the garlic with the oil and if there is excess add to the roasted garlic oil bottle below.
For roasted garlic oil: I used the same mini ceramic bread loaf pan and sliced the top edge off of two garlic bulbs and placed the entire bulbs in the loaf pan. Fill with extra virgin olive oil, place on a baking sheet and bake at 250 degrees for two hours. Let cool to room temperature. I then squeezed the garlic from the bulbs into the confit jar. Use a coffee filter or cheesecloth folded into four layers and place inside a funnel and filter oil into a measuring cup. Using the same funnel and filter pour the filtered oil from the measuring cup through the cheesecloth again, into your final glass bottle.
Note: You can purchase peeled garlic cloves or break a bulb of garlic apart and place the individual cloves with peel into a tightly closed jar and shake vigorously until all of the peel comes off of the garlic.
How to use your garlic confit and roasted garlic olive oil.
Roasted or confit garlic is sweet and very flavorful. You can spread the soft cloves on breads to make homemade garlic bread, create a vinaigrette, add to soups, pasta or roasted chicken. Be creative and experiment. I had a loaf of freshly baked lucky seven grain bread that I sliced and spread the soft buttery roasted garlic cloves on one slice and caramelized onion chutney on the other slice with thinly sliced honey turkey breast that created a delicious turkey sandwich with intense elevated flavor.
One of my favorite things to do with the roasted garlic infused olive oil, is to drizzle it over fresh tomatoes, avocado or roasted potatoes (any roasted vegetables). Anything you would finish with a little drizzle of olive oil can also be drizzled with the rich garlic infused flavored olive oil.
Bakery Lucky Seven Grain Bread, Confit (roasted) garlic and thinly sliced deli honey turkey breast.
Whether it’s a hot sunny day or a rainy hot day that you are trying to escape, while staying indoors here’s a productive way to spend the afternoon preserving herbs and creating flavor filled pestos and oils to elevate your summer and future Fall and Winters dishes and maybe even create a few gifts for the holidays.
My favorite summertime fruit is the peach, more specifically the white peach and even more so the saturn or donut peach. The donut peach is a squatty version that when eaten fully ripened, has an intense, juicy, sweet white peach flavor that for me is perfection.
Saturn or Donut Peach
Sunday mornings are my time for a break from the weekly routines, with an extra concentrated focus on prayer, gratitude, and rest that begins with a special breakfast. On this Sunday morning, I was in the mood to combine my favorite peach with pancakes.
For my simply elevated experiment, I started with my favorite pancake recipe published in 2012 in Martha Stewart Living magazine. While few changes were made to her original recipe (always the best choice for success), it’s the topping that elevates these pancakes with a fresh twist of white balsamic vinegar and fresh herbs.
Front (left), sage, spring onions, left rear sweet basil, right thai basil, with rosemary in front (right).
To ensure that I always have fresh herbs when needed, I planted a small garden that thrives throughout most of the year. Mint is kept in a pot (or it will take over the rest of the garden), while basil is a Spring and Summer herb that requires new planting in early Spring. Both also provide beautiful floral blossoms. Planting a small herb garden is also a budget friendly way to add fresh flavor to your recipes.
Summer Pancakes with Peach-Blueberry White Balsamic Maple Syrup
2 medium white or yellow peach (medium ripe -not too firm or too soft) sliced into rings –
1 donut peach (small diced)- or white, yellow peach
1 cup fresh blueberries
1/4 cup pure maple syrup
1/2 teaspoon white balsamic vinegar
fresh mint &/or sweet or thai (for a little spice) basil (chiffonade or thinly sliced) and more for garnish
In medium to large mixing bowl whisk together flour, sugar, baking powder and salt.
In a separate bowl whisk eggs, buttermilk, vanilla, oil and melted butter until thoroughly combined and then mix into the bowl of dry ingredients. Let sit for 10 minutes.
With a paring knife slide peaches into 1/4 inch horizontal rings, pulling away from the pit.
In a small bowl combine diced saturn peach, blueberries, maple syrup, white balsamic vinegar and chiffonade mint and sweet basil (set aside for serving).
Heat 1 tablespoon butter in a large nonstick skillet over medium heat. Working in batches and adding more butter as needed, pour 1/2 cup batter into the pan (I used a large ice cream scoop), top each with a peach slice. Cook until bubbles form on the surface and underside is golden (about 3-4 minutes), then flip (you may have to hold the peach to avoid slipping) and cook until the second side is golden brown (3 to 4 minutes).
Serve with peach blueberry white balsamic maple syrup and garnish with fresh mint and sweet basil.
Review tips below before you start.
Vanilla paste is a little pricey, but not as pricey as vanilla beans and the overall quantity is greater and lasts longer. While vanilla exact is just as acceptable, vanilla paste is filled with those beautiful seeds from the bean and elevate the flavor in your recipes.
Peaches were used for my version of this recipe, but other stone fruits such as nectarines, apricots, plums and mangos are other options to experiment with. For the best fruit flavor, the fruit should be ripe, but not overly soft.
If you don’t have buttermilk, you can make some with milk and white vinegar or fresh lemon juice or use yogurt or sour cream. See the link below for alternatives. https://celebratingsweets.com/buttermilk-substitute/
I did try placing the peach slice in the pan first and pouring the batter over it. This caramelizes the peach a little more, but the weight of the pancake is less formed (cooked). When flipping the pancake, the cooked portion is thinner and weighted by the peach slice – so the balance is off and the peach can fall out. Feel free to try the version that best works for you.
To elevate the pancake experience I used one of my favorite ingredients, white balsamic vinegar. Using my saturn peaches that are soft, ripe and sweet, diced similar in size to making a chunky salsa (however more of whatever peach you have will create the same results), I then added my second favorite summer fruit, fresh sweet blueberries, a small amount of maple syrup and white balsamic vinegar tossed with fresh mint and sweet basil (or thai basil for a little spice). The vinegar adds an unexpected pleasant brightness to the combination and fresh new way to top our pancakes. The addition of more maple syrup is optional.
These fruit filled pancakes can be further elevated with a serving of crispy bacon on the side.
This summer, freshen up your Sunday morning breakfast pancakes by filling them with beautiful pitted fruits that are at their peak and surprise the family with a new bright, fruity and herbaceous topping they’re sure to remember.
When we are young, we are so very busy. Busy getting an education, busy building a career, busy having and caring for children and their many needs and later activities, busy shopping for groceries, new shoes for the kids, hair appointments, doctor appointments, yard work, laundry, cooking, cleaning ….. and at the end of each week, there is still a list of things we still didn’t get done. It’s ok, we still have time, until we don’t.
When we are young we think we have an abundance of time just waiting for us to spend later. As a grandmother who has not yet retired (a couple of years away), time becomes more and more precious. My daughter, her husband and my three grandchildren live five and half hours away and between my work schedule, their work schedules and the ever growing busy activities of each grandchild as they grow into lives of their own, attempting to coordinate uninterrupted time together has become an impossible challenge.
I remember when my mother retired, she suddenly had time to spare and fantasized about her family all getting together to take a cruise or some kind of trip together. While she and my dad now had the benefit of time, my brother and I, and our children struggled to clear our schedules all at the same time to make this wish of her’s materialise. We all thought we still had time, until we didn’t.
My mom passed away at the age of 75 with pancreatic cancer. The biggest shock to all of us including her. She was certain she had so much more time, but time for her, had ended.
Mother’s Day is a day to celebrate our Moms, but when Mom has gone to live with the Lord everything changes. Those who have their adult children and grandchildren living near, may be blessed with an afternoon brunch, lunch or even barbecue to spend time with those you hold so dear to your heart for at least a day. For those like myself that live at a distance, the day is less about me and more about my memories of my Mom and the pride I feel for my lovely daughter who is a wonderful Mom trying to find time for forming my grandchildren into beautiful little people.
My Annual Mother’s Tea was formed to gather with friends whose Moms have also gone to be with the Lord, and offers us each a place to share memories and celebrate our mothers.
Held on the first Sunday in May (so as not to conflict with the actual Mother’s Day holiday), we all have a rhinestone framed photo of our mothers that I like to think of as their crowns; that are placed before us at each place setting.
Each year we select a name from a teapot and the following year I create a tea theme that celebrates and honors that mother. Over the years we have found common ground between our mothers from different generations and drawn memories from just taking the time to sit and listen to each others stories.
This year, for our 4th Annual Mother’s Tea, we honored Kelly’s Mom, Jane Peacock. At our very first tea, Kelly recalled a memory of collecting the dried seeds of marigolds so her Mom could replant them in her garden the following year. These seed packets were created from my garden at the end of last year’s season, to use as favors for this year’s tea.
I of course had to include some fresh marigolds, and the flowers that Kelly most associated with her Mom which were yellow roses and daisies. Daisies are not readily available in my area, so I used chamomile that resembles a floppy delicate miniature daisy in the floral arrangements. I used purple irises in memory of Lydia’s mother that we honored last year and some lavender from my garden.
The tea I chose met with the beachy theme that was carried throughout the table setting and some of the menu. This tea by Teavana, Beach Bellini was delicious. A couple of the ladies don’t like tea, and this was a perfect choice. I sweetened the pot with honey and the pineapple mango flavor was light and very refreshing. It is a perfect Spring or Summer time tea hot or cold.
While I’m honoring a specific mother, I do try to inject a little piece of each mother somewhere in the day. One friend said her mother loved pineapple sorbet that I put a small scoop of in a fluted glass and topped with champagne for a pineapple bellini cocktail.
THE MENU:
Strawberry Citrus Salad
This strawberry citrus salad with honey balsamic dressing was served in memory of Jane, who added strawberries to various salads and was what Kelly described as the first time she can remember having fruit in salad that she learned to love. A fresh nasturtium flower dressed up the colorful bowl.
Mixed spring greens and wild arugula, sliced ripe strawberries, naval orange segments, marigold petals, feta, toasted slivered almonds (chopped) and honey balsamic vinaigrette.
Finger Sandwiches:
Grilled Ham and Gruyere Cheese Sandwiches (Kelly’s memory of a lunch date with her Mom) at a diner called Mayberry’s in North Carolina.
Pineapple chicken salad wrapped in sweet brown bread tied with chives and chamomile flowers.
Cucumber Radish with herby creme fraiche on white bread when fennel fronds.
Pink peppercorn egg salad in crispy pastry cups with violas.
At the top: Jane’s favorite sandwich, roast beef on toasted rye (topped with onion chutney and tarragon blossoms.)
A Palate Cleanser…
A splash of Spring celebrated with fresh floral ice bowls created to serve a mango sorbet palate cleanser between the tea sandwich and scone courses.
The inside of one of the ice bowls. Each bowl is unique and different.
I also served small eclairs and small slices of gentilly cake (a white cake with whipped cream and berry filling) that I did not get a picture of. Kelly said her Mom loved eclairs, and another of our friends said her mother loved berries (so that cake was for her Mom.)
Little winks from Mom…. Kelly told us about a hidden tattoo her Mom sported of a happy face that I put on the place cards. Her daughter told me that the family always laughed about how her grand-mommy loved boiled peanuts. So I presented a serving in a little covered cup just to Kelly in elegant tea fashion that gave her a smile.
As a wink to me and my planning this tea, I was in a bakery where I purchased the pastry shells for the egg salad and on the counter was a basket of happy face cookies. This one with the wink felt like a sign from Jane in her fun and playful way of letting me know I had captured her spirit and that she would be near on this special day.
As Mother’s Day approaches and we are all grasping for time, make sure to clear your schedule now and then. Saying no to something just for one day can make all of the difference in the world for your memories in the future. Once time is up, you can never get it back. In loving memory of Barbara, Edwina, Helen, Jane, Kathleen, and Mary.
Love letters from Mom with a little “coupon” inside.
These Italian fig cookie filled pastry envelopes were created for my Annual Mother’s Tea to capture a loving memory my friend Kelly had of her Mom. She shared that her Mom used to write her little letters and stick $100 bills inside that she called “coupons”. (Referred to as coupons because her Mom used to hide the $100 bills in her coupon envelope so that her husband wouldn’t know.)
While the idea seemed simple to create, it took two tries to get the results I preferred and an effort to recall all of the little baking tips I’ve learned over the years that had to be applied. For the same results, it’s important to follow the tested tricks and recipe below:
You’ll need an envelope to use as a template. Mine was from a box of thank you cards 4 1/2 ” x 3 1/4 “. Gently open the envelope to create a flat template.
2. One box of refrigerated pie dough (I used Pillsbury) will make 3 envelopes. Sprinkle your surface with a dusting of flour, remove the dough from the little sealed bag and gently unroll on the floured counter. In order for all of the pastries to look the same and slightly puff, gather the dough sheet into a ball, gently knead together until smooth and then roll it out -long enough for two envelopes using the templates to measure. With a sharp point of a knife, trace the template to cut out the dough. Knead together the scraps and roll out again to create the third envelope. (See the images below that show how the rerolled dough makes a fluffier risen product. )
Shown here – on the left dough rolled out as is straight from the package; on the right the dough was kneaded together and then rolled out – creating a slight puff and prettier end result.
A scalloped pastry wheel used to trim the top part of the envelopethat will remain unfolded.
3. I was surprised by the details I had to pay attention to when making these, and learned from mistakes I made on the first try. If you look at the template I used above, the top triangle of the template is very sharp and pointed, while the folded up bottom is rounded. To add a little cute design, I used a scalloped pastry wheel on the sharp top portion of the envelope that will remain unfolded, resulting in an open envelope. Now transfer the dough to a parchment paper lined baking sheet pan (only 2 fit on one sheet) and place the pan in the refrigerator for 5 minutes.
4) I decided to use my stamp set, that I bought for last year’s tea (I made my signature sugar cookies decorated with dried edible flower cookies and a stamping of each mother’s name), to stamp “Love Mom” on the outside of the envelope. Doing it correctly took to extra thought and practice.
Messy stamp and filling exposed on top.Clear stamp and filling hidden inside.
Originally I folded the filled envelope and tried to stamp it, but because the surface was let’s say “bumpy” and soft, the stamp did not come out clear or legible. I realized I needed to chill the pastry first (after cutting out the template as instructed above) before stamping.
5. After chilling for about 5 minutes, turn the pastry over with the bottom section at the top (in my case the rounded end). Stamp the message – I used “Love Mom” with a heart so that when folded under – the words are facing the correct direction. See below that when the pastry is turned over again, when the bottom flap is folded up, the stamp is smooth and clear.
Sugar cookies decorated with dried edible flowers and every Mom’s name.
6. I then had to learn the correct placing of my filling. (Recipe further below.) At first I placed the filling over the entire rectangle that would form inside once folded. In the messy version above, you can see that the filing is exposed above the envelope pocket. On my second try I lowered the filling to just below where the side flaps would overlap. Fold in the side flaps and then the bottom flap up using a light brushing of egg wash to glue it in place. Using a fork, dock the top flap to eliminate puffing in the oven. Place the prepared pastries back into the refrigerator for 5 minutes.
Pastry with fig/nut filling and folded. Then lightly brushed with egg wash and sprinkled with sanding sugar. The top inside flap “docked” (pricked with a small fork) to prevent puffing,
7. Finally lightly brush egg wash on the outside and then sprinkle with sanding sugar careful not to fill in the stamped message. Place into a preheated oven (350 degree F) for 12 minutes. Read the tip below to address areas that bake at different timeframes.
IMPORTANT TIP: Carefully watch the baking process around 10 minutes. If you look back at the two examples of my first and second bake, you’ll see that because I didn’t dock the top portion it bubbled (puffed) and cracked. It also baked faster than the lower filled portion. So in my second try I docked the top to stop the puffing and after 10 minutes I placed a piece of aluminum foil over the top part to stop it from browning any further, and then baked for another 2-5 minutes for no more than 15 minutes. Everyone’s oven is different, so you’ll have to watch closely to see what happens in yours.
8. Finally, one last reference to my first and second bake pictures. Originally I glued the dried edible flowers to the pastry on to the pastry with egg wash (or water was used on the cookies). My flowers are so dark, that the baking process made them darker and not as pretty. So I decided to attach the dried flowers after baking using a little store bought icing. However, if you have lighter colors to use, the baking process works fine. My edible flowers are violas that were pressed between two layers of paper towel and then pressed together with two microwavable plates. The microwave drying time varies depending on how much water in in the flower. Usually for violas or pansies it can take between 5 and 7 minutes, but only dry in two minute intervals and check after the first five minutes. When complete they are dry and fragile and feel a little like paper. Just don’t touch the plate for about 5 to 10 minutes until it cools down.
For the final touch I needed the $100 bill tucked in. So for the pictures above I just copied a $100 bill on the printer and cut the ends off of each side to tuck in. I actually ordered edible $100 bills on Etsy that are made of frosting that I will cut and should (according to the instructions) slightly melt into the pastry AFTER the baking process. (Don’t judge me if I chicken out and use the paper version.)
While these pastry envelopes or letters were used to represent a memory of someone’s Mom, they would have also made a cute dessert for a book club read involving read letters (that happens often in historical fiction) or a cute Valentine dessert with something like a strawberry filling.
What you’ll need to make the pastry envelopes:
Pre-made pie dough (I used Pillsbury) 1 box makes 6 envelopes
1 egg (scrambled in a bowl with a teaspoon of water – for egg wash)
White sanding sugar
Dried edible flowers (optional)
Printed images of $100 bill or you can order edible versions on Etsy (optional)
Letter stamping (purchased on Amazon also optional)
How to prepare and bake – follow the narrative above that provides tips learned for the best results. Make the filling below a day ahead. These pastries can be made a day ahead and stored in a tightly sealed container once completely cooled to prevent any moisture from forming.
Cucidati (Italian Fig Cookie Filling)
The Cucidati (that my Mom called Italian Fig Cookies) are popular here in Southern Louisiana and served at the annual St. Joseph Day Altars. They were a special coveted favorite of my Mom’s, so much so that she eagerly attended an altar or two each year to seek out her little gifted bad of Italian cookies. The filling came to mind as it isn’t runny and tucked inside the pastry is very reminiscent of the cookie itself.
1 Cup Dried Mission Figs or Calimyrna Figs ,stems removed and chopped, about a 6-7 ounce package
1/2 Cup Pitted Dates ,Chopped
1/2 Cup Freshly Squeezed Orange Juice
1/4 Cup Candied Orange Peel ,or Orange Marmalade or Apricot preserves
2 Tablespoons Granulated Sugar ,or honey
Zest from 1 Lemon
1/2 teaspoon Chinese Five Spice (or 1/2 teaspoon Cinnamon)
1/4 Cup Almonds
1/4 Cup Walnuts
2 Tablespoons Dark Rum, French Brandy, or Orange liqueur such as Grand Marnier
Add all ingredients to a food processor or blender and process until a paste is formed and no large chunks are left. Place in a bowl and cover with plastic wrap. Place in the fridge to chill for at least an hour but preferably overnight so ingredients can meld together.
Edible $100 bills.
Some may ask why go to so much trouble for one of many elements of this mothers tea, but my friends and I are making a special effort to bring back to life some of our favorite memories of our mothers that are no longer with us on Mother’s Day. If you’re feeling the void we all do on Mother’s Day, consider creating your own little tradition to honor your Mom year after year. You’ll feel her spirit present with gratitude.
Suggested Music:
“I Remember You”- Trisha Yearwood
“Supermarket Flowers” – Ed Sheeran
“The Best Day” – Taylor Swift
“Mother” – Kacey Musgraves
“Tell Mama” -Etta James
“Mama’s Kitchen” – CeCe Winans
“Ring Off” – Beyonce
“Turned to You” – Justin Bieber
“Mother Like Mine” – The Band Perry
“Mother” – Sugarland
“Don’t Forget to Remember Me” -Carrie Underwood
“Mom” – Garth Brooks
“God Must Have Spent ” A Little More Time on You-NSYNC
Book selection… On a bright and cheery mid-April, Sunday afternoon a group of ten of my reading friends (members of my book club) gathered around my dining room table set with English garden decor and a slightly gourmet luncheon, inspired by our latest book selection “The Undomestic Goddess” by Sophie Kinsella. The light hearted “Hallmark like” story, started with a young female workaholic attorney who after being set up to cover up the bad actions of a Sr. Partner at the firm, flees to the English countryside and is mistaken for an applicant as a professional housekeeper. Samantha has absolutely no domestic skills, but does her best to fake it until she makes it with the help of some very kind and supportive new acquaintances she meets in the fictional Cotswolds-like town far from the hussle and bussle of London.
Nathaniel’s garden and his mother Iris’s cooking lessons lead me consider a special lunch menu with a table draped in the rustic elegance of an English garden. A photograph I found in a back issue of Victoria magazine provided the inspiration I wanted for my table setting. Having always been drawn to shades of soft blues, purples and lavenders for their casual and soothing aesthetics, I had a table runner and linen napkins in my arsenal to recreate the look. I planned to create a floral centerpiece and fill decorated clay pots filled with ferns and flowering plants that would been given as party favors to each of my members.
The Favors: Two kinds of moss purchased from the Dollar Tree in addition to bark from my crepe myrtle, were used to create layers of moss affixed with spray adhesive to terra cotta pots (also from Dollar Tree). I mixed mossy gray and green acrylic paint and then dotted a collage of color to the exterior of each pot with a sponge. Craft glue was used to then affix the bark and flowers pressed and dried in the microwave from my garden. The idea was to create pots that look like they were lying around in a greenhouse for many years. Later the use of a hot glue gun touched up the areas that may have pulled away some from the surface.
I played around with different ways of displaying and arranging the pots on the table,but remembered I wanted that pop of blue and shades of purple, violet and lavender arranged in the center of the table. So I removed several of the posts and displayed them on a small table in the corner to be distributed at the end of the meeting.
Springtime Cocktail:
A Sparkling Blueberry Lavender Bellini
The frozen blueberry puréed spheres were made with fresh blueberries in a small processor. If processed too long it becomes gelatinous as it thaws. If too loose it disburses blue chunks into the drink. I over unintentionally over processed mine (learning experience) and used it as a colorful ice cube substitute that adds a little flavor to the drink, but doesn’t water down the cocktail. It makes the glass frosty and the cocktail stays very cold.
I found this Citrus & Petals cocktail sugar at Homegoods around the holidays and set it aside for a future springtime party. But this pretty sugar idea could easily be created at home. Flower petals can be pressed between paper towels and dried in the microwave in just minutes. The dried flowers retain their brilliant color and when completely dried can be crushed to add to sugar. Lemon, orange or lime zest and dried chopped mint leaves can be set out on a plate overnight or for a few days to dry and also mixed into the sugar.
The rim of a coupe glass is gently dipped in egg white and then into the sugar mixture. I did this the day before and placed all of the glasses on a tray in the refrigerator The egg white dries and sugar and flowers were well attached for the luncheon. (I used a small paintbrush to add some egg white to the front of the glass to attach the tiny fresh flowers.)
I made a blueberry syrup by cooking down one cup of fresh blueberries with 2 tablespoons of water and sugar. Once cooked down I strained out the skins and seeds. After preparing the rims of the glasses with sugar and flowers I stored them in the refrigerator until time to serve.
To serve, I added one tablespoon of blueberry syrup and one tablespoon of lavender syrup, then placed a frozen blueberry disk in the center. Each coupe glass was then filled with chilled prosecco or cava (even sparkling water can be used for a non-alcohol version). The sparkling beverage will cause the blueberry disk to fizz slightly, similar to a bath bomb for a fun afternoon cocktail or drink. (The added syrups may require a gentle stir to mix into the prosecco or water.)
Deep blue, almost purple hydrangeas, white delphiniums, lavender stock and filler flowers that I do not know the name of, helped create a bright centerpiece.
On the Menu:
Chicken and Sherry Mushroom Vol au Vent
Mixed Spring greens, with dried blueberries, orange segments and toasted chopped pecans with a crème fraîche citrus and herb vinaigrette
Mini rainbow carrots with brown butter and a citrus mint marigold gremolata
Gentilly berry cake
The recipe was adapted for the link below. This chicken and mushroom filling is also delicious as a sauce tossed in pasta. My adjustments to the recipe included:
Finely chopped shallots in place of onions
After cooking the shallots and mushrooms down, add a half cup of white wine and simmer down to about 1/4 cup.
I then add the flour and cooked for a few minutes
Add 1/2 cup of chicken stock letting simmer about 5 minutes
After adding the heavy cream, I added a teaspoon of sherry vinegar
Chopped tarragon and thyme where the last addition
It never fails… I get so busy preparing and serving (with the help of a wonderful friend) that I either forget to take pictures or don’t take the picture I really want due to rushing. I usually do a test run so I can decide what I want to add to or omit from a recipe that I’m using. The picture above was from the test. The picture below was the rushed version the day of the luncheon.
We added a couple of law books to the table – to represent Samantha’s career as a Lawyer.
A convenient scene in the book, was when Samantha’s new friends threw her a surprise birthday party. It just so happened that two of the ladies in my group had birthdays on the following two days. So for the dessert course, I purchased one of their favorites cakes, we sliced it up and put a candle on each of their pieces and sang happy birthday.
At our previous book club, I served champagne and elderflower liqueur cocktails that everyone really enjoyed. So I bought two small bottles of St. Germain Elderflower liqueur and bagged them up as little gifts for the two birthday ladies with balloons.
An English luncheon must have tea. As a nod to London, where Samatha lives and works, I served London tea lattes. Steeped Earl grey lavender tea (fairly strong), lavender syrup and a little honey, topped with foamed half and half and dusted with dried pulsed lavender.
As our meeting adjourned, the next book was announced (that will be hosted by a different member in June), everyone bid adieu with their arms filled with plants, leftovers and some with birthday gifts. Until we meet again, happy reading!
Let’s get back to fun and games! A few years back I hosted a Murder Mystery Party with a free script I found on Pinterest. For that party I bought six 19 Crimes wines with interactive labels. At the end of each round (of the script) we passed around the next bottle of wine to pour and taste. We had so much fun, laughing and acting up that everyone wanted to revisit this theme again in the future.
Around the holidays while visiting the local book store, I found the above Murder Mystery Party kit that once again takes place at a winery and I decided to purchase it for a future gathering. A date was decided by taking a poll from my group and then I chose the character assignments that I felt would best suit each guest.
The party set provided invitations, but I wanted something a little more attractive and festive, so I found the above version online that I glued a copy to the top of the provided cards. Inside are the list of “suspects” with character descriptions and suggested costumes. Assigned names were written next to the characters. As I read through some of the descriptions, I discovered that the fictional winery was UNDERWOOD WINERY.
Pinot Noir that inspired our tasting- Oregon (Will be the prize for winners)
While shopping at a local grocer I came upon an actual Underwood Winery Pinot Noir from the State of Oregon. After purchasing a couple of bottles, the invitation requested each couple or individual guest bring a Pinot Noir – and were assigned a State or Country to create a variety of domestic and imported Pinot Noirs for the blind tasting throughout the script. Fortunately, we haven’t had a Pinot Noir tasting in the past and for me personally, this is one of my favorite varieties.
Pinot Noir, Oregon
At the beginning of the 2020 Quarantine, the Kutchers -Ashton & Mila – worked with Nocking Wines to create this special fundraiser Pinot Noir they labeled Quarantine. I bought 6 bottles and we shared some at my Sunset Wine Party in the summer of 2020. – Everyone that attended signed a bottle that I saved for a future party -when we could all gather again. This will be our Oregon wine for the evening!
I always request that everyone send me a copy of their label prior to the party so that I can do a little research one each to share at the tasting.
The lineup for our blind tasting from top left to right, California, Chile, Italy – Australia, France, New Zealand and Oregon.
Cocktails upon arrival….
It’s been a while since everyone has seen each other, and tonight will kick off a new year of getting back to meeting the way we did before the pandemic. In addition, everyone will be excited and silly checking out each other’s costumes. As my guests arrive I always have a starter cocktail and something small to nibble on while they visit and I collect and open the wine bottles, assign a number to each bottle and then pour their contents into the numbered glasses on the table. (I usually employ the help of a couple of my guests with this task).
For appetizer bites I made artichoke balls (from someone’s family recipe card below) and Antipasto Appetizer Squares from Brown Eyed Baker who always has new inspiring recipes.
Tip: Allow to cool a good 45 minutes to an hour before cutting (otherwise you do not get a clean cut and cheese and ingredients ooze and slide out). They are just delicious at room temp.
In keeping with my dinner menu, I’m serving an Aperol Spritz, made with Aperol, prosecco, a splash of soda water ( I had about a half cup of the syrup left over from the amarena cherries -for dessert and combined a teaspoon in each glass to add a little sweetness to the bitter Aperol).
While everyone is visiting, sipping cocktails and nibbling – I’ll have a chore for them while I’m working on the bottles of wine and making last minute preparations to the main dish for dinner. I bought a screen for mugshots and a little letter board from the craft store for everyone to change out the name of their character. I tacked a ribbon to the back side for each guest to hang the name board around their neck while posing for a mugshot in front of the screen.
All of my guests dressed to kill.
Now for the table…
For a bloody good place card, I printed some clip art from online and hand wrote the last name of each couple or first name each single attendee, folded over the ends and cut little slots in each side (with small scissors or exacto knife) and slid steak knives through the holes for a Murder Mystery touch.
Bloody Placecards
A black tablecloth and linen napkins with my goldware set the scene. I used seeded and leafy eucalyptus branches along the center of the table with fresh artichokes, candles and battery operated mini lights. My table is narrow and when filled with multiple wine glasses there isn’t much room for a lot of fussy decor. I like to keep it simple and elegant so that my guests who are already very tightly placed around the table, have as much room as possible and can easily converse and see each other on all sides of the table.
Scripts and clue packets set to the side of each assigned character.Live eucalyptus, artichokes with cork wrapped pillar candles.
One to the menu.….
I’ve planned a light Italian menu that is easy to eat since we have to concentrate on scripts and acting, while tasting wines and filling our tummies.
The menu started with fresh and roasted (multi-colored) cherry tomatoes for a twist on the caprese salad. The roasted tomatoes add a rich concentrated flavor to the entire dish and the drippings from the pan added to some balsamic crema (or concentrated balsamic vinegar) further elevated the tomato flavor. Fresh herb marinated Mozzarella balls (halved), crumbled ricotta salata for a slight salty bite, sprinkled with flaky Maldon sea salt and droplets of roasted tomato drippings and balsamic crema- finished with thinly chiffonade ribbons of fresh sweet basil. (The final version may have small Thai basil leaves for a gentle spicy kick.) The dish is served at room temperature and will be plated and ready at the table when my guests arrive.
Sometimes another ingredient may present itself on the day of the party. While making the appetizer I found an extra package of prosciutto. I cut the sheets into 2 inch pieces and then crisped them in a 400 degree oven on a sheet pan for 15 minutes (ovens may vary) creating prosciutto croutons for a crispy salty bite.
The main course….
Chicken Marsala, served over artisanally made Italian Taglia Tella pasta. I use sliced baby bella mushrooms that I carmelized in olive oil and butter for an enhanced meaty bite and the sauce is created with delicious marsala fortified wine. Thinly pounded boneless chicken breast baths in the luxurious sauce that is deliciously light and satiating.
Finally for dessert….
Amarena cherries with zabaglione, and crumbled amaretti cookies for a lightly sweet finish to the evening.
The evening ended with the winning wine (Louis Jadot-France) with 5 votes out of ten and (19 Crimes- Australia ) with 3 votes out of ten; a top performer (Papa Vito) and best costume (Otto Von Schnapps) and the murderer r-e-v-e-a-l-e-d.
Remember to follow to receive notice of our next wine party…..Salute!
One January afternoon, my book club met to discuss this tropical murder mystery. “Something in the Water” by Catherine Steadman. Catherine is a British actress who played Mabel Lane Fox on our beloved Downton Abbey. It also was one of Reese’s Book Clubs first book selections.
Another member in my group selected this book, and at the last minute wasn’t able to host our luncheon – so I pulled together a quick table decor and menu.
I served tropical chicken salad with crackers for a light lunch.
For the table I filled blue wine glasses with white sand and candles; used shell and coral printed paper napkins I purchased to create a table runner, added palm leaves from a plant in my yard; and used a wood platter to assort shells, starfish and coral that one of the other members and I had in our home collections.
I greeted my guests with sunset cocktails made with pineapple juice,grenadine and prosecco. The Bora Bora styled umbrellas were created with regular cocktail umbrellas affixed with circles cut from brown paper bags. I glued a couple of layers around the top center and then cut strips around the circle to create the thatched fringe affect.
For dessert I made bananas foster cake, banana ice cream (from frozen ripe bananas that are pureed in the blender), and a dehydrated fresh pineapple slice to garnish (that everyone ate as a crispy treat).
“The Christie Affair” by Nina de Gramont was a quick and entertaining read. What I enjoy the most about historical fiction (this one also with a mystery appropriately crafted from the eleven day disappearance of Agatha Christie in 1926), is that the facts about the real story can be easily searched and viewed on the internet. Whenever the final conclusion of a mystery is not completely and clearly solved, it affords writers the license to create their own imagined version of what may have happened.
Reminiscent of “The Timeless Mansion”. Candlelight, dinners of tinned meats, tea, bread and wine while the rest of the country was vehemently searching for Agatha Christie.
Ms. de Gramont’s version is told from the perspective of Archie Christie’s (Agatha’s husband) lover and then second wife Nan O’Dea. [Nancy Neele (1889-1958) was the lover, and eventually, second wife of Archibald Christie. They had a son, also named Archibald, in 1930.]
I also enjoy drawing inspiration from books and create a themed luncheon. When I finished the book, the memories that stood out were those of Nan’s homeland of England and her love for Ireland where she met Finbarr. With that in mind I decided that an English-Irish fusion menu would be appropriate.
Irish Leek and Potato Soup and Irish Guinness Stout Bread.
While Finbarr and Agatha nourished on loaves of bread, apples, and tea – your guests may better appreciate this Irish inspired menu formed from Finbarr’s homeland and the place where Nan fell in love with both Ireland and Finbarr.
Above is a simply prepared potato leek soup made with a combination of both pureed and small chunks of potato, garnished with crispy bacon and chopped spring onions or scallions. If my chives were blooming I would have added a chive blossom, but it’s not quite Spring yet. (recipe in the link further below)
Also above, a Guinness Stout Bread. Very easy and quick to make. No rising or kneading required! I purchased a stout with coffee and chocolate notes – very interesting and delicious with both bitter and sweet notes. I decided this might be more flavorful than the traditional Irish Soda Bread – but maybe not. You choose. https://www.platingsandpairings.com/guinness-beer-bread/
NOTE: My variation to the above recipe was using the zest of an entire naval orange, adding 1/2 teaspoon of vanilla paste and two pinches of kosher salt. Otherwise follow the recipe exactly.
For the dessert course, I brought in Nan’s English homeland with Lady Gray tea (that has citrus notes) and made these English biscuits scented with orange. While it’s appropriate for the English, it also reminds me of the Timeless Manor candlelit moments of meals created from tinned meats, bottles of wine, loaves of bread slathered with marmalade and hot steaming cups of tea.
I read so many books, and as an entertainer can’t help but imagine how I would create a themed table and menu after finishing each book. “The Christie Affair” by Nina de Gramont was selected by Reese’s Bookclub and sparked my interest. Ironically, just this past weekend there were two Agatha Christie movies on PBS this past weekend – one with Agatha having disappeared with a very different story line. I hope for those who are interested in hosting book club meetings will be inspired by the ideas I will share in this new series on my blog – “Bookclub Menus.” Happy reading!
Two Thousand twenty-two marks the eighth year anniversary of my Social Writes Book Club. We’ve had a couple of members that have left the group, and few new members creating a strong membership of 11. To begin this new year of reading, it was important to select a book that was both interesting, entertaining, and inspired a theme that was festive and fun.
One late Fall afternoon, I stopped at the local bookstore in search of something new to read. Far behind the larger display of current new fiction, stuck in a small corner, one book’s cover caught my eye. The striking cover sparked my interest and I picked it up then turned it over to read the blurb on the back. Earlier in 2021 I had read “The Chanel Sisters” by Judithe Little that chronicled Gabrielle “Coco” Chanel’s life as a young orphaned girl who would eventually find a path to becoming a famous designer. The book I discovered by chance on this day described Coco Chanel’s life during the war and hinted at her being a spy for the Germans. Intrigued I decided to buy the book and headed home.
The Chanel Sisters: Historical fiction that covers Gabrielle (later Coco’s) life as a little girl brought to an orphanage, where she learned her sewing skills; her life’s journey after the orphanage to seamstress, singer, mistress, hat designer and beyond.
Later that evening I sat to look over the book more closely, the name of the author seemed familiar to me. I searched the internet and the photo I found confirmed my thoughts.
Several years ago, when my book club was just in its second year of inception, I was at a local store waiting for assistance to purchase a fruit tart for my meeting. Pamela stepped up beside me and as we looked at each other with quizzical expressions (wondering if anyone was going to assist us), I explained that I was buying a tart for my book club. I told her we were discussing “A Paris Apartment” by Michelle Gable and I was trying to do as the French do – buy dessert from a local patisserie (or basically from what we had available in Mandeville, Louisiana. )
She responded by saying, “You should read one of my books.” I was taken aback and asked her name, wrote it down and told her I would look for some of her books. She also explained that she was in the process of writing a book set in Paris that would be published in the future (something about The Queen of Paris). Surprisingly, here it was in my hands five years later. Pamela resides here in Louisiana, just a few miles down the highway from me. It was quite interesting how a store filled with so many books would accidently lead me to hers and the memory of this chance meeting and brief conversation.
As I read the book, that I thoroughly enjoyed, I realized that without having read “The Chanel Sisters” by Judithe Little, it would have been harder to understand why Coco would eventually do the things she had to do to survive the war and try to protect her financial future. As a result, I recommended that my group read both books. Overall I find the two books together, cover Coco’s story in a way that explains why she is so determined to succeed and for the most part made unscrupulous choices to to so. She had a unique gift of creativity that even she was unaware of and with all of her difficulties found a way to build an empire that still exists today. What could be more interesting than an afternoon with Coco Chanel?
Setting an elegant table with a formal handmade menu adorned with pearls and Coco’s favorite flower the white camellia because it had no scent to compete with her signature parfum Chanel No 5.
I wanted a light, but elegant French menu. After some thought I searched for savory soufflés and decided on a brie soufflé. It’s important to test a new recipe in advance to avoid day of the event failures. I also like to add my own twist to the ingredients and confirm the actual portions to determine if I’ll need to double the recipe to ensure I’m not short on servings.
The test bake went well, but I felt the flavor needed a little boost. I remembered I had some white truffle butter in the freezer that I decided to use in place of the salted butter in the recipe. It turned out great. A small bistro salad will be served on the side with warm breaded goat cheese croutes.
The test bake went well.
The recipe that inspired my White Truffle Brie soufflé is in the link below. I added 1/2 tsp of kosher salt to the batter and I used this white truffle butter in place of the salted butter in the recipe. I also buttered the souffle dishes with the truffle butter before filling with the batter.
TIP: The batter can be made ahead and set aside. Whisk the egg whites just before ready to bake and fold into the batter base.
The soufflé will fall quickly, but are still beautiful.
Bistro side salad: spring mix tossed in a red wine mustard vinaigrette, topped with a few haricots verts and warm panko crusted honey goat cheese. At the top of the picture a slice of truffle chicken liver pate’ and baguette crisps.
On to the table decor. I used a black table cloth, my Mom’s black and gold bone china and goldware. Champagne flute glasses will be used for the Champagne cocktails of St. Germain’s elderflower liqueur and bubbly garnished with a pale pink rose petal.
A cocktail or aperitif at the ready is important as the guests arrive and Coco would expect champagne. For my cocktail, I’m using a French Crémant with a rose petal and splash of St. Germain Elderflower liqueur.
As part of my planning and searching for items to set the table, I found and purchased some Chanel ribbon. Originally I thought I would use it to tie the napkins, but due to the small amount I had (2 yards) and the number of guests I would have 11 – it pained me to think of cutting the ribbon into such small pieces. That’s when I came up with the idea of forming the linen napkin into a “Little Black Dress”.
Cinched high at the top with black and white ribbon and then tiedtightly in the back, the ends formed into loops to create a bow, with a flat backed pearl in the center – creating a “Little Black Dress”.
The backside with a little bow. Turn the napkin over and slide hand inside of the bottom to fluff out the skirt into a little black dress.
With my two yards of Chanel ribbon still in tack, I searched for ways to use it. Then I remembered my small form mannequin that I use for my annual mothers’ tea. After all – Coco was a seamstress who became a designer. Of course there would be form mannequins! I draped the ribbon from bottom to top and tied the ends into a bow. I made a small white flower with gift bag tissue paper (like her favorite camellia) and pinned it to the center. I also repurposed a necklace with a small spool of thread, scissors and soft pink rose that fit in perfectly. Finally it had to be draped with pearls to be truly Coco.
An afternoon discussion about Coco wouldn’t be complete without Coco Chanel quotes. I found and wrote out several, on these gold embossed Eiffel tower cards with pink borders (tucked away in my stationary drawer for several years) and sealed each into their envelopes with ribbon and a wax stamp. Each of my guests will pick an envelope to open and read a quote to the rest of the group.
Coco Chanel’s infamous quotes.
A simple, inexpensive square glass vase was given a Chanel No. 5 label on all four sides for the entire table to see from all angles and filled with lush pale pink roses for a pop of color.
French architectural paper luminaries I found several years ago at TuesdayMorning were each $1.49. I had tucked them away with my stationary knowing one day they would be of good use for one of my parties. On this day they will make their debut.
I use place cards to help mix up the group at the table, otherwise the same people always sit together. Sitting next to someone new encourages everyone to become familiar with one another. I dug through my stash of supplies (little finds that attract my attention and I somehow feel I will use in the future) and found these little tote bags with a white flower that I’ll pretend is a white camellia for Coco’s sake, and two pages of gold letters.
Making sure I had enough letters for everyone’s name.To ensure the letters were secure I slid them across a glue stick and then on to the card.
First I had to open the package of letters and spell out everyone’s name to ensure I had enough letters. One name (Stephanie) was shortened to Steph in order to complete the names of my other guests. I then centered the little tote bag on to the same soft pink cardstock I used for the menu and underlined the name with the pearls also used on the menus. Calligraphy or hand written names would be appropriate to the era, but I had these letters and decided to add a little golden glam to the table.
Champagne with elderflower liqueur and a rose petal.
“I only drink champagne on two occasions, when I’m in love and when I’m not.” -Coco Chanel
Time for dessert….. Strawberries are plentiful during the month of February in the south. Not so far from where I live is a town considered the Strawberry Capital (Ponchatoula, Louisiana). Strawberries are often associated with champagne, so I decided to make a champagne sabayon to pour over fresh strawberries and then lightly brûlée the sabayon just before serving. The sabayon can be made early in the day or the day before and placed in the refrigerator until ready to serve. The recipe I referenced is below.
Strawberries with sabayon. The sabayon slightly brûléed with a small hand torch.
One can’t have a French luncheon and not serve chocolats français. As luck would have it, stores like Homegoods have a variety of chocolates from various parts of the world in stock for Valentine’s Day. When I saw this box – I grabbed it!
A plan can be made, but never set in stone. The Saturday prior to our luncheon I drove to Trader Joe’s about 45 minutes from where I live expecting to find beautiful fresh roses and an edible flower I could use for the salads. I was there before the doors opened only to find mixed floral bouquets as the only available option. There were other items I hoped to purchase while I was there that were also unavailable. The cashier explained that the winter storms that blew through Texas the two days before had delayed their trucks. I spent a few hours going to every grocery store and even some florists to find they also had not received shipments. So I had to pivot – the word we’ve heard used so much over the past couple of years.
Afraid I wouldn’t find the pale pink roses I wanted, I bought two bouquets of pale pink tulips. Many years ago I learned a trick for how to make tulips last longer. On the left the tulips lay on their side after arranging. Pretty, but if left this way they would continue to extend out and not look so attractive.
As soon as possible, I had been taught to trim the ends and place the bouquet into a jar of cold water and refrigerate overnight. The next day, using a straight pin, prick a horizontal hole through the stem just below the flowerbud. For some reason this encourages the water to come up to heal the hole. The following morning notice what happened in the picture on the right. The tulips are all standing up straight.
My diligence paid off and I finally found one slightly shabby bouquet of pale pink roses for the table, but no one knew the difference. They were too busy savoring their champagne cocktails, white truffle brie soufflés, bistro salads with truffle chicken liver pate’ and finally strawberries with champagne sabayon and chocolats français with a rich cup of coffee discussing the life and legacy of Gabrielle Coco Chanel.
What a lovely ladies lunch we had! It was so fun to gather everyone together again. So looking forward to the next 📖!
Don’t forget to wear your pearls now and then. As Coco said: “Dress shabbily and they remember the dress. Dress impeccably and they remember the woman.”
The past two years have been filled with social distancing, masking, pivoting, and mountains of challenges and uncertainties. Depending on your field of work, like mine, it also may have been and continues to be stressful. Like most of you, I was ready for an escape from it all, and wanted to host a holiday gathering with my wine group of friends before the year ended. When fielding date options, the majority of my group were only available for New Year’s Eve.
With the date decided, I found myself now trying to figure out how to host a party on a Friday, after a full eight hours of work. For a couple of days my mind spun with ways to put everything together the weekend prior, and a simple way to have food and spirits, when the idea of a large tray of sushi came to mind. I thought of all of the special heavy meals enjoyed over the holiday season, and thought that an Asian themed party might be a nice change in cuisine to end and begin the years, while allowing me to order and pick up fresh prepared sushi with no worries of cooking, keeping warm and so on.
Chinese Lanterns to greet my guests.A Sake and Plum wine tasting.
I shared my idea with the group and asked everyone to bring an Asian dish and a wine or possibly Asian beer that they would like to drink at the party. I would supply a couple of bottles of sake to taste and a plum wine. The selection of options were minimal, and I have no knowledge of sake, but the bottles I did find were nearly sold out, so I took that as a sign they were at least considered acceptable. Below are the notes I found on each.
Tyku Junmai Ginjo (black bottle) drops the sweet grain and banana of the Junmai for classic Ginjo flavors of melon and pear. However, overall aromatic and flavor intensity takes a hit. Fortunately there’s enough sweet melon flavor on the finish to save it from tasting bland. Like the Junmai, what’s here is good but the sake tastes too simple and too gentle.
Tozai Junmai Nigori Snow Maiden Sake and fresh with a lovely ricey and fruity combination. Flavors of honeydew melon, raw pumpkin, and radish. Creamy texture and full body. Try with spicy foods, crab, pork, or spicy tuna poke.
Gekkeikan Black & Gold California – This versatile sake has a smooth, mellow flavor and can be enjoyed warmed, room temperature or chilled. Serve from this traditional “”tokkuri”” container that was used when purchasing sake in the old days. Full-bodied with hints of honeydew, papaya, anise and roasted nuts. Well balanced, finishes long and smooth. A great sipping sake.
One evening I searched through Pinterest for some inspiration, and found this Youtube video of how to fold a napkin to look like a kimono. I remembered I had these floral paper napkins and thought the print was perfect for my Asian theme. The embossed textured borders folded nicely and provided texture and interest to the finished fold. I used the kimonos as placeholders for the chopsticks, with my purple linen napkins just beneath.
I had just enough time to order two sets of painted black wooden chopsticks that pulled together a place setting of purple, greens, blacks and golds (inspired by the sake bottles). While looking through the flower selection at my local Fresh Market, I found one lone package each of purple and a variegated green/purple chrysanthemum that were the perfect colors and looked very much like the flower on my kimono napkin. It never fails that I’ll find exactly what I want two weeks before the party and then can’t find a single replacement the week of the party. Fingers crossed I’ll find the same lovely version again, or I’ll have to figure out an alternative.
One of the comforting traditions of Japanese restaurants are the small fragrant steamy hot towels (called an oshibori) they hand out along with the menus. My best friend and I often had lunch at one such place and each time we were so tempted to wipe our faces in addition to our hands, which would have resulted in destroying our makeup. Always a lovely surprise to me when the tray of steamy towels arrived and I’ve prepared to do the same for my guests.
Japanese restaurants often provide a small hot towel called an oshibori. This is to wipe your hands but not your face. You may see some Japanese wiping their faces with their oshibori, but sometimes this is considered bad form. If you must use your oshibori on your face, wipe your face first, then your hands.
While searching for chopsticks I also found these vellum gold trimmed chinese floating lanterns. I don’t have a lake or a swimming pool to float lanterns in, but I thought they would be lovely, lite and simply placed all across the front lawn. (Below is just a quick test I tried before Christmas to see how they would look.) The package of 20 will create a warm, celebratory scene for greeting my guests. I also placed a few on the table.
Asian meals traditionally end with fortune cookies. A friend of mine made large versions years ago for Christmas gifts dipped in chocolate and sprinkles, so I thought they shouldn’t be that hard to make. I learned they were a bigger challenge than expected, but somehow I got through and used red ribbon for a pop of color with a New Year’s wish for each of my friends. The first recipe I tried was an epic fail, so I went to my trustworthy mentor Martha Stewart. The technique takes a little time to master and leaves the baker with slightly burning finger tips, but eventually I got the hang of it and filled a bowl with the number I needed.
My modest effort at fortune cookies are individually wrapped with red ribbons and stacked in a large bowl to serve to my guests.
The next addition were paper glittered 2022 eye frames that I wrapped around the bottom of the lanterns on two sides and placed New Year’s crackers at each place setting.
Bowls and spoons set up for Thai Coconut Shrimp Soup
Thai Coconut Shrimp Soup with cilantro and thai basil blossoms.
While there will be wine and sake, we will still have bubbly for midnight.
To crank up the party atmosphere I strung lights on the wall with a Happy New Year banner that can also be used as a backdrop for taking pictures. I’d like to order black, gold and white helium filled balloons to rest along the ceiling in the dining room, but that may be a challenge to pick up prior to the party (remember I’m working that day), but if I can make it happen – I will.
All I have left to do is order my platter of sushi for pick up on Friday afternoon. My guests are bringing items some of which are potstickers, chicken satay, spring rolls, edamame salad and a couple of other items that haven’t been shared with me yet.
A friend from our group has offered to come help me with some ideas for an Asian charcuterie board. I found only one example on Pinterest that included sugar snap peas (that would be good in a little sesame oil with black sesame seeds), thinly sliced pickled cucumbers, edamame, pineapple, mandarin segments, dumplings with dipping bowls of peanut sauce and soy sauce, and some Thai spiced potato chips. We’re looking to see what we can find to make our own version.
There is no need to buy fireworks because folks in my neighborhood put on an incredible fireworks display every year that we can simply step outside among the chinese lanterns and enjoy. I’m so looking forward to bringing in the new year with the company of friends, good conversation, laughter and of course good food.
Happy New Year everyone! We are all ready to feel the joy again in our lives and share time together to form new memories. Blessings and joy to you and yours!
Photos from the actual party.
Asian nibble boards with sake tasting bottles.
Sesame sticks, red chili crackers, pickled carrots and asian pickled cucumbers, sesame sugar snap peas.
The food was amazing and plentiful, in the far back, forward, chicken satay, potstickers, spring rolls, a variety of sushi, krab salad, asian stuffed eggs, edamame salad, teriyaki salmon bites, pork tenderloin.
Spring rollsPork loinKrab salad and fried wontons
My neighborhood fireworks – photo taken with a drone.
Year after year I search through stacks of boxes of Christmas cards in search of one that expresses the true meaning of Christmas. For several years I picked cards with beautiful angels on the front; others with manger scenes, Mary, Joseph, the baby Jesus and sometimes the three kings in the background, and every now and then I grab one just because it’s a beautiful picturesque scene that makes me remember the joyful festive streets of New York from a couple of occasions when I was fortunate enough to be there when all of their beautifully decorated buildings and windows, glowed from every direction.
I’ve received many versions of Christmas cards over the years, some more thoughtfully chosen than others, and some so special that I’ve kept them tucked away with my box of Christmas stationary and read them once each year.
One year (I don’t even recall how long ago, but it could be as long as two decades) a long time friend who was residing in Germany at the time sent what I have claimed as my favorite Christmas card of all time.
Simple, elegant, and straight to the point, I couldn’t help but praise the wonderful person who designed this beautiful card. As I slowly unfolded each of it’s accordion folded pages, I wondered how even after all of these years I’ve never seen another card with this same beautiful message.
As I opened the pages to read my special card this year, the thought came to me to share this beautiful card with all of you. As I centered on each page to take a picture, I noticed that when I took the picture of the final page (above) a warm light glowed through along the trunk of the tree. I knew my decision to share it was validated.
I send out far more cards than I ever receive these days. I miss seeing the beautifully unique script handwritten signature of each family member and friend who once sent them to me. Some were once filled with beautiful handwritten letters sharing a few notes about their year (as were mine). As this once very special tradition gets lost in the chaos of texting and posting, rather than personally writing and mailing – I suppose life won’t slow down enough for these old traditions to find their way back again. Fortunately, I’ve held on to the best so I can enjoy reading them again again for years to come.
Special thank you to my lovely friend Vivian who is always filled with faith and devotion to our Lord Jesus. God Bless YOU! An a very Merry Christmas to all of you!
Christmas is filled with the sparkle of lights, the fresh scents of evergreen, the sound of jingle bells and the angelic harmonies of song. Some kitchens may be busy with baking, sending the warming fragrances of gingerbread, cinnamon and nutmeg throughout the house. The stockings are hung, the ornaments on the tree glowing, packages are wrapped and ready. We are all filled with the excitement and beauty of Christmas.
Maybe you’re not a baker, or you still have a lot left to do, or you’re one of our wonderful first responders, medical professionals, that hard working cashier at a local retail store, still there for last minute shoppers or a hard working server at a business restaurant and you don’t have time to bake.
Here’s an easy way to capture the warm comforting aromas of the holidays by simply adding those special holiday spices to your ground coffee. Whether a last minute gift for a neighbor or to create a special way to wake up on Christmas morning, it’s a quick and easy to achieve.
TIP: If you live near a World Market Cost Plus store, you can purchase most of these spices for a reasonable price. Another tip is to check in the ethic section at the grocery store where Mexican spices are sold. They are often priced lower there than the spice rack section,
The ingredients below will make a small batch of Christmas spiced coffee. However it can be doubled for a larger batch. Fresh spices will provide the best results.
2 cups of ground coffee
4 large cinnamon sticks
20 whole allspice berries
20 whole cloves
10 whole black peppercorns
10 cardamon pods
3 whole star anise
Place all of the spices in a pestle and mortar (or place in a zip bag and roll with a rolling pin). Break up the cinnamon and spices until crushed but not powdered. The pieces of cinnamon stick look pretty in the mix. Mix thoroughly Place into a tightly sealed jar (such as a mason jar). If you can, leave overnight for the spices to infuse into the coffee grounds, however you can still use the finished grounds right way. The longer it sits, the better the flavors will come together. Use a drip coffee maker, espresso stove top pot or a French press to make your fragrant morning cup of Joe and enjoy the aromas synonymous with the holidays.
Merry Christmas everyone! Wishing you all blessings and joy in the New Year, Thank you for your support! See you next year!